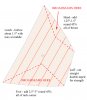
OK, drawing attached below. For a vertical-cut lugsail, the broadseams fall inside the areas between the dotted lines near the head and foot and their respective edges. You tape the sail's perimeter lofting out on the floor and run a couple more lines of tape to mark off the broadseam areas. When you start taping fabric panels together over the lofting you can see the broadseam lines right through the cloth. As you're basting a panel seam together (panel seams are the vertical orange lines on the drawing) and come to a line, you start broadening the seam at that point and continue it out to the edge. As you can see, in the middle of the edges the broadseamed sections will be pretty long and near the corners they'll be pretty short sections of the panel seams. The exact location of the dotted lines is pretty much a matter of experience with a particular fabric and practice (unless you want to invest a couple hundred grand in a computer design and plotting system, which I don't). For a sail this size, I'll locate the "peak" of the foot section's dotted lines slightly below the spot where I want maximum sail draft. It would end up 40%-45% of the way aft of the luff and maybe 3' or so above the bottom of the sail. For the head edge, I seldom come down farther than 12"-15" below the edge for the point where the dotted lines meet and again 40%-45% of the sail's width aft of the throat corner. You're not trying to create a lot of draft up there. You just want to give the top a little shape.
Question #2 was how much to increase the overlaps when making the broadseams? This will depend upon just how many seams there are. If we use wide fabric and can make the entire sail with only three or four panels, the overlaps will need to be increased quite a bit. For full width, 36"-wide fabric panels, it's fairly typical to increase the overlap 1/2" for every 30"-36" of broadseam length, so some of our seams that are the regular 1/2" width in the middle of the sail may wind-up being up to 1" wide at the edges along the foot in the broadseamed areas.
I usually split my fabric into 12" wide panels. The narrow-paneled sails have a nice classic/antique look for traditional boats that you just can't get with full-width panels. This also means that I have more panel seams running through the broadseam areas and can do my shaping with smaller overlap increases, because there are more of them. Seldom do I need to increase the overlap more than 1/4" per seam and very short broadseams near the corners may just get a tiny bit of broadseaming.
For a sail of this type and size, the overall amount of draft you build in is a function of how much edge round you start with, how big the broadseamed areas are and how much you increase the width of the seams. More round, bigger areas and wider broadseams generate deeper draft. More modest rounds, smaller broadseamed areas and smaller overlap increases makes for less draft. These measurements are fairly typical for the shallow-draft sails commonly used on canoes and small dinghies. You'll notice that during the broadseaming process, you may be removing a couple inches or more in the length of a head or foot edge, due to the increase in seam overlaps. If we had pre-cut everything to size before seaming, these edges would now be a little short, compared to our original plan. So we wait until all of the panel-to-panel seams are finished and then place the sail back over the lofting to find and mark the corners and determine the final cutting lines for the edges. Add a couple more days of reinforcing corners, binding edges and installing hardware and you've got yourself a lugsail.
Standing lugs generally need a lot of luff tension just about all the time. Out on the water, you can then experiment with the outhaul/foot tension to see what kind of shape/draft variations it will generate. For the most part though, the shape and draft of a small sail made from relatively stiff fabric is more a matter of what shape you designed into it than how much tension you're putting on it's foot.
You can see a photo of that particular finished sail near the bottom of the list in this folder (it's "standing lug #1 copy.jpg)
http://webpages.charter.net/tbradshaw/Sails/