Worth Gretter
LOVES Wooden Canoes
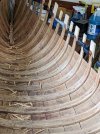
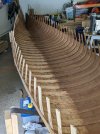
Rib Ends
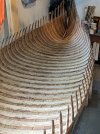
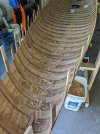
I recently replaced all 88 rib ends in my project canoe, and thought I would write down the process I used, while it was fresh in my mind.
Certainly I am not the expert on this, but I did learn a few things along the way that might be useful to someone else attempting this for the first time. A lot for what I learned was either from Mike Elliot's book “This Old Canoe” or from this forum. In particular, when I started digging here I found a 2016 post from Dave Osborn that suggested the use of a belt sander, and that was a tremendous help. Thanks for this tip!
I knew that accurate measurements would be very helpful later, so I had already recorded the depth inside the canoe at every foot of length (to get the new inwales positioned at the right height), and the width every foot, and lots of other dimensions too. (I also measured depth from a string between the ends at every foot, and that was invaluable later in getting the ends of the inwales right.)
So here is my process:
1) Determine how much you will cut off the ribs. If taking off 1 inch will solve most of the problems, then the few others can be handled separately by marking and cutting them differently.
2) If you are taking off 1 inch, then mark the cut line at 1 inch from the top, the scarf line at 2 inches, and a reference line at 3 inches, on every rib. The reference line is for setting inwale height later, after the other two lines have been erased by your work. Accuracy here will pay off here! If you can't measure down from a rib top because it is no longer full length, then bend a thin batten along the marks on two ribs on each side of the damaged one, to extrapolate a mark.
3) Make the marks on the outside where they won't show later. Also, marks on the outside will make the bevel face out, and that minimizes what will be visible on the inside later. These marks will get you a 4-to-1 bevel on a rib 1/4 inch thick.
Side note: It is often said that scarf joints should be bevelled 6-to-1 or 8-to-1, and that is true in many cases. But I think 4-to-1 is fine here because the load is shared by the other ribs, the top plank, the inwale, and the outwale. Also, the ring nails that hold the rib top to the inwale will probably rip out along the grain of the cedar before the scarf fails.
4) Cut each rib end at the cut mark. A jig saw is fast and easy if you have the right blade, i.e. one with very sharp teeth on alternate sides of the blade, and flush with the sides of the blade for a clean cut. Bosch and Diablo make these flush cut blades, and probably others do too.
5) Use a belt sander to cut the scarf angle. What worked best for me was to hold the sander at the correct angle but with more pressure at the top, then sand until the top of the rib was a very fine edge, and finish by tipping the sander gently down to complete the bevel down to the line, while being careful not to take any more off the top.
6) Now to make the new ends. The rib stock should be just thick enough for the thickest rib, to minimize what must be sanded down later. It can be plenty wide, since that will make alignment easy and trimming the sides later with a craft knife is not hard. The new ends should be 3 inches long: 1 inch for the inch cut off from the old rib, 1 inch for the scarf, and 1 inch extra to be trimmed flush with the inwale later. Mark them 1 inch from one end for the scarf. If you have cut some ribs further down, then you will need to also make some longer new ends for them.
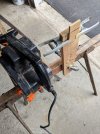
7) The new end pieces are beveled with the belt sander just like the cut off rib. But the hard part is securing them so you can work on them. I clamped a piece of 1x3 to a sawhorse so it stuck up in the air, then used two very thin spring clamps to hold the bottom of the new piece. The clamps need to be thin so the belt sander runs clear of them. If you have enough clamps, you can set up a bunch of 1x3s and mass produce the new rib ends.
8) While making the new rib end pieces, it is a good idea to make a few with bevels too long, and a few too short. Keep these separate from the accurately cut ones.
9) Before gluing on a new rib end, hold it in place against the bevel on the rib. Take a small straightedge, maybe a 6-inch ruler, and lay the edge across the joint. It should be dead flat. If not, the bevels are not exact. This is where you use one of the pieces you intentionally beveled too long or too short. Worst case, you might have to adjust the bevel on the new piece until you get a perfect fit.
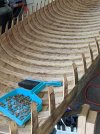
10) Working on alternate ribs (to have room for clamps), check 3 pieces for fit, glue them on and clamp them, then do the next 3. (I used Elmer's Wood Glue Max but I know a lot of other people like Titebond II or III.) I found that after I glued the second group of 3, I could go back to the first 3 and very carefully remove each clamp and wipe off excess glue with a wet cloth, then re-apply the clamp. After doing half the ribs, wait a day for the glue to dry, remove the clamps, and glue the other half.
11) When the glue has set on all the new rib ends, they need to be trimmed to width and sanded for thickness and to smooth the joint. It is easiest so trim the width first, as this leaves less to sand. Take a craft knife and cut down from the top near one edge to see what the grain will do. If the grain is nice and straight, just trim the edge to match the rib. If the grain runs in, you will need to whittle the new end from the bottom up. Then send both sides (but with a gentle sander not a belt sander).
12) Stain the new wood to match the old. In my case, I was staining both old and new wood, and was able to get a decent color match just by leaving the stain on the new wood longer before wiping it off, or with a second quick application.
So there you have it, at least a way that worked for me anyway. I have to say, it was nowhere near as hard as I feared it might be!
Others with more canoe projects under their belt can add their tips and tricks. And my thanks again for all the expertise available, free of charge, on this forum!
-Worth