Douglas Ingram
Red River Canoe & Paddle
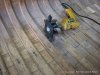
I had a chance to try this sanding tool out this week. Its my new favourite for sanding the planking between the ribs. It's called a "Sand-O-Flex" I got mine from Lee Valley, but I'm sure that its also available in other stores, too.
What makes this tool great is that it has lots of abrasive available for contact with the wood, and the nature of the paper is that it conforms well to the shape of the canoe. The drill, being variable speed, allows you to adjust how aggressive you need to be. Different grits paper is available, and as it wears or clogs, it is simple to pull out new fresh paper from the internal spool. The brushes between the paper "fingers" give some backing to the paper ensuring contact to the wood that you are sanding.
I used to use the sanding stars, which were the best tool available before I found this, but the abrasive paper wears out faster and there is nothing to do about that, short of replacing it. Also, the diameter of the sanding stars is much smaller.
This works great on restorations. I still sand only by hand on new building as all sanding marks caused by a power sanding tools seem to be revealed in the way that the varnish transmits light through the wood. Clients don't seem to appreciate that.