fred capenos
Canoe Pilot
Our Morris was seaworthy when we bought it and we've had a blast using it. Knowing that it's last restoration didn't meet any of the WCHA standards, I was somewhat timid about getting started. The good news that I was about to learn is no major damage had been done and it isn't going to be a very big project at all.
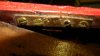
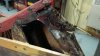
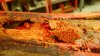
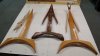
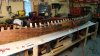
The canoe is now picked apart and all the rib tips have been replaced. The steel tacks had pretty much given up all of their holding power and the last restorer added ring nails. All this plus the large steel finish nail that held the rails together trashed the tips beyond repair. New deck frames were in order as were rail and stem extensions. We had already redone the seats and thwarts.
Phil, our friendly groundhog weather predictor, tells us that winter is now over (it's snowing as I write this) but it won't be long till I have the old gas mask on and the stripper will be doing it's work. I'm sure I'll have a few questions down the road like the size and type of rivets that were used to hold the outside stems onto the cedar inside stems. Fred