Rollin Thurlow
member since 1980
If you canvas enough boats sooner or latter you'll have a boat that needs 60" canvas but laying the canvas on the boat as flat as possible the canvas will only be 59" wide. (Image -Too short)) Rather than having to go to a more expensive piece of canvas that is 72" or 84" wide here is a way to stretch the width of the canvas that extra inch.
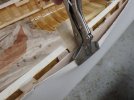
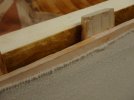
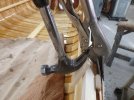
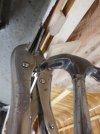
I use a pair of wide mouth vice grip pliers for stretching the canvas. When used in the most common manner with the rounded edge of the pliers against a wood button on the rail (Images- 1 & 2), there is not enough leverage to stretch the canvas or to pull the canvas close to the planking where it can be fastened.
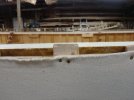
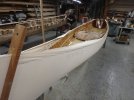
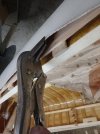
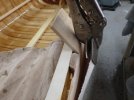
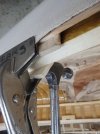
Instead I place the pliers between two ribs, reverse the pliers so the hinged side is facing the rail (Image- 3). I try to clamp as little of the canvas as possible in the jaws of the pliers but still need to grab a half inch or so to get a good grip. Using a curved claw framing hammer, I can place the claw under the knuckle of the hinge ( Image -4) ,using a wood button to protect the rail I can then pry on the hammer which lifts the canvas pliers. (Image -5&6). This prying motion is now pulling the canvas straight up right along side the planking. Its quite easy to stretch a half inch on either side of the boat. I can now fasten the canvas on the rib thats on either side of the canvas pliers. (Image -Success and Finish)
The first time I tried this method I was very happy with my success. Then I went to the other side of the boat and found instead of stretching the canvas I was just pulling the canvas from the other side and the canvas on the second side was way too far from the rail. I had to start over, even out the canvas again and make sure I had an even pull on both sides.
I use a pair of wide mouth vice grip pliers for stretching the canvas. When used in the most common manner with the rounded edge of the pliers against a wood button on the rail (Images- 1 & 2), there is not enough leverage to stretch the canvas or to pull the canvas close to the planking where it can be fastened.
Instead I place the pliers between two ribs, reverse the pliers so the hinged side is facing the rail (Image- 3). I try to clamp as little of the canvas as possible in the jaws of the pliers but still need to grab a half inch or so to get a good grip. Using a curved claw framing hammer, I can place the claw under the knuckle of the hinge ( Image -4) ,using a wood button to protect the rail I can then pry on the hammer which lifts the canvas pliers. (Image -5&6). This prying motion is now pulling the canvas straight up right along side the planking. Its quite easy to stretch a half inch on either side of the boat. I can now fasten the canvas on the rib thats on either side of the canvas pliers. (Image -Success and Finish)
The first time I tried this method I was very happy with my success. Then I went to the other side of the boat and found instead of stretching the canvas I was just pulling the canvas from the other side and the canvas on the second side was way too far from the rail. I had to start over, even out the canvas again and make sure I had an even pull on both sides.