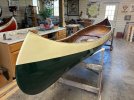
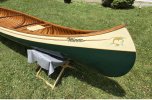
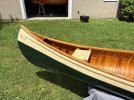
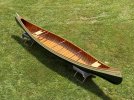
At long last the old girl is finally finished. We named it Minna. Minna was Fred Brodbeck’s wife. Their marriage certificate lists her name as Minnie, like the mouse, but on the family headstone It reads Minna so that’s what we went with. Maybe we should have named it Lazarus because the canoe really did come back from the dead – I mean seriously dead.
Finished pictures below. You will have to scroll back to the first post to see how it started out. I should have done some things differently and others could have been done better but in the main it came out pretty good. The Brodbeck bloodline ended with Fred’s generation. Fred and Minna never had children. His brother Herman never had any either. His sister Emily had a daughter Anna who married Harry D. Nay. They had a son Malcolm Nay who married but they had no children. So the only thing left with the Brodbeck name is the canoes he left behind. I hope I did right by Fred and he would be pleased with the result.
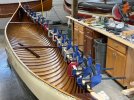
As an amendment to the previous post concerning the gunwale caps – I bent them on dry until I got to the point where if I bent them more they would most certainly break. I then slid the hose from an old shop vac over the last three feet or more, connected it to my steam pot and let it cook for half an hour. I removed the hose and bent and nailed the cap into place. I did the top caps first and then the side caps. After all four on each end were installed I worked them together until I was happy with the resulting joints. I used dome headed escutcheon pins to nail them in place. Based on the old nail holes in the inwale Fred set the nails at about 5.5” inches apart until he reached the decks. Then the nails gradually became closer together until the end was reached. It’s also interesting that there were two nails set only 2” apart, one on each side of the center thwart. I have no idea why other than maybe aesthetics. I stained and varnished the caps, added the last coat of ivory topcoat paint and considered my work done. The pinstripe guy came, did his magic and now it's really done.
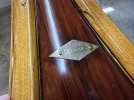
The Brodbeck nameplate on his early canoes is thin nickel plated brass. I presume the original stem bands were also originally nickel plated but of course were long gone before I got the canoe. I reinstalled the nameplate and declared Victory.
I bought this canoe in May 2025 and with the exception of waiting for filler to dry, a vacation and the affairs of general living I worked on it fairly steadily for the past 14 months. Good thing I’m not trying to make a living at this business.
Jean and I will be bringing Minna to Assembly and will reintroduce her to the water again.
Many thanks to everyone with suggestions and help especially, Benson Gray, Bill Conrad, Zack Smith, Chris Pearson and Michael Grace.
Paddles Up!!
Jim