1st Time Fiberglassing issues

Rob Learmont

Curious about Wooden Canoes
I just finished wetting the fiberglass on my strip canoe and I ran into a few issues.
This is my first attempt at fiberglassing and my first cedar strip canoe.
I watched every video and read every article on fiberglassing that I could find over the last few months trying to prepare for my own attempt, but there is something different about doing it for yourself that can't be learned for watching and reading.
1. Seal coat. I decided to do a seal coat before wetting the glass. MAS Epoxy recommended sealing any porous material before fiberglassing. I was warned about the seal coat raising the grain some, creating a texture that stuck to the raw fiberglass making it almost impossible to stretch it cleanly over the hull and near impossible to brush out the wrinkles. Nowhere did I read or hear about sanding down the seal coat, I wish I had taken some time to smooth the surface.
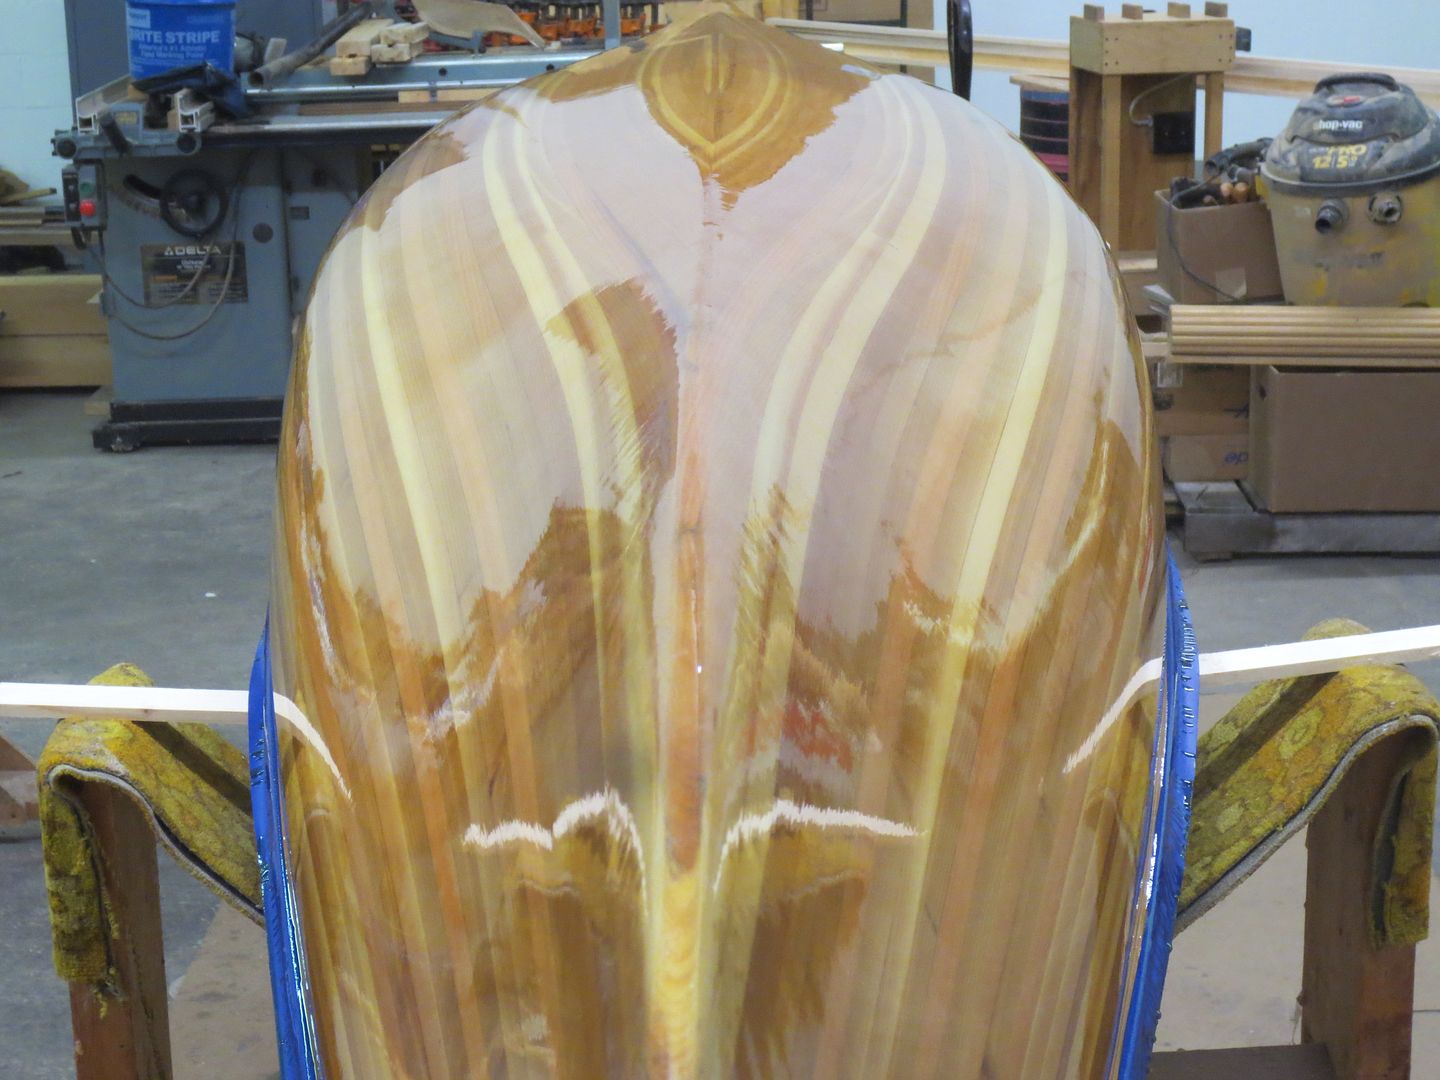
2. Squeegee pressure. Everything I read and watched talked about the angle of the squeegee, too high and starve the glass, too low and float the glass. It took me almost 3/4 of the canoe before I realized the correct pressure to apply to the squeegee in order to wet out the glass and stick it to the hull. I have several spots that are saturated in resin, but not stuck to the hull. So now I have some "waves" in the glass layer. (Photo attached)
3. Vertical surfaces. I could not have imagined how difficult wetting the glass on the vertical sides would be. I think I ended up with more epoxy on the floor than on the sides of the canoe!
4. Squeegee mess. While spreading the epoxy with the squeegee, I ended up with the entire squeegee coated with resin. I was trying to maintain the correct angle while spreading the epoxy and due to lack of experience I had to stop and clean the entire squeegee several times, plus change gloves numerous times due to getting so much epoxy on the squeegee that it was too slippery to hold.
5. Set up time. I used slow hardener and the temps were in the low 70's. By the time I finished wetting out the glass, the resin was already too set up to scrape the "grunge" off with the squeegee as demonstrated in most of the videos I watched.
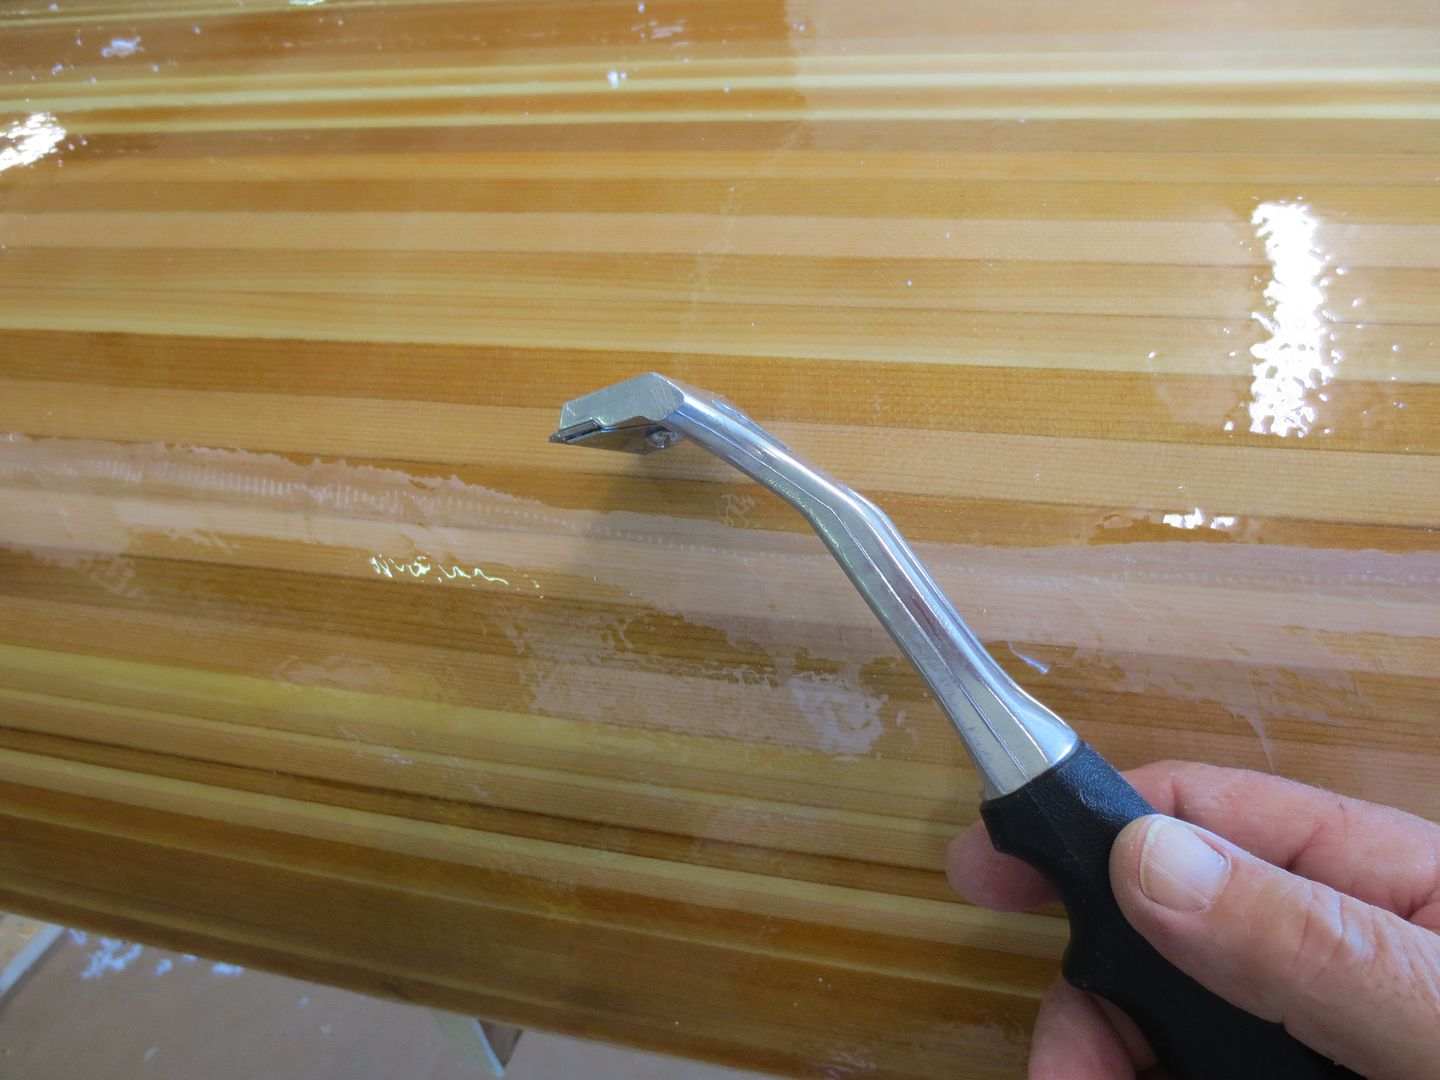
6. Trimming the fiberglass and the "Strings Attached". Maybe I did something wrong that I don't even know about, but at the stems and the sheer, where I trimmed the fiberglass, those pesky strings caused me to use curse words I haven't used in years!!! then when I attached the bias strips on the stems, I believe I could have made a Sailor blush with the words that came out of my mouth as I fought getting the strings to lay down. I believe I am going to have to sand them down and give them another coat of epoxy.
7. Wearing (or actually NOT wearing a respirator). Yes I am one of those people that face danger head on and choose not to wear protective gear such as respirators. MAS Epoxy doesn't have any smell that I could tell, and I was just spreading it on so I didn't believe there would be any dust or other issues.....I was WRONG!!!!. Just from mixing and working with the epoxy, my mustache and beard are now coated with epoxy and stiffening up as the resin hardens, so I can only assume that my lungs also have some hardening going on. Maybe my mustache filtered out the majority of the resin and I'll be okay. I will be wearing a respirator for the fill coats.
8. Going it alone. Maybe someone with experience and more skill than me could wet out the fiberglass on a 17' canoe alone, but for anyone doing it for the first time, I wish I would have enlisted some help. It was only after I finished my comedy of errors that I found out my wife helped restore a wood sailboat many years ago, including fiberglassing the hull. I asked her if she had any advice about working with the fiberglass.....her reply was a simple "Don't". No wonder why she didn't volunteer to help me when she knew I was going to take on this project.

Overall, I am happy with the end result, I am building this canoe for me and I will probably be the only one that will see any mistakes and issues once it's all done and gliding quietly across the lake.

My thanks to everyone on this forum for all of the advice I've got so far, but as I said, until you do it for yourself, you "Don't know what you don't know"
 

Attachments

  • IMG_5642.JPG
    IMG_5642.JPG
    204.4 KB · Views: 588
I would never SAND a seal coat ! SCRAPE it !! Sanding epoxy that hasn't had several days or a week to cure, ends up gumming up your sand paper ! If you are determined to sand, just lightly Hand sand !

First time ? Alone ? Foolish !

Cigar Foam rollers !! Apply Resin to your cloth with a "Cigar type" foam roller ! I too struggled with Squeegees ! I originally started with short nap foam paint roller covers. They worked great, but soaked up too much resin for my liking. Try Cigar foam rollers next time.

Again ! DON'T SAND ! SCRAPE any fibers, or edges. f Feather with a scraper any over laps !! Do this best with in a couple of days !

We all learn from our Mistakes ! Others will appreciate you sharing yours !

I'm sure, when you get ready to glass the inside, you will improve upon your technique !

Waiting to do your fill coats is a mistake !!! Start filling you weave with in a minimum of 12 hrs in my book ! And each fill coat should be applied about 1-2 hrs apart. until the weave is completely filled !

Good Luck !

Jim
 
Thanks Jim
Yes I'm sure the inside will go much better.
I am doing all of the fill coats today, should have 3 on by this evening.

As for the overlap, I am debating scraping in a day or two or waiting 7 to 10 days before sanding. I don't have much experience with scrapers (I just purchased a set of scrapers yesterday to use cleaning up the inside of the canoe)
Will the scrapers "feather" as well as sanding?
 
In addition to what Jim said,

I don't/didn't squeegee, but I also use a less viscous resin, I apply it with a nylon brush, working it in a little at a time. I also use thinner/tighter weave glass, which is why the brush. The most I mix at a time is 6 oz, and that has to be applied quickly or it goes bad, not that it sets but it starts getting thicker and doesn't fill the weave well.

Not sure exactly how you got the resin all over you, but it sounds like too much resin at a time.
 
I mix 9 oz batches. It seems about right with a roller.

If you experience the resin wanting to kick over too quickly, as soon as you have it mixed, pour it into a plastic paint tray. This will slow the reaction time a bit.
Another cause of short pot life, is old resin. It could have been old when sold to you, stored improperly, or you've just had it too long, and stored improperly !

Epoxy is NOT a good thing to get on your skin, or anywhere else !

I use a straight Carbide paint scraper on the outside. It works great to feather overlapping layers of cloth.
Home Depot has them.

Jim

https://www.googleadservices.com/pa...mBII4d7Q7gQTQXjSpGy6T5Oit4upcq4RoCODsQAvD_BwE
 
- Do not sand green epoxy unless you want to get a nasty and permanent reaction to it.
- There is no reason to ever even think about sanding or smoothing the saturation coat's texture. As I mentioned before, if you choose to use one, you have to live with the stickers and move the cloth by lifting it, not sliding it.

- Personally, I find trying to use a squeegee on a convex surface to be a completely crazy and inefficient idea. A good foam roller will spread the resin thinner and much more evenly. You obviously were applying way more resin at once than you should have been. There should never be a situation where you are getting it all over yourself or dumping anything on the floor other than a few stray drips.

- You aren't the only person on the planet. The rest were mostly put there to help you do a decent fiberglassing job. There have been way to many failures over the years from epoxy mixing errors, and they are an absolute nightmare to fix later. One small mismeasured batch in there will ruin the whole job. Get someone you can trust to mix you a continuous stream of accurate small batches of resin as their only job, while you concentrate only on the application and watching for bubbles or other problems.

- The only squeegees I ever use are slabs about 1/2" - 5/8" thick cut from leftover blocks of ethafoam packing foam, like you would get a TV packed in. Whenever we buy something packed with that stuff we keep the foam. You later slab them out using a serrated bread knife, electric kitchen knife or the band saw. They're kind of a combination of firm and soft and you can "comb" the surface of the fiberglass down to a perfectly uniform cloth texture that is down tight to the wood and more even than the vast majority of folks can create with the typical plastic squeegee. They are especially good on concave shapes like canoe interiors and you can have a ready stack of 20 of them if you want, so there is no messing with gunked-up squeegees. Toss it and grab a new one. And they're free!

- Granted, I guess I'm now an old-timey strip builder, but I've never feathered out an overlapping layer during the initial fiberglassing process. When the cloth was doubled over the boat bottom, the second, partial layer was always spread out first, then covered with the full layer and both were then saturated at once. For stems, the bias layers (even graduated up to around 8 layers of 10 oz. cloth on the stem bottom on my big fur trade canoe) were applied rapid fire with no feathering. The vast majority of the transition when dealing with multiple layers will pretty much disappear during the filler coats. The rest go away during the final sanding after full cure (the only time you should be doing any resin sanding).

- It may seem crazy, but the proper number of filler coats is however many it takes to do it properly. Don't try to decide on a specific number ahead of time. Different tools, application styles and pressure, ambient temperatures, etc. vary from day to day and person to person. The best rule of thumb is usually to apply however many filler coats it takes to completely cover the weave - and then add one more as a sanding cushion to prevent sanding down into the cloth.
 
One thing that I have learned over the years is that fiberglass applied properly, is not easy to do . I am terrible at applying fiberglass to anything!!!!!!!!!!!!!!!!!!!!!!!. I have seen many amateur fiberglass jobs, and have removed a lot of poorly applied fiberglass from w/c canoes. Like everything, there is no substitute for experience.
 
One more and super important thing as you start thinking about the interior fiberglassing job ahead:
The normal resin-spreading process, either inside a stripper or when laying up a fiberglass canoe in a canoe mold, is to dump resin on top of the cloth which has been draped into the space in the bottom and then spread it outward and up the sides, saturating the cloth as you spread resin and sticking it down into place. Both squeegees or rollers can do this, but I think squeegees are more popular for interiors.

Anyhow, as you sweep the resin into the cloth, outward from the center line and up the sides, you are putting a certain amount of tension on the fabric - which is supposed to be laying down neatly inside a big concave space. You may look back a couple of minutes later and see spots where the fabric has lifted off of the surface, making a good sized bubble which looks kind of like screenwire, hovering over the curve of the bilge. You roll or squeegee it back down again, tight to the surface, and it may come back again a couple minutes later. Sometimes these spots will do this over and over and over, until they eventually harden that way. They will then need to be cut out later and patched. Not good.

The fix if you do see one of these spots forming in a tightly curved and recently saturated area is to use your squeegee or roller strokes in the opposite direction (downward and inward, instead of upward and outward) to adjust the cloth and move a bit of slack toward the tension problem until the bubble goes away and stays gone. Repeatedly just pushing these spots back down isn't going to do it. You have to give them a little slack, and often it isn't much but it allows them to stay down tight on the wood and harden that way.

I very strongly suggest that you avoid any sort of pre-coat and its resulting grain raising stickers on the canoe's interior. To do a good job there you need to be able to move and adjust the lay of the cloth with your tools as you work. An interior covered with tiny stickers will make that much more difficult compared to installing the cloth onto smooth, dry, sanded wood. Whatever you might gain from the pre-coat is never going to make up for the hassle and problems it will cause when glassing the inside.
 
I agree with about everything Todd has said ! Great advise Todd !

But for one thing ! I add an extra layer on TOP of my main cloth layer. Wether you sand or scrape, you only want to feather the edge of the extra layer, not the main layer.

I made up a drawing showing the reasoning behind this. This also apples for extra Bias layers on the stems ! Widest layer goes on first !

This applies to the outside of a hull. I don't worry as much about the inside.
A pic

IMG_1696_zpsuruxzrov.jpg


Feathering is the smoothing or removing the edge of a layer of cloth.

Jim
 
Only in reality it doesn't work like that. The sanding, scraping or whatever does not cut into the fabric of either layer. At some point, every strip builder should be required to wax up a hunk of Formica and lay up a test panel which consists of two layers of six ounce fiberglass cloth, saturated together and properly rolled or squeegeed-out as you would the cloth on a canoe hull. Once it has cured, peel it off. You will find (usually much to most peoples' surprise) that the piece is only about as thick as the side of a plastic milk jug. It also has similar flexibility. It is nowhere near as thick as most people think it would be. If you stick your partial layer of glass cloth underneath the full layer on your canoe bottom, and saturate them as one, just that process will almost completely smooth over the transition. There is no big step down like you have drawn, and any that might remain after the initial resin saturation step will be completely gone after a filler coat or two because the transition is so thin. If they were included and to scale on your drawing, the filler coats themselves would easily add another layer which would be at lest as thick as you have shown a fiberglass layer to be. Final sanding of the filler coats can then proceed in that layer without cutting into the cloth at all. There simply is no thin spot in the glass present.

If there is a disadvantage to applying two layers of fiberglass as one, it would be needing to be somewhat more careful with roller or squeegee pressure. Moving the tools too quickly or pressing too hard will tend to make tiny air bubbles in the resin, which can get trapped down in the cloth weave, and which can show on close inspection. This can happen on a single layer of cloth as well, but a double layer needs a bit more care to avoid this sort of agitation. The advantages of doing two layers at once would be less resin used - less cost, a little less finished boat weight and a higher glass to resin strength ratio, as well as one less step in the process.

Depending on how many stem reinforcement layers you want to add, you can do your stacks with little pieces covered by bigger ones or the opposite. I do mine big pieces first, stacking them pretty heavily as you start getting down to the lower stem area where rocks live. I feather out their edges and anything left sticking out after the filer coats are done. Once it became available, I started using a thin, cigar-shaped strip of Kevlar felt about 8" x 1/2" as a bombproof grunch strip right at the most vulnerable spot on the lower stem. It is pretty much abrasion proof for life.
 
Thanks again to everyone for the advice!
I scraped a little at one of the bubbles and it looks like I had to go into the cloth before I could get it smoothed out with the surrounding area. Once I get the entire hull scraped and sanded I will see if I had to go through the cloth in any areas or just slightly into the cloth.
Then I will have to decide on if anything needs to be patched or recoated.
I will not pre coat the interior, there is no way I would attempt to position the cloth with all of those stickers from the precoat. I am also going to finish my bulkheads and use them as more fiberglass practice before attempting to glass the interior.

I am doing this canoe alone, maybe I should get some help, but I like the solitude and like the challenge of solving problems and coming up with creative solutions.

I have always been served well by listening to everyone's advice and combining several different methods into my own way. I have read, seen, and heard so many different methods (squeegee, roller, brush, foam pad, vacuum chamber, having an expert do it), and each one works best for someone, I like to find what works best for me. I went into the Fiberglassing step with the mindset "do your best, and if it does't work, just sand it off and start it over again"

I have been looking forward to this for more than 10 years.
This is a learning opportunity, an enjoyable endeavor, a relaxing hobby, an escape from work, a test of patience and persistance, and in the end will always be a fond memory.
I am in no hurry to finish, I am not concerned with perfection, I am not bothered by anyone else's opinion of my work, I am only thinking about being able to look proudly at my own creation and know that I did the best I could. I will say, even with the struggles and accidents (2 days before I was going to fiberglass, a board fell off the racks on the wall in the middle of the night and put a 2 foot long split in the hull. Oh well, after prying it open, spreading a little glue, taping it closed, a little more sanding, I was right back ready to fiberglass...a week later...) I have to say I am very happy with how far I've come and how much I've learned.
 
Another pic to show the feathered edges of bias strips.

Sorry Todd, but if you apply the narrow strips of cloth first, you will thin the wider top layer, and weakening it, in order to smooth it !
Yes I'm sure you can get by the other way. But I still stand by my statement, as to the proper way.

IMG_2384_zpschvzwpvo.jpg


If you look at the above pic, you can see where I scraped or feathered the edge of the extra layer smooth. When done ! It is near impossible to see. You definitely can't feel it !

IMG_2540_zpsuvgnqtzd.jpg


Draw your own conclusions ! At the curve of the stem is 4 layers of 6 oz E-glass. Not to mention the extra layer up to about the 3" waterline.

Jim
 
Last edited:
Rob

There are a lot of different techniques out there !
Yes,you have to make your own choices. I like you learned from my Mistakes, as you will !

I only wish I could have been there to help you with that first glassing !

Good Luck !

Jim
 
"Sorry Todd, but if you apply the narrow strips of cloth first, you will thin the wider top layer, and weakening it, in order to smooth it ! "

You apparently missed or didn't understand the statement I made which said that you don't sand, scrape or otherwise "thin" the top layer at all - zip, zero, nada (or the bottom layer either for that matter). The thickness transition is minimal and easily buried down in the filler coats. Your so called "proper way" doesn't make any difference in strength or the look and quality of the final product, and since my application of two layers at once yields a higher glass to resin ratio, uses less epoxy and adds a bit less excess resin weight to the boat, I'll stick with my method. It's worked just fine for me for about 45 years.
 
That's fine Todd ! To each his own !

I don't think either of us will change our minds. I'm OK with that !

Jim
 
Well said Rob,

Enjoy the journey

Dan

[QUOTE="Rob Learmont,]I am in no hurry to finish, I am not concerned with perfection, I am not bothered by anyone else's opinion of my work, I am only thinking about being able to look proudly at my own creation and know that I did the best I could.[/QUOTE]
 
Back
Top