1915 OTCA 17’ Restoration - SCKC Jax Fl

The finishing touches are all that remain. One issue was the front deck coaming, currently in 2 pieces. I tried several different techniques to bend new coamings of Cherry. I really didn’t like the bright yellowish oak pieces the previous repair looks to have installed. It’s only 1/4” thick, but I couldn’t get it the cherry to work. Most likely the wood grain orientation was just wrong for this application. I ended up using epoxy to glue the piece back together and then screwing it into the deck and inwales with new brass screws. I did strip the varnish off, which removed most of the bright yellow color. A bit of early american stain and they blend in nicely. Time for varnish inside, then put in the floorboard and seats. Only one thing left now: Brass Stem bands.
IMG_5227.jpeg
IMG_5233.jpeg

IMG_5257.jpeg
 
The boat was safely transported back to the club boathouse and has been curing. I’ve received the Old Town water decal from the WCHA store to put on the front deck, and the boat will need a few more coats of varnish on the decks and inwales. The club’s annual annual spring gathering and open house is right around the corner - June 6th, where everyone will have a chance to paddle this piece of history. I’ll be back with some action shots.

In closing,
I’m very thankful for this opportunity to restore a wood and canvas canoe. What a fantastic learning experience it has been. I have much to learn about bending wood for sure, but overall the guidance in Jerry and Rollin’s book truly enabled me to succeed in what at times appeared to be a project way over my head. My thanks also to the fine folks here on the forum. Their willingness to share information and encourage others is a blessing. You inspired me with your projects and helped me believe I could do this as well.

Now to get back on the sail rig for my decked canoe.

IMG_5263.jpeg

IMG_5266.jpeg
IMG_5270.jpeg
 
Last edited:
The saga of complete restoration. Way to persevere! And thanks for sharing with detailed description, photos and learnings. This may inspire folks to embark on the journey, or not. And that $1,000, well, that may have covered the materials.
 
The saga of complete restoration. Way to persevere! And thanks for sharing with detailed description, photos and learnings. This may inspire folks to embark on the journey, or not. And that $1,000, well, that may have covered the materials.
Oh yes, The Budget. The extra ribs and tacks increased the budget a few hundred. I also contributed quite a bit in the form of general shop supplies, brushes, gloves, sandpaper etc, the epoxy repairs, I also bought and made some tools that will be useful on future projects. The biggest resource of course is time. Very difficult to put a finite value in that.

For me, the experience of working with a 100 year old boat, seeing how it was made and putting it back to working order was very special.

The next step for this boat is to serve as our Club Mascot boat, and go out on club paddles.
 
If you have read "Sailing Alone Around the World" by Joshua Slocum (he was the first to do so) then you might remember the neighbors mocked him (at first) for his restoration of the derelict sloop the Spray. Thus this quote:
"Now, it is a law in Lloyd's that the Jane repaired all out of the old until she in entirely new is still the Jane."
(That would be Lloyd's of London, the maritime insurer.)
If your canoe does not yet have a name, may I suggest Jane! Or Spray!

Seriously, congratulations on the completion of a very big project!
 
Thanks Worth, original serial numbers on each stem, both bow and stern are original ribs, a lot of original planking. I purposely kept the original inwales, and I’m fairly certain the Mahogony gunnels are OT. So Repaired? Yes, at least 2 major overhauls. Easily spotted, And that in itself adds to the character and legend of a boat like this.

I’m hoping to get some history from the family on how the canoe came to Florida, and they travels it has had. But perhaps more importantly is what adventures lie ahead.

I think we’ll have it on a multi-day Suwannee River trip in the fall,, and certainly some day trips in the Okeefenokee Swamp. But it will probably be seen the most on club paddles at Florida Springs. There is an annual paddle race in the spring here, we may field a team next year and see how we do against the dragon boat team. Who knows.
 
I breezed right by the info on finishing the hull prior to canvas. There were A LOT of tack holes to fill after replacing that many ribs. I also had to deal with some of the fiberglass removal damage that pulled the surface off the planking in a few areas. I also had some gaps between my new planking and the existing hull. I chose to fill these all with epoxy resin thickened with wood flour. Once dry I carefully sanded and planed the repairs down, doing my best to not affect the old planking. The result was pretty good, not great, The hull is stronger and tge imperfections seem appropriate for the age and condition of the boat. Here’s a shot before I put on the boiled linseed oil.

IMG_4755.jpeg
 
Nicely done. There is a lot of satisfaction from finishing up a restoration.
If you plan to do another, one thing that you might experiment with is leaving all of those tack divots unfilled. You would be amazed at how those disappear when you stretch a canvas over the hull. The temptation to fare and fill is strong, but realistically, only the worst spots tend to need that treatment. when I restore a boat that has had fiberglass installed on it, my last step on the hull is picking out all of the resin that has filled in over the tack heads. I do that for three reasons. One, those tack heads were driven down below the surface of the planking by a skilled builder deliberately. A good clinch does not allow the head to sit proud but it will also not show through the canvas.
Two, resin, fillers etc. in that tack divots tend to pop loose and separate if the hull is dropped, hit, dragged etc. during use. Those little bits would end up between the canvas and the hull.
Finally, and this is a personal thing, looking ahead to the next time the boat is worked on, what a PITA to unseat those tacks if you need to pull planking or replace a rib.
Mike
 
Thanks Mike. I have considered those things and it’s good you mention them.
Yes, to get the ribs out, I had to pick the resin out of each tack divot to pull the tack.

I did not fill over the new tacks. I filled vacant holes from previous tacks in an attempt to avoid excessive plank replacement. Preservation vs replacement. I did fair the damaged planking where the surface had been removed with the fiberglass. The tack hole divots should not pop out as I had a wet mix that soaked into the surrounding wood and the new rib underneath. We’ll just have to see if it worked.
 
Thanks for the photos and description of your project! Nice work with the canoe and reporting the process. I am just starting a project and am appreciative of your work.
 
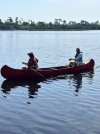
The boat got its first float yesterday. Happy to report there were no surprises. She’s solid and paddles well. It is ready for the club members to enjoy at our annual spring festival and Open House June 7th.

I still have the OT water decal to apply and I think I’m going to put the club name on it using vinyl.
 

Attachments

  • IMG_5831.jpeg
    IMG_5831.jpeg
    172.8 KB · Views: 11
Back
Top