Replicating a 1908 Morris Lateen Sail

Todd Bradshaw

Sailmaker
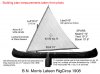
Years ago, I bought a copy of the WCHA reprint of the 1908 Morris Canoe Company catalog and I've always really liked the look of the lateen sail rig that they showed as an option. The sail is nicely proportioned, simple and no-nonsense but elegant. It's hung just high enough that the boom's nose clears the gunwales, which will improve performance by reducing the wind's heeling force, and the non-battened, hollowed leech edge should resist flapping and adds a nice visual sweep to the shape.

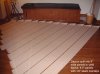
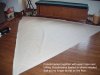
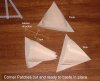
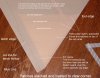
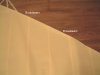
The sail was cotton and divided up into very narrow, vertically oriented panels. This was done for a couple of reasons. For one, some types of fabric back then weren't made as wide as they can be on modern looms. More importantly, the closely-spaced seams on the old cotton sails helped control the fabric's stretch. Some were real seams, where two pieces joined. Others are "false seams". They look like seams, but are actually ridges where the cloth has been folded back on itself and then forward again, forming a small "Z" in cross-section and sewn down. They reinforced a larger section of cloth with little "load bands", resisting bias stretch and helping the sail hold its proper shape. By covering the sail with a combination of seams and false seams, dividing it into narrow panels between the seams, it simply made a better performing, longer-lasting sail than using full-width panels of cotton. It also looked better. Some famous designer once claimed that any sail with panels wider than a couple of feet looked like a bed sheet. There is some truth to this.The Morris sails and early Old Town sails all had this simple, narrow-paneled, elegant look.

The only advantages of cotton sailcloth today are that it is very soft and limp when you have to handle/fold/stow it, and it's quiet - doesn't rustle in the wind much. In just about every other possible category (performance, durability, lifespan, resistance to rot/mold/mildew, strength, shape-holding ability, bias stability, ease of maintenance, etc.) modern Dacron (polyester) sailcloth is far superior. Cotton suitable for making a decent sail is also extremely difficult to find, where Dacron is readily available, woven and finished for the exact use that sailmakers have in mind. It does tend to be rather hard and stiff, very unlike cotton, but the sailcloth manufacturers have brought out what's generally called "Egyptian Dacron" to cater to the traditional and antique boat markets. It's just about as stiff and hard as other Dacron, but it has been dyed a light cream color, similar to raw canoe canvas, and is made to at least have the color and look of cotton sailcloth, even if it doesn't have that soft cotton feel.

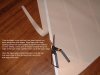
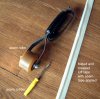
As the sailmaking season is winding down, I just happened to have an extra roll of lightweight Egyptian Dacron sitting in the pile and figured I'd build a replica of the Morris sail, with the same proportions, approximately the same dimensions and narrow panels to maintain that antique look. It will be Dacron, not cotton, but the goal is to make a low-maintenance, durable sail that looks like it's supposed to be there on a boat of that period, and one which won't require much in the way of special handling by its eventual owner.

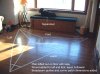
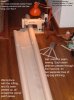
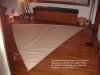
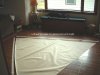
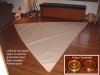
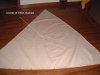
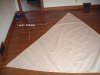
For those who are interested, I'll photograph and document the building process, which is basically old-school, traditional sailmaking. I do draw on the computer, but the actual design and shaping work of the sail is mostly done by eye with string or tape, a ruler, battens and push pins, lofted out on the floor pretty much the same way it was done in 1908.

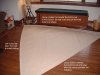
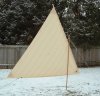
Here is our objective, simple, classy, looks great on the hull and it should perform quite well.

More to follow.......
 

Attachments

  • morris001.jpg
    morris001.jpg
    216.9 KB · Views: 1,364
I scanned the catalog photo and transferred it to the old Mac drawing program that I use for measurement and drawing sailplans. The Morris catalog claimed it to be 47 sq. ft. of sail area. The boat it was shown on looked to be either a 17' or 18' model, as it had three thwarts. Its depth-to-length looked more like a 17 footer to me, so I scaled the hull to 17' and proceeded to measure the sail. I eventually arrived at a measured size a hair under 43 sq. ft. Even though it's a good, straight-looking profile photo, it's certainly possible that the photo had some lens distortion or the printing in the catalog was slightly distorted to account for the sail area discrepancy. It's also possible that the original measurement method varied a bit from the methods we use today (or was less accurate). In any case, It doesn't much matter for this build. I want the same profile and proportions between the hull and sail that I see and have always liked in the catalog. Forty-three square feet is usually plenty to move a canoe in the 16'-18' range well. Since I doubt there are many original Morris spar packages floating around on the used market, the spars will most likely need to be built new anyway, and it's a pretty simple job. They can be built to the same proportions as the new sail, though original spars would probably work just fine if anybody happened to find some.

The first photo below shows the catalog photo with the boat scaled to 17' and the sail and spar measurements added. This is about as far as we go with computerized help around here, and at this point the sail is still basically just a flat and shapeless outline. Time to get down on the floor and start doing some traditional design work.

The spots where the sail's three corners will be are located on the floor, marked with push pins and connected with string. On the luff (front edge) and foot (bottom edge) of the sail, we will add some round, making those edges convex curves. When we eventually lace these curved edges to straight spars (the yard is the upper, angled spar; and the boom is the lower, horizontal spar) the spars will force that extra cloth in the curves toward the middle of the sail, helping to create our sails draft (belly). It doesn't take much round to generate the amount of draft we need on a small canoe sail. An inch or a bit more of convex-ness is usually plenty for good draft. However, we can be sure that in use our long and rather skinny yard and boom are going to bend some, and it usually happens in a curved shape pretty similar to our convex sail edges. As they do bend, they tend to lose the ability they had when straight to force the edge-round into the sail's middle for draft creation. To compensate for this and maintain our sail's draft, even if the spars are bending, we make the sail edges even more convex. I don't want to completely bury you in sailmaker mumbo-jumbo, but by the time it's all said and done on a lateen sail in this size range, the edge round added to the sail's luff and foot is usually something on the order of 1" for draft and another 1.5"-3" or so for a spar bend allowance, making the total round amount 2.5"-4". Once the round amounts are decided upon, the luff and foot curves are made on the floor with a batten between the sail corners and "lofted" out with masking tape to represent the sail's edges. The hollowed leech edge is also added with a batten and tape.

In addition to luff round and foot round for creating draft and shape in the sail, we also use "broadseaming". It helps us position the draft where we want it to be.Typical sail seams or false seams are 1/2" - 5/8" wide. A broadseam is simply a place where we gradually increase the width of the seam as it approaches an edge. These help give the edge a bit of a cupped shape and help locate the deepest draft in the area just before we started increasing the seam width. Different types of sails and different panel layouts require different styles of broadseams. The Morris lateen is a "vertical cut" (panels running up and down, following the leech edge). The second photo below shows the lofted out edge rounds, leech hollow and that big star-shaped thing in the middle is a guide that indicates where the broadseaming will be needed. The top of the sail is closest to the viewer in the photo, the front end is on the left, the back edge on the right. Most of the sail will have the standard 1/2"-5/8" seams, but the long, triangular areas between the broadseam guides and the luff and foot edges will be areas where seams get broadened a bit. The small triangles at the corners indicate where extra layers of fabric will eventually be added for corner reinforcement.

Trust me, the theory stuff gets a lot deeper and we don't have time or space for it here, but hopefully at this point there won't be any lines on the floor that are a complete mystery to the viewer and we can actually start building something.
 

Attachments

  • morris 002.jpg
    morris 002.jpg
    205.7 KB · Views: 3,044
  • morris 003.jpg
    morris 003.jpg
    83.2 KB · Views: 745
Hi Todd,

I have a tattered original if you'd like to work from it.

I'll have to take some pictures and post them tomorrow.

Thanks,

Paul
 
I never pass up an opportunity to see an original. It's usually amazing just how much time and effort went into them, especially when you see the prices they sold for back then. In some ways, the spar measurements and details are more useful than those of the sail. Once you have those, it's pretty easy to create a dead-on sail to fit them.

Back to work!

OK...The tedious theoretical part is over and all of the needed design work has been figured/estimated (the cut and design of any sail is always a bunch of compromises and estimates) and lofted out on the floor. Let the building begin!

Step #1 is to roll out enough fabric to cover the lofting. This cloth comes 54" wide and as you can see in the first photo below, two hunks of cloth could cover this entire sail. Unfortunately, that wouldn't leave you enough seams to do much broadseam shaping...and then there's that "looking like a bed sheet" thing. The mimimum panel count on a lateen sail in order to get enough shaping seams is 3-4 panels, joined by 2-3 seams and 4-5 panels with 3-4 seams is even better. That's what they have on most modern lateen sails for small boats like a Sunfish. In our case, we're building a cosmetic replica of an antique sail with panels only about 8.5" wide, so that's what we will do. We'll end up with around 12 panels and lots of seams to choose from for shaping. Fabric is always placed with the weave square to the leech edge of the sail. Since the leech edge is not reinforced by being attached to a spar, we want the yarns parallel to, or 90 degrees to, the edge to give us maximum resistance to cloth bias stretch.

Dacron is too stiff to false seam well, so all of our seams will actually be seams, joining narrow strips of fabric. We start with a long steel ruler and a utility knife and carefully cut our two big hunks of cloth into strips. Each 54" wide hunk yields six 9" wide strips of Dacron. It would be nice to be able to hot-cut all the pieces, but hot knives tend to make rather erratic cuts and often leave an ugly dark brown melted bead along the cut edges. The resin coating on the fabric does a pretty good job of sticking the yarns together and seams are sewn right along the cut edges, so raveling isn't much of a problem. Owners may eventually get a few stray yarns raveling out and they can be trimmed off as needed. I figure I'd rather trim a few yarns from time to time than have ugly melted edges on all the panels all the time. The second photo below shows our two big hunks of Dacron split into 9" wide strips. They're left a bit longer than our lofted plan on their tops and bottoms at this point. With our seam overlaps joining them, it will yield finished panels very close to our target 8.5" width.

We use a thin, but aggressive, 1/2" wide double-sided, mylar carrier seam tape to baste the panels together prior to sewing. Dacron is tough to pin and too slick to keep aligned without something holding it together, so all seams are tape-basted. The tape also adds considerable strength to the seams. Over time, the adhesive cures and after a few weeks the seams are usually stronger than the unseamed cloth next to them. Following the broadseaming guidelines on the floor, various sections of many of the seams will be standard width in some spots and broadened in other areas (toward the sail's edges). There are no hard and fast rules for how much to increase the overlaps or how often to do it (every seam?, every other seam? etc.) It's done mostly by eye from practice. I built my first lateen sail in 1980, and remember being very nervous and semi-confused about the whole broadseaming concept. Luckily, at this point I've made enough of them over the years that I don't have to think about it much and do it by eye. The third photo shows all the panels basted together and our sail is no longer dead flat. It has some shape, even though it doesn't look like much yet.

Before we start sewing the seams, we lay the cloth back over the lofting, locate the corners, get out the batten and a pencil, and trace the lofting's luff and foot edges onto the cloth. Then we cut away the excess on these two sides. The hollow on the leech edge will also be traced onto the Dacron, but we won't cut it to shape just yet. Photo #4 shows this work underway. As soon as our edges are marked and trimmed, we're finally ready to start sewing!
 

Attachments

  • morris 004.jpg
    morris 004.jpg
    74.4 KB · Views: 715
  • morris 005.jpg
    morris 005.jpg
    70.4 KB · Views: 728
  • morris 006.jpg
    morris 006.jpg
    112.7 KB · Views: 746
  • morris 007.jpg
    morris 007.jpg
    117.3 KB · Views: 664
Dacron will crease if bent sharply or wadded-up, so during the sewing process it is always left on the floor to prevent unsightly creases. The sail will eventually get some creases from being used and they don't hurt the cloth, but it's a point of pride to deliver a sail that's as pristine-looking, and with as few handling marks on it as possible. The worst part of sailmaking is when you finally have to fold it up and stuff it in a little box for shipping. It leaves a series of horizontal creases that are unavoidable unless the customer is crazy enough to be willing to pay a fortune to ship a ten or twelve foot long tube half-way across the country. Folding creases are just something we have to live with, but we do our best to limit any other sort of creasing.

In order to do this, we roll the sail like a scroll on either side of the basted seam and have the longest infeed/outfeed space possible on either end of the sewing machine. I have a narrow path to sew in on my floor, but it has about 25' of clear length with the sewing machine set into the floor in the middle. If the scroll-rolled bundle is more than about 12' long, I start running into walls - which isn't good and causes creases, so I'm limited when it comes to the sizes of sails that I can build these days. The first photo below shows the rolled sail, temporarily held into its rolled state with a couple of strips of strapping tape. You can see the basted seam, ready to be sewn. Each seam will get two individual passes through the machine. Each lays down a line of zig-zag stitching right along one of the edges of the basted panel overlap. Early cotton sails were sewn with a straight stitch, rather than a zig-zag. Dacron has different stretching and tearing characteristics from cotton, and a zig-zag which spaces the needle holes over a wider distance makes a stronger seam (less like a perforated line on a sheet of paper). Even though we're shooting for a semi-historic replica of the old sail, we don't want to do anything dumb, so we'll stick with a zig-zag. With the combination of the seam tape's bond and two lines of zig-zag, we will end up with very strong seams that will never let go.

Neatly sewing long seams is rather tedious. I sew one line, guiding along one edge of the seam overlap, then flip the scroll over and sew the second line of stitching along the other side of the seam overlap. I use size V-46 polyester thread and a #16 needle for sails this size. Just for grins, I measured the length of all those panel seams on this sail. They added up to 62.6' of seams, which means a bit over 125' of stitching for both passes. Once the panels are seamed, there is probably another 70'-80' of edge and corner seaming to do before this sail is done. We'll end up with about 200' of zig-zagging, which is a lot for a 43 sq. ft. sail, but I think the look will be worth it.

A couple hours later the panel seams are all double stitched (2nd photo) and we're done for today. For the next episode, we will make and attach the corner reinforcing patches. After that, we'll hem the leech edge and bind the luff and foot edges. Finally, we will install the grommets and a couple telltales and call it done. Stay tuned, 'cause it's actually starting to look like a sail!
 

Attachments

  • morris 008.jpg
    morris 008.jpg
    89.2 KB · Views: 633
  • morris 009.jpg
    morris 009.jpg
    103.7 KB · Views: 630
The most highly-stressed areas on any sail are usually the corners. Our little lateen is no exception. Its three corners will hold the three largest grommets on the sail, pulling the sail out toward the ends of its spars. The luff and foot edges will also each have about a dozen smaller lacing grommets spread along their lengths, but those little ones just keep the cloth close to the spars and don't get anywhere near as much strain as the bigger corner grommets.

Each corner will be built up with several additional layers of fabric in the form of a small triangular stack of "corner patches" to help take the strain. The sizes of the patches in the stack will be graduated, to stair-step the total thickness from a bare panel up to four layers thick at the very corner. Gradually increasing the thickness like this both spreads the strain over a large area and helps make the transition smoother - which helps to prevent the in-use stresses from wrinkling the sail in the corner areas.The intersection of the binding strips, which we will eventually wrap the raw edges of the sail with, adds additional layers right at the corners where the grommets sit. At those spots, even a small sail like this one will end up being 7-8 layers thick. This is also good for the grommets. We will be using brass "Spur Grommets" which have small teeth that bite into the fabric for a better grip and more strength. Grommets need a certain amount of fabric thickness to get a good bite, and bigger grommets with larger teeth need more thickness than small grommets.

Corner patches can be made in a variety of shapes and types. Our simple triangles will do the job, are easy to make and seem to be the most common on surviving examples of old canoe sails (which usually were not fancy, big-ticket items with a lot of added frills). Since we're using Dacron, we will make one small concession, compared to the old cotton sails. Our corner patches will be somewhat larger than those used on cotton sails. The reason has to do with the differences in stretching and tearing characteristics between Dacron and cotton. Unlike cotton, Dacron is very stretch resistant (both the woven fabric and the yarns that make it up) - which is one of the main reasons that it makes great sails. They hold their designed shape well through varying wind conditions and over the years. When we apply concentrated stress to a hunk of Dacron fabric, its non-stretch yarns tend to attempt to take the stress one by one. The closest yarn to the source of the stress tries to take it all, and if it's not strong enough, it will break and pass all of that stress on to the next yarn in line - which is just as likely to fail for the same reason and pass the load to the next guy. There is a scenario known as "explosive tearing" where this process can happen over and over again, rapid-fire, and not stop until the tear reaches some sort of reinforcement. In a matter of a couple of seconds a huge Dacron sail can virtually tear itself in half. Our little canoe sail isn't likely to ever see that much stress, but whenever we work with Dacron fabric, it's wise to keep these things in mind and do what we can to prevent potential failures with good reinforcement.

Cotton is a different story. The yarns have some stretch to them and tend to work together with their neighbors much more, spreading strains between the group, rather than leaving them for individual yarns to handle alone. Cotton sail corner patches could be made smaller because they work together better, stretch a bit and share the loads more as a group. A cotton lateen sail like the old Morris and Old Town sails might have triangular corner patches as small as 3"-5" on a side and they would be adequately strong. On our Dacron version, the patched area will be more like 10" on each side of the triangle, so that we can spread the load out over a larger area, enlisting the services and strength of more yarns in the process. This issue, by the way, is also closely related to the reasoning for using a zig-zag stitch on Dacron instead of a straight stitch. We spread the needle holes and the in-use stresses on the seams over a larger area and more yarns. Having to use slightly larger corner patches will be a very small price to pay for all of the extra shape-holding stability that the Dacron cloth will add to the project. We can live with that and our sail should live longer because of it.

Step #1 (shown in photo #1) is to cut out a series of triangles for each corner. The top patch will be the full 10" size, the next patch will be about 1.25" shorter and the following patch an additional 1.25" shorter. Why 1.25"? Mostly because that's the width of my ruler and it makes them easy to draw. However, it also makes for a good spread for the stitch lines - and it looks really nice, both interesting and orderly, when the sun back-lights the sail. Dacron is thin enough that it's a bit translucent and out in the sun all of our corner patches and panel seam overlaps will show up very clearly. For what will be a pretty plain, cream-colored sail, this one should be quite elegant when the sun gets behind it and lights up all those panels and corners.

In this case, I'll pick up the dimensions of the corner patch areas from the lofting on the floor. It's usually not critical to bother to loft-out small simple corner patches, but it sometimes helps to see the visual relationship of their shape and size to the sail's outline. We always cut corner patches so that their weave is aligned with the weave of the panels that they will be attached to. This helps to prevent stress-wrinkles in the corner areas and/or irregularity in the gradual fabric thickness build-up that we're constructing. The edges of the patches will be basted/bonded to the sail and each other with seam tape for added strength and once they're all tape-bonded in place, the stitching will go through the entire stack and the base sail panel.

The leech side of the peak and clew patch stacks will be inset about 3/4" from the reference line (photo#2) that we drew for the eventual leech hollow. At this point, we only sew the sides of the triangles that face the middle of the sail. The sides along the luff, foot, and leech edges wil get sewn down when we finish the sail's edges. The "blue Line" is a thin blue line that most sailcloth companies print along the edges of rolls of sailcloth. Modern production sail lofts often use it as a seaming line when sewing their panel seams using full-width fabric. Since I cut fabric into narrow panels for traditional-style sailmaking, the blue line is usually more of an annoyance than an aid.

Once the patches have been sewn, we can finally cut the leech hollow. We start by putting down a strip of seam tape along the leech hollow's cut line that we penciled-in from the lofting. Sliding the sissors along the edge of the seam tape line gives us a clean, flush cut (photo 3).The lofting allowed an extra 3/4" of cloth, outside of the designed leech, to be folded back onto the sail, forming the leech edge hem. A simple "fold-over-and-sew" works fine on most Dacron sails. We want a nice, smooth, bulk-free edge for good airflow off of the back end of the sail and a basic hem will give us one. The hem will also bind the raw leech edges of the peak and clew corner patches. Once the excess is cut away, we fold the hem over, peel the paper backing to stick the seam tape down, scroll-roll the sail and sew the hem down (photo 4).

Finally for this session, we baste and sew the tack corner's patches to the sail. Since their raw edges will be covered by the edge binding, rather than a hem, the patches extend all the way to the foot and luff edges with no leech-style 3/4" setback.

We're making good progress and the end is slowly coming into sight. More to follow.
 

Attachments

  • morris 010.jpg
    morris 010.jpg
    145 KB · Views: 663
  • morris 011.jpg
    morris 011.jpg
    128.4 KB · Views: 616
  • morris 012.jpg
    morris 012.jpg
    140.9 KB · Views: 629
  • morris 013.jpg
    morris 013.jpg
    106.9 KB · Views: 592
The first photo is a shot of the cut, but still unbound, luff edge. It allows you to see what the broadseams which help to shape the sail look like. With these extra-narrow panels and lots of seams I didn't need to broadseam every seam to generate the shape, so I was alternating between straight 1/2" wide seams and broadened seams to cup the edges a bit and build in some draft. As the two broadened seams approach the luff edge, you can see how they widen a bit.

Interestingly, modern computer cut sails don't have any broadseams but yield the same shape. Instead of building the sail from straight-edged panels and varying the width of the seam overlaps with broadseams, the computers cut the panels themselves with curved edges and keep the seam width constant throughout the sail. The advantage of this is that once programmed, the computer does the vast majority of the thinking. Its automated plotter sucks the cloth down tight on a vacuum table and cuts out all the pieces very accurately, draws a seaming line on them and even numbers them. When they are finally handed off to a sewing person, they usually baste them together (sometimes with tape, sometimes with tiny pin-pricks from a hot knife with a needle tip) and all they need to do is sew 1/2" wide seams everywhere. It's very efficient and makes great sails, but it's basically boring factory work.


In the second photo, you can start to get an idea of what our seams and corners will look like out on the water. Most of the canoes and small boats that I build sails for are wooden boats, and most of them have been built or restored by their owners. The vast majority of them are very good looking boats and some will really knock your socks off. As a sailmaker, I think it's important to remember that out on the water and from 100 feet away, much of the fine work that the boat's owner put into the project may not show up - but the work that I do will. So in addition to trying to make sails that perform well, I also put a very high priority on the cosmetic aspects of the sailplan. It needs to look like it belongs on that boat and nicely compliments the whole package - whether from 100 feet away or 100 inches away.

Just for grins, I counted up how many feet of zig-zag stitching this sail currently has and added the footage that will be needed to finish it. The total came up to 182' of stitching! We're averaging about 77 stitches per foot, so in the end, our simple little 43 sq. ft. canoe sail will take the better part of three days to build and contain slightly over 14,000 stitches! The easy way would have been to make it from three panels, and the end result would be effective, neat, and unfortunately, very plain looking. I don't like plain sails and they're boring to build, so if it takes 14,000 stitches to capture and celebrate the look of the original sail, then that's what it will get. Luckily with this crowd of canoe builders and restoration fanatics, most of you can understand why it's worth doing.
 

Attachments

  • morris 015.jpg
    morris 015.jpg
    76.8 KB · Views: 627
  • morris 014.jpg
    morris 014.jpg
    119.2 KB · Views: 626
We're ready to finish the raw edges on our sail's luff and foot. These will be the last sewing steps on the sail, so we're almost home. After that, all that will be left to do will be to pound in some grommets and do a couple of small trim additions. From the catalog photo it's impossible to tell exactly which method they used to finish or bind the luff and foot edges of the cotton Morris sails. On most old canoe sails, these edges are finished with a "rolled hem" about 1" wide. This simply means that when they cut the sail to shape over the lofting, they left a couple inches of extra cloth along the luff and foot. To finish the edge, it would be folded over once in a 1" wide hem and then folded over again, to hide the raw edge and yield a 1" wide band along the edge that's three layers thick. The thickness helps to prevent stretch along the edge and three layers are enough to give the lacing grommets a good bite when we install them.

Other possibilities would have been to bind the edges with a separate long strip of cotton, tucking the raw cut edges of the strip to prevent fraying, or to finish them with what is called a "tabling". Remember when we paneled the sail and sewed the panels? We purposely made it a bit over-sized, hanging over our lofting for a few inches. Then once all the seams and broadseams were in we could place the sail back over the lofting and cut it to the proper size without losing any edge length due to the seam overlaps. Then we cut off the excess. A tabling is a narrow strip of cloth cut from that excess, and its inner edge is the other side of that cut. If the sail's cut edge is a curve (most are) then the tabling strip will be a matching curve and the strip itself will have seams crossing it, just like the sail panels. It's kind of like scarfing a gunwale for your boat out of 12" chunks of mahogany.

To install a tabling, a very narrow, single-fold hem is made along the edge of the sail. Then similar narrow hems are made along both edges of the tabling strip. The strip is then installed flat on one side of the sail (not folded over the edge) with the hemmed sides of the sail and strip together and their raw edges hidden inside. Tablings were very common on big boat sails back in the cotton days, but seldom used on sails as small as our canoe sail.

For our sail, we're actually going to do something different from all the above methods. We will use the modern method which tends to work best on Dacron fabric. Since it's rather stiff, non-stretchy and very stable, Dacron often doesn't do very well when you try to fold it twice over a curve to make a rolled hem. The first curved fold is bending it one way and the second is then trying to bend it in a curve in the opposite direction. The result is often a wrinkled edge, which we don't want. Instead (and since our resin-coated fabric resists fraying pretty well) we're simply going to cut a 2" wide strip of cloth, fold it in half lengthwise and bind the raw edge. It will be bonded to the sail with seam tape and also get two lines of stitching. It will yield three layers of edge thickness (two from the strip, plus the sail panels) so our lacing grommets will get a good bite. It's simple, strong, relatively quick to do and less prone to wrinkling.

The standard sailmaking term for any narrow, cut strip of Dacron edging like this is a "tape". A "luff tape" is one that will be folded over the sail's luff edge, and a "foot tape" is one that will be folded over the raw foot edge. At this point, they are not sticky, like duct tape - though we will be using seam tape (which is) to bond them to the sail, and then backing that up with stitch lines. Depending on how much fabric is left on the roll, the tapes can either be cut from one long piece, or scarfed (angle-cut, seam-taped and sewn) from shorter chunks. The finished strength is the same. In our case, I'll make each tape from two pieces, spliced together, as I'm getting down to the end of the roll. In photo 1 you can see the tapes, cut to length along the sail's edges. To prep the tapes, I'll just run a line of seam tape down both edges and fold and crease them in half, lengthwise. Then they're ready to stick down to the sail's edges and sew (one at a time, because you can't turn a 10' long scroll of fabric 90 degrees or more in the sewing machine). They will get one line of stitching along their inside edges and another right along the outside edges of the sail. The lacing grommets will eventually be installed between the two stitch lines.

In photo 2, the Dacron luff tape has had 1/4" wide seam tape applied to its inner edges and has been folded in half and creased, ready to install. The roller is used to roll down all tape-basted seams for a better bond. It's made from a skateboard wheel, a couple hunks of stainless steel sailboat chainplate material and a photo flash handle that I found in the bargain bin at a camera store. The screwdriver came with my sewing machine. When you crease Dacron you need something hard to rub the crease down with, so that the crease is nice and sharp. The first time I ever made a sail, I just happened to grab it and use the plastic handle as a seam-rubber because it was close at hand. I should make myself a fancy wooden seam-rubber some time, but so far, the luff and foot tapes of every sail I've built since 1980 have been creased and rubbed down with the handle of that cheap little screwdriver - which is approaching half-way worn off at this point.
 

Attachments

  • morris 016.jpg
    morris 016.jpg
    99.9 KB · Views: 533
  • morris 017.jpg
    morris 017.jpg
    157.6 KB · Views: 582
I seem to remember from a few years ago at one of the assemblys held at Keuka College that Scott Barkdoll, Skywoods Canoes, had a complete Morris sail canoe in original condition. It included all the sail gear and the sail. I could not find a picture of it but I do recall looking at it. He refered to it as his "lottery" canoe - finding it was like winning the big one. Maybe he will chime in on this.

Jim C.
 
The luff and foot tapes have now been attached and sewn down and that concludes the sewing for this sail. Next up are the three big spur grommets for the corners and the smaller lacing grommets along the luff and foot edges. Grommets are pretty easy to install. A steel arch punch is used to punch the hole and the grommets are pounded in with a mallet and a special setting die. Spacing for lacing grommets varies a lot on sails - from as little as four inches apart upward to twelve inches or so. Performance-wise, it doesn't seem to make much difference, though the older sails often had smaller spaces between them than most modern sails do. The original Morris sail showed a lacing grommet through the luff and foot tapes at every panel seam (about 8.5" apart) so we will match that for our replica. It's a good spacing functionally and being lined up with the seams gives them a very neat, clean look.

In the first photo you can see the taped edges and the installed grommets. The inset shows the two parts which make up a spur grommet. The barrel section on the left has a rolled rim around its outer edge. The washer section on the right has the teeth which bite into and through the layers of fabric and then clench in the rolled rim of the barrel part. They're light, reasonably inexpensive, quick to install, historically accurate and quite strong. About the only drawback to spur grommets is that each size needs a specific setting die set and the good ones tend to run $100-$150 each.

At this point, the sail is basically done, but there are a few small touches that we can add to make it more convenient to use. The corners of most old cotton canoe and dinghy sails came to a sharp point at the very edge, out past the grommets. There wasn't much else that they could do there that wouldn't expose a cut cotton edge and eventually fray. In time, those little pointed ends often tended to get beat up and rather sad looking from lines or lacing running through the corner grommets. With Dacron, we aren't limited like that. We can hot-cut a small radius at the very corner, both removing that little pointed chunk and at the same time, making the corner look more finished. Big boat sails would often have heavy hand stitching combined with leather wrapping binding the corners and protecting them, but I've never seen such a treatment on an old canoe-sized sail, where it would tend to be expensive over-kill.

Photo #2 shows the peak corner up top. You can see the corner grommet with the radiused corner, the luff tape, and a lacing grommet on the right. The left edge in the photo is the upper leech. I've installed two more, very tiny spur grommets there (#000 size - about like shoe lace grommets). These are optional grommets in case the sail's owner ever wants to fly some sort of small streamer, pennant, club flag or burgee from the back edge of the sail's peak. Perhaps we should petition the powers that be to also offer a miniature version of the WCHA flag for the sailing crowd.

The leech edge also got a couple of red yarn telltales. These are little, single-strand yarn streamers about 8" long attached to the leech hem. Once you learn to read the way they are streaming (or not streaming) they will tell you how well the wind if flowing over the sail, which indicates whether you need to trim it in (pull it in tighter) or ease it out a bit. There are various places on a sail where telltales can be placed, but since the mast crosses a lateen sail on one side, causing turbulence, a couple leech telltales seem to be the most useful. We stick one on the upper leech and one on the lower leech. As we're sailing, we generally want our sail's angle to the wind adjusted so that we get smooth airflow over both sides of the sail, causing the leech telltales to stream nicely behind the leech edge. If we have the sail eased too far out for our heading and current wind direction, it will usually tell us by fluttering or flapping, because our airflow is stalling on the upwind side of the sail. At that point, we trim the sail in until it fills nicely, stops fluttering and our telltales stream.

On the other hand, if we trim our sail in too far. It will still be filled with wind and it won't be fluttering, but the flow will be stalled out on the downwind side. Since you can't see airflow, this won't be obvious, but it also won't be very efficient sailing. This is where our leech telltales can really help us. If the sail is trimmed in too tightly, one or both of our telltales will hide behind the leech edge on the downwind side of the sail. From our sailing position on the upwind side, we won't be able to see them. When we notice this, we ease the sail out gently until the telltales are streaming again. At that point, we know we have restored good airflow to both sides of the sail and it is no longer stalling out. They're just two little hunks of yarn, but thay can certainly make you a better sailor if you pay attention to them. You can see the telltales in photo 3.

Our final construction step is another small option that I like to do, and that is to mark the sail's Center of Effort, or C.E. This comes in handy when the owner is initially setting up and adjusting his sailing rig for good performance. The Center of Effort is the center of the sail's area (draw an imaginary line from the clew corner to the midpoint of the luff, and another from the tack corner to the midpoint of the leech. The spot where the two lines cross is the C.E.). For initial set-up on canoe sailing rigs, we usually start by clamping-on our leeboard bracket to the gunwales so that the leeboards will be directly under the sail's C.E. when the boat is viewed from the side. During the sailing trials, or in different conditions, we may find that adjusting the boards slightly farther forward or aft of the C.E. sails a little better on that particular boat, but it's probably going to be pretty good spot for starting out. I mark the C.E. on the sail with a small red mark made from peel-and-stick Dacron, just to help with the set-up. It can be left there permanently, or later peeled off, once the owner gets his rigging figured out. Photo 4 shows the C.E. mark in the sail's center.

After a lot of cutting, taping, stitching, and crawling around on the floor we're finally done! The last task is to see if I can dummy-up some temporary spars, hang the sail up in the yard and maybe we can get a good look at it to see how close we came to the look of the original Morris sail.
 

Attachments

  • morris 018.jpg
    morris 018.jpg
    138 KB · Views: 593
  • morris 019.jpg
    morris 019.jpg
    145.6 KB · Views: 580
  • morris 021.jpg
    morris 021.jpg
    74.5 KB · Views: 587
  • morris 020.jpg
    morris 020.jpg
    79.5 KB · Views: 579
Well after various delays (weather, family, holiday, etc.) I finally got to hang up the finished sail to get a better look at it. I found a nearly clear, twelve-foot fir 2x4 in the stack at Home Depot for $3 (nearly a Christmas miracle in itself) and ripped a couple tapered spars out of it for a demo yard and boom. A hunk of closet pole stuck into the semi-frozen ground served as a temporary mast. It's not heavy enough to do the real job on a boat, but it worked to get the sail up off of the ground long enough to shoot a couple of pictures. No wind to fill it out or bend the spars, but I'm pretty happy with the shape and I think it will have that classic look once it finds a home on an old restored boat.
 

Attachments

  • morris001.jpg
    morris001.jpg
    216.9 KB · Views: 890
  • mo-lat-002a.jpg
    mo-lat-002a.jpg
    190.4 KB · Views: 728
  • mo-lat-007a.jpg
    mo-lat-007a.jpg
    201.9 KB · Views: 732
  • mo-lat-015a.jpg
    mo-lat-015a.jpg
    77.5 KB · Views: 654
I am looking forward to reading this carefully. It might even be something that I could attempt, or at least enjoy the prospect of doing it.
thank you for posting.
Paul
 
Back
Top