John K
Curious about Wooden Canoes
We have two 16’ cedar strip canoes. I’m planning to restore both.
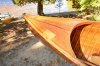
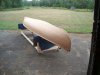
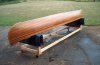
One, a Peterborough Canadien, I believe, (originally cane seats, a walnut accent strip below the gunwales and butternut(?) decks with wide, contrasting centre strips), has been in the family for over 60 years (I think it is probably about 75 years old). It is in what I would describe as poor condition. The ‘go-to’ boat when the weekly ration of mixed gas for the runabout ran out, the first boat in the water after Spring breakup, and the last one put away in the Fall, this canoe saw lots of use, and we didn’t realize back then what a prize it was. Ideally, it would have been stored in a boathouse, or at least upside down each night, but we just dragged it up the beach, ready for use the next day.
As I recall, the seat caning lasted about a year or two, later to be replaced with vinyl material laced on through the original cane holes. I recall the ‘Peterborough’ decal on the king plank but that’s long gone. With the canoe, we received the sail setup, but lacking the requisite lee boards, or the skill to use paddles for directional control, we soon gave up on that. Unfortunately, the sailing equipment is also gone. (Until just recently, I had always thought that the sail and the deck and step fittings were homemade add-ons, not optional factory parts.)
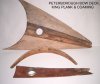
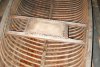
For most of its life, the canoe was stored in the cottage for the winter, but when it was no longer being used, Dad moved it under the cottage. Out of sight, out of mind. Sadly, about two or three inches of the forward and aft decks and king planks were damaged, along with about six inches of at the forward and aft ends of both gunwales, the supports it rested on having sunken into damp earth while in storage there.
A sibling had started the restoration many years ago, but stopped because of lack of a place to do the work - most of the finish had been removed in and out, luckily by stripping, rather than by sanding. Unprotected, the exposed outer surfaces had a gray, well-weathered look. It has since sat in dry storage in my care for about 15 years.
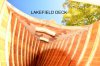
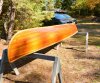
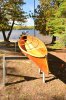
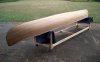
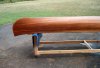
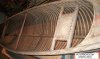
The second canoe, which we purchased about 30 years ago and still use, is, I think, a Lakefield – it has never had seats, so it would have been paddled in the traditional manner. It doesn’t have the walnut accent strip, and has narrower deck centre trim strips, perhaps because it also lacks the sailing provisions. It has three beefy thwarts and two, one-piece floorboards in lieu of the four-strip rack-type boards of the other canoe. It was restored by a previous owner – commercial aluminum strips were used for the stem bands instead of the original brass, (perhaps that was all that was available at the time), with a fairly large-area planking patch incorporated very well but without staggering the joints. But the hard work of cleaning it up and refinishing it has been done quite well. Overall, I would grade it as being in fair to good condition. For that canoe, I plan on temporarily removing two of the three existing thwarts and installing cane seats per the other boat. I’ll plug the mortises in the redundant thwart supports with removable blocks so the canoe can be returned to its original configuration if desired at some point in the future.
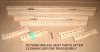
Initially, I removed the Peterborough’s seats, after installing temporary bracing to maintain the hull shape, to use as patterns for seats for the Lakefield. The seat frames basically fell apart – most of the 3/8 x 2” maple or birch dowels had rotted over the years, and were never glued in the first place.
That was the first time I really had a good look at that old boat, and apart from the stem and stern damage, it really is in pretty solid condition.
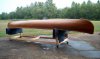
To assess the restorability from a cosmetic standpoint, I gave the exterior of the hull an initial cleaning, brushing on a ‘Wood Cleaner and Brightener’ (a.k.a. deck cleaner, containing oxalic and phosphoric acids) full strength and scrubbing with maroon 3M scotchbrite. Flushed with water, the results were amazing.
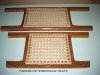
I also cleaned up the seat frame parts. After several applications of the deck cleaner and much scrubbing, most of the black staining was gone. I decided to restore the seats, rather than replace them, mainly for the sake of originality. I re-caned them after varnishing.
I initially thought that the floor racks would have to be replaced, but after several applications of the wood cleaner, it’s apparent that only one strip is damaged, but can be glued.
So, I’ve gone down the rabbit hole, eyes wide open, and started the restoration work on the Peterborough canoe.
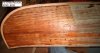
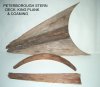
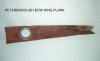
To do a proper job, the Peterborough ideally needs new gunwales (outwales) to replace both that are damaged at both ends and have cracked at the scarf joint amidships, and new decks, plus much TLC inside and out before refinishing. A small section (about 9” including the portion over the deck) of the aft stem band and the painter ring are missing, the unsupported band having broken away from the disintegrated deck, as well as a 9 ½” section near the stem-keel end. As I mentioned the king planks will need replacement as well.
The seat modifications of the second boat excepted, I’d like to restore both canoes to as close to new condition as is reasonably possible.
One, a Peterborough Canadien, I believe, (originally cane seats, a walnut accent strip below the gunwales and butternut(?) decks with wide, contrasting centre strips), has been in the family for over 60 years (I think it is probably about 75 years old). It is in what I would describe as poor condition. The ‘go-to’ boat when the weekly ration of mixed gas for the runabout ran out, the first boat in the water after Spring breakup, and the last one put away in the Fall, this canoe saw lots of use, and we didn’t realize back then what a prize it was. Ideally, it would have been stored in a boathouse, or at least upside down each night, but we just dragged it up the beach, ready for use the next day.
As I recall, the seat caning lasted about a year or two, later to be replaced with vinyl material laced on through the original cane holes. I recall the ‘Peterborough’ decal on the king plank but that’s long gone. With the canoe, we received the sail setup, but lacking the requisite lee boards, or the skill to use paddles for directional control, we soon gave up on that. Unfortunately, the sailing equipment is also gone. (Until just recently, I had always thought that the sail and the deck and step fittings were homemade add-ons, not optional factory parts.)
For most of its life, the canoe was stored in the cottage for the winter, but when it was no longer being used, Dad moved it under the cottage. Out of sight, out of mind. Sadly, about two or three inches of the forward and aft decks and king planks were damaged, along with about six inches of at the forward and aft ends of both gunwales, the supports it rested on having sunken into damp earth while in storage there.
A sibling had started the restoration many years ago, but stopped because of lack of a place to do the work - most of the finish had been removed in and out, luckily by stripping, rather than by sanding. Unprotected, the exposed outer surfaces had a gray, well-weathered look. It has since sat in dry storage in my care for about 15 years.
The second canoe, which we purchased about 30 years ago and still use, is, I think, a Lakefield – it has never had seats, so it would have been paddled in the traditional manner. It doesn’t have the walnut accent strip, and has narrower deck centre trim strips, perhaps because it also lacks the sailing provisions. It has three beefy thwarts and two, one-piece floorboards in lieu of the four-strip rack-type boards of the other canoe. It was restored by a previous owner – commercial aluminum strips were used for the stem bands instead of the original brass, (perhaps that was all that was available at the time), with a fairly large-area planking patch incorporated very well but without staggering the joints. But the hard work of cleaning it up and refinishing it has been done quite well. Overall, I would grade it as being in fair to good condition. For that canoe, I plan on temporarily removing two of the three existing thwarts and installing cane seats per the other boat. I’ll plug the mortises in the redundant thwart supports with removable blocks so the canoe can be returned to its original configuration if desired at some point in the future.
Initially, I removed the Peterborough’s seats, after installing temporary bracing to maintain the hull shape, to use as patterns for seats for the Lakefield. The seat frames basically fell apart – most of the 3/8 x 2” maple or birch dowels had rotted over the years, and were never glued in the first place.
That was the first time I really had a good look at that old boat, and apart from the stem and stern damage, it really is in pretty solid condition.
To assess the restorability from a cosmetic standpoint, I gave the exterior of the hull an initial cleaning, brushing on a ‘Wood Cleaner and Brightener’ (a.k.a. deck cleaner, containing oxalic and phosphoric acids) full strength and scrubbing with maroon 3M scotchbrite. Flushed with water, the results were amazing.
I also cleaned up the seat frame parts. After several applications of the deck cleaner and much scrubbing, most of the black staining was gone. I decided to restore the seats, rather than replace them, mainly for the sake of originality. I re-caned them after varnishing.
I initially thought that the floor racks would have to be replaced, but after several applications of the wood cleaner, it’s apparent that only one strip is damaged, but can be glued.
So, I’ve gone down the rabbit hole, eyes wide open, and started the restoration work on the Peterborough canoe.
To do a proper job, the Peterborough ideally needs new gunwales (outwales) to replace both that are damaged at both ends and have cracked at the scarf joint amidships, and new decks, plus much TLC inside and out before refinishing. A small section (about 9” including the portion over the deck) of the aft stem band and the painter ring are missing, the unsupported band having broken away from the disintegrated deck, as well as a 9 ½” section near the stem-keel end. As I mentioned the king planks will need replacement as well.
The seat modifications of the second boat excepted, I’d like to restore both canoes to as close to new condition as is reasonably possible.
.JPG")
.JPG")
.jpg")
.jpg")
.jpg")
.jpg")
.jpg")
.jpg")
.jpg")
.jpg")

.jpg")
.jpg")
.jpg")
.jpg")
.jpg")
.jpg")