1915 OTCA 17’ Restoration - SCKC Jax Fl

Big E

Curious about Wooden Canoes
Hello, This thread will show the steps taken to restore a 1915 Old Town OTCA 17ft wood and canvas canoe. The canoe was donated to the Seminole Canoe and Kayak Club (SCKC) by the family of former Club Commodore John Mann.

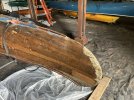
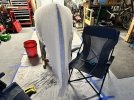
The boat was in somewhat rough condition - cracked and battered, but appeared to be a good candidate for repair.

This will be my first experience with wood and canvas construction. I do know some about woodworking and canoes. I am building a Rushton inspired sailing canoe and set that aside, after completing the basic hull and deck, to take on this project.

Here are some photos of the initial condition.


IMG_3189.jpeg
IMG_3196.jpeg
IMG_3198.jpeg
IMG_3187.jpeg
 
We started this project with research. An email to Old Town (JohnsonOutdoors)with the serial number received a quick response with a copy of the build sheet and the catalog page for this model. Thank you very much. This confirmed it was indeed and OT OTCA. The next step was to get educated about these boats and their construction. Thankfully I located a copy of The Wood and Canvas Canoe (Stelmok/Thurlow) at my used book store, which turned out to be a First Edition. Wonderful!
IMG_3214.jpeg
1915 build card.png
 
I used the sage advice in the book to do a visual inspection and then put together a repair plan and cost estimate for club approval. SCKC is a non-profit organization and we saw this as an opportunity to preserve a piece of history for current and future generations to experience. My initial intention was repair for use, not a full “restoration.” As such I came up with a basic budget around $1000 to replace/repair the broken ribs and put new canvas and paint on.

The club approved the project and authorized the removal of the canvas to get a better idea of the condition and extent of repairs.

Our first discovery was that the boat had been repaired previously, perhaps 20-30 years ago, with fiberglass covering the hull in place of the canvas. The repair included the installation of what appear to be authentic OT Mahogany outwales, new white oak seats and matching white oak deck comings. The keel was made of cedar, installed over the fiberglassed hull, then sealed with a layer of chopped cloth fiberglass and polyester resin.
The keel came off in chunks. We found the top of each stem was gone, the bow more than the stern, and had been repaired with cloth tape and body filler under the fiberglass
IMG_3919.jpeg
IMG_3732.jpeg
 

Attachments

  • IMG_3719.jpeg
    IMG_3719.jpeg
    278.9 KB · Views: 19
The fiberglass came off remarkably well with the help of a heat gun and careful lifting with spackle knives. It seemed the cloth had been put on dry, then the resin applied With only a few areas soaking though to the thin planking. A few of these areas required new planking.

Overall, the exposed hull did not reveal any significant new damage. With the wales off we could see the rib top damage at both ends, and numerous cracked ribs probably associated with the large hole in the fiberglass on the port side. We decided to move ahead with the repairs.

I placed an order for all the canoe specific supplies with Northwoods Canoe Co. consisting of a bunch of rib material, tacks, screws, canvas and filler.

Then I wrapped the hull up and transported it to my garage to get started on stem repairs.

The planking was in pretty good condition, but the top of the front stem was completely missing. I used the planking to template the new stem, and referencing other OTCA restoration photos online, restored the missing 1” at the peak. From cardboard, to plywood, then Ash.
IMG_4185.jpeg

IMG_4105.jpeg
IMG_4155.webp
IMG_4181.jpeg
IMG_4178.jpeg


IMG_4280.jpeg
 
With the stem tip establishing to tip of the bow, I could then work on the rest of the rotted and missing inwales and rib tops. The inwales required my first adventures in steam bending. So I built a small 6’ steambox with removable rack powered by a wagner wallpaper steamer. At first I tried to bend an inwale using the boat as the form. This didn’t work for me, so I built a form, and after several attempts arrived with new spruce inwales that matched the curve of the 20” decks
IMG_4279.jpeg
IMG_4319.jpeg
IMG_4386.jpeg
IMG_4383.jpeg
 
My shipment from Northwoods Canoe arrived very quickly while I was figuring out the inwales. Now that they were in place, I used the new rib stock to fix the cracked and rotten rib tops in the bow. Once both sides were ready, I could then fit the original deck. This turned out to be a clamping challenge, but eventually everything fit together nicely.

IMG_4328.jpeg

IMG_4346.jpeg

IMG_4358.jpeg

IMG_4359.jpeg
 
I started working on the stern framework stem shortly after I got the front stem piece in place. The stern stem and inwales required much shorter repairs and I was able to do this while keeping the rear deck in place. Next would be rib repair.
IMG_4361.jpeg
IMG_4360.jpeg
 
The dots on the stern inwales are toothpicks used as dowels to help locate and strengthen the scarf joints.

Moving onto the ribs; the job went pretty much as planned. Remove one rib here, one rib there, never 2 next to each other. Measure the old ribs (tape the pieces back together as needed. Cut new rib a little long, flip the boat and use the old rib to find the spot on the hull, about 1 rib toward the stem, where the new rib will be bent over. I marked the bending area with chalk as tape did not stay well. I also made a “keel” strip, held in place after the chalk marking, by screws through the existing keel holes. This strip kept tge middle of the rib tight to the hull and helped with the bending process. Then steam, bend, clamp. Let dry. Then flip the boat upright again, fit the new rib and tack/clinch it in place. This also required several hull rotations to get a workable hammer/clinch dolly situation. I did a couple ribs initially then started doing 4 or 5 at a time.
IMG_4414.jpeg


IMG_4445.jpeg
IMG_4456.jpeg
 
The more I moved the boat, rolling it over then on its side and upright again, additional rib cracks became apparent. As I removed a rib it would be cracked already, a hairline crack I couldn’t see easily without a trained eye. It seemed a strike to the hull or possibly, just dropping it at some point, had cracked virtually every rib down the starboard side. That and the 110 year old white cedar was super brittle. Several ribs cracked during removal. Our intention with the boat is to use it as a living piece of history. So, no rib top repairs in the body of the boat. I decided to remove, inspect, and replace any rib with damage. As it turned out, just about every rib in the forward half was replaced. There are 3-4 ribs from the previous repair that were solid and I left in place.
IMG_4587.jpeg
 
The front of the boat was looking real good to me, happy with the progress. I put the boat in my garage August 14th, 2024 it was now Sept 28. I forgot to mention it earlier, but I spent the first several days stripping the varnish from inside the boat and giving it a good cleaning. This gave me a better look at the wood and certainly helped with rib removal.

I didn’t like the look of the new wood in contrast to the original wood. One approach would be to let the wood age gracefully, I thought that would be an odd look for this boat, with a rebuilt front stem, front ribcage, some 1970s(?) era repair ribs in the middle and then a mix of original ribs and new in back. A real patchwork. By now I suspected most needed to be replaced which would make the boat look new inside. I had planned on staining the stem repairs, and ultimately chose to stain all the new wood to maintain the well earned patina look of this survivor.

I tested about 6 different stains and settled on Minwax Early America #230, the name alone was certainly appropriate. Gunstock was a close 2nd.

I stained the bow structural repairs and the new ribs, ended up staining the interior planking because it kinda went everywhere when I did the rib edges. Keep in mind this boat is water bound, not a museum piece.

I used my now seasoned eye to carefully inspect the ribs in the back half of the boat. About what I expected, same issues as the front. There was a consistent crack along the keel, and a shorter section along the port side showing hairline cracks across several ribs. Combined with bad rib tops - I ordered another shipment of ribs and tacks from Northwoods.

IMG_4545.jpeg

IMG_4410.jpeg
 
At this point, early October, I spent some time on wood safari, visiting my local home improvement stores for clear rough sawn western red cedar for the planking repairs. Ended up with a beauty. I had a couple new ribs to work with and started in on the rear repairs. Then the rear inwale broke at a seat hole. Not to worry - we have challenges and work through them.
IMG_4552.jpeg
IMG_4550.jpeg
IMG_4553.jpeg
 
The second supply shipment arrived within a few days, thanks again Rollin and Co at Northwoods Canoe Co.

By now I was pretty confident with the rib work and finish the them on Oct 17th.
There is 1 original 1915 rib remaining. I thought it was cracked and removed it to find it was in excellent condition. So it is now the Heritage Rib. Lol.

Before staining the rear section, I chose to repair the planking next; seeing as I had stained the front planking already.

I cut the cedar lumber into planks that matched the existing plank width. Ensured I trimmed each repair to span at least one full rib. The hull appears to have received a lot of new planks on the bottom during the previous repair.

IMG_4588.jpeg

IMG_4606.jpeg
IMG_4635.jpeg
IMG_4624.jpeg
 
I’m not quite done with the woodworking. The boat is missing a floorboard according to the build sheet, and I need to make a new keel.

The keel is made of Ash, 3 pieces scarfed together, from the same 7ft board I bought for the stems. I cut the keel parts, rough fit them and set them aside until the hull was done and the boat was ready to it. Easier to store the pieces than an assembled thin strip 15 feet long. When we removed the existing keel at the start of the project, I cut an end off and saved it to template the new keel. I also took a few measurements to help with the placement of the new keel.

Following the keel work, I put 2 coats of boiled linseed oil on the hull. The intent is to put some fresh oil/moisture into the ol planking and provide some water protection before the canvas goes on. That curred for a few days while I started making the floorboard.

IMG_4753.jpeg
IMG_4751.jpeg
IMG_4759.jpeg
 
The floorboard was made of Northern Spruce, strips cut from a locally sourced 12 foot long 2x4, took some digging to find a good candidate. Cross pieces and latch bases are cut from rib scraps. Assembled with clinched tacks and held in place with brass toggles cut from small piece of flat stock with brass screws. I’m getting ahead of myself a little bit with the photos but wanted to keep the floorboard information together in one post.

Concurrent with the floorboard work, I also refinished the thwarts, stained the rear of the hull and then put down mor boiled linseed oil in the interior. As you can see, the canvas was not far away.
IMG_5787.jpeg
IMG_4788.jpeg
IMG_4787.jpeg
IMG_4874.jpeg
 
After completing the floorboard construction and applying the stain and BLO to tge hull, I moved on to Canvassing- Finally! It is now Dec 2nd. I been pulled away several times for life but kept chugging along bit by bit. I test fit the canvas, spread it out and gave it an overnight to relax on the hull.

I’ve read A LOT about the canvassing step. Too much perhaps. I considered many options and did some testing with the canvas I had purchased from Northwoods Canoe Co; the recommended #10 treated stuff.

I decided to try hand stretching it. No elaborate set-up of winches and pulleys, no hanging the boat in an envelope, nope, let’s just put it on by hand. I chose staples, corrosion resistant stainless of course.

I put a few staples on the keel line amidship, then stretched the canvas over the bow stem and secured it with spring clamps. This got the keel line tight to the bow, I captured that tension with a few staples at the base of the stem, about where the keel would start. Then moved back to the middle and started pulling and stapling along the gunnel, working each side a few ribs before switching to the other side. I did this up to where the canvas would need to be cut to finish the bow.
Then I did the same thing on the aft section, with a slight difference. I pulled the midship staples from the keel line and stretched the canvas over the stern so that the tension along the keel line looked good end to end. I clamped the canvas in place and captured the tension at the base of the stem again. Now it was just more stretching and smoothing to staple the canvas down doing a few ribs each side, back and forth. I left the ends for the next day. There is bedding compound on the stem, then the first side is stretched and stapled. Then trimmed and more bedding compound on top. The other side is stretched and stapled then trimmed. The whole thing went well and rather quickly.

IMG_4810.jpeg
IMG_4822.jpeg
IMG_4833.jpeg
IMG_4837.jpeg

IMG_4840.jpeg
 

Attachments

  • IMG_4844.jpeg
    IMG_4844.jpeg
    291.7 KB · Views: 18
I had some more unexpected damage during the canvassing, toward the end of the job I lost my grip while turning the boat over to finish the top of the stems. The boat dropped on the stand and I heard a loud CRACK!
Another section of inwale broke at a seat mount hole. I fixed that and then did some additional work on the other remaining holes.
The holes had been drilled out previously, with a dowel glued in, then redrilled for the seat bolts. The old glue was failing, dowels were coming loose and the holes were so larger there wasn’t much inwale left. I cleaned the holes out and filled with thickened epoxy, then drilled new seat holes.

Moving along, I was using the book for reference and missed the note Rollin includes with the supplies about not toasting the treated canvas. The note was in the box with the filler which I had opened, but hadn’t unpacked yet. Oh well, it’s just lightly toasted. Followed by a quick hot water wipe down to clean off any ash or debris.
IMG_4897.jpeg
IMG_4848.jpeg

IMG_4884.jpeg
 
The canoe sat for three days, then on Dec 9th I put on the filler. I was over the hump, it was a boat again. Nothing to do but wait for paint and final assembly in 6-8 weeks.
IMG_4894.jpeg
IMG_4898.jpeg
 
I enjoyed a nice Christmas season with friends and family, patiently visiting the garage to test the filler every few days.
Early January I refinished the seat frames and installed new woven cane mat.

Right around Valentine’s Day the keel area was pretty dry, but the stems were still setting up. So I spent a few days finishing the keel and installing it. This too had its challenges.

The new keel was perfect-perfectly straight end to end and perfectly flat along the keel edge with the proper concave groove for the bedding compound. The hull however - was not so perfect. I had a low spot near the center of the boat and ended up with a 1/4” gap there between the keel and hull. Time for some more thickened epoxy. Then a few screws and the keel was done. The stems will need more cure time
IMG_4634.jpeg
IMG_4928.jpeg
IMG_5153.jpeg
IMG_5154.jpeg
IMG_5163.jpeg
IMG_5167.jpeg
 
Feb 19th now, 6 months I have been staring at this boat taking up my garage. The stems are set. Time to get rolling.
First was a light sanding and prep. I’m going to be using Rustoleum marine top coat paint and used Rustoleum Universal Bonding Primer for the base coat, 2 coats actually.
The canvas was trimmed and the gunnel was fitted, a few repairs, treated with several coats of Teak Oil, then installed. It was really starting to look like a boat now! I suggested we paint the boat the original red color, using locally available paint which will help with upkeep. The club agreed and the results after 4 coats of color are beyond my expectations.
IMG_5178.jpeg
IMG_5180.jpeg
IMG_5202.jpeg
IMG_5207.jpeg
IMG_5210.jpeg
 
Back
Top