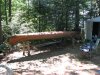
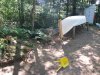
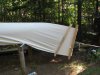
When I went to see Bill Clement and get some supplies, I was shown HIS way of doing the upside down canvasing.. It consisted of a narrow "bench" on small wheels. the top rails were padded and the canoe fit over it upside down. the shackles were mounted on the floor at the right angle to stretch the material.. After finishing the canvasing, he had a portable stand that could move around and was convenient for the filling and storing.
I improvised on his system and made a stand and took the angle to the base of a tree at one end and stretched my canvas using the comealong on the trailer hitch on the end of my vehicle...It worked perfect and was very stationary and stable...He also had a small stool on wheels that he could move along and it contained a pocket that he kept his supplies in...I also improvised on that and it was a very comfortable way to progress along with the canvasing..I have completed a huge wood and canvas boat, and just finished a 16 OTCA...When you dont have a ceiling to brace your canoe in a pocket...This is an easy solution.
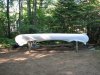
PS: when the fill is cured, it also serves as a perfect way to set the canoe on to paint it and the height is just right to see all areas as you go along.
Just passing on another way to do it the "upside down " way....LUV IT!/B]
"Its not hw many strokes of the paddle it takes to get you where your going, its the JOY that is in the journey"......Blue Viking