Stem Repair on my Otca 17

Hodtay

Curious about Wooden Canoes
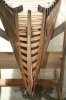
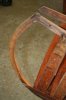
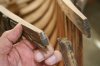
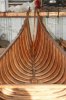
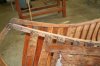
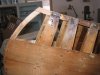
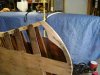
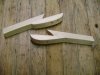
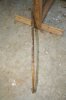
I opened up the bow today to determine how to restore the stem and the ends of the inwales. I think I'm going to replace the stem rather than splice it and repair the split inwale ends with epoxy.

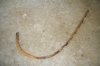
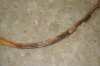
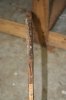
I attached some photos. I hope you can see how warped the stem is.

Any comments or suggestions?

Steve
 

Attachments

  • 001.jpg
    001.jpg
    27.1 KB · Views: 322
  • 003.jpg
    003.jpg
    21.5 KB · Views: 335
  • 005.jpg
    005.jpg
    32.8 KB · Views: 307
  • 008.jpg
    008.jpg
    33.4 KB · Views: 309
  • 007.jpg
    007.jpg
    47.3 KB · Views: 300
I would splice the stem forward of the cant ribs where it is still straight. Use the old piece as a pattern for a form to steam bend the new piece and use an 8-1 or longer splice, or birds mouth as in the picture. Pete
 

Attachments

  • bow6.jpg
    bow6.jpg
    161 KB · Views: 299
laminate

Another option I don't think has been mentioned is you can laminate a new stem from multiple thin strips, or a use thicker strips and some steam bending to assist prior to laminating.

I'm steam bending thinner strips this morning for my stripper project.

Fitz
 
Beak approach

I put the beak on the new stem tip and cut it about twice as deep as Pete does. I do so because it seems to me that if there is a chance of forces splitting the beak, it would ruin the repair and not further degrade the old stem. With the beak reversed, I think the forces on the top edge of the new tip will be transferred to the outer leg of my beak, which if stressed would be in shear and a stronger solution. This is especially the case if you do not add screws to the joint. Lots of ways to skin this cat, I guess.
It will be helpful to drill pilots for the reattachment of the planking where the joints are. Copper coated steel weatherstripping nails work great for this, and can be had at any hardware store. Dave DeVivo
 
I don't yet have a steamer

so I guess I should start looking into how best to build one. When I built my cedar strip canoe stems I just cut thin strips of ash, buttered each strip face with Tite Bond glue, wrapped them around the stem form and clamped them overnight (photos below).

I'm getting some helpful input on how to repair my stems. I think I'll put this project aside for a couple days and let the ideas settle in a bit. I had just finished five hours of stripping and cleaning the hull when I began looking at stem repair, probably not the best time to make a rational decision about a tedious task. I'll take advantage of today's 80 degree weather for a paddle with my dog.

So far I've seen photos and videos of all type of steamers. Is there a preferred design? Size? Horizontal? Vertical? Propane? Electric? Steel? Wood? I have the room to not have to deal with a portable or temporary set up and I would like to eventually build chairs for the dining table I built.

Thanks.

Steve
 

Attachments

  • 027.jpg
    027.jpg
    74.3 KB · Views: 219
Locaton of stem splice

Example photo shows a nice example of a birds beak splice but the splice is relatively close to the deck. Mine would have to be 12" below the deck so I probably can't avoid a laminated or steam bent repair stem.
 
As an experiment, with little to lose, have you thought about steaming the stem in place, and clamping to a jig with an opposing bend? You can make a cheap temporary steam box out of white Styrofoam insulation board duct taped together and sized to fit over the stem in place, stuff up the ends with rags, stick a steamer hose in it, let steam for an hour and clamp to a 2 x4 milled with an opposing bend. May work, may not, likley will not be perfect, but another idea....
 
Last edited:
Easy steamer

Another easy steamer for a few pieces at a time is to use a piece of stovepipe, some fittings and a hose and your trusty old camp stove. A wad of chicken wire in the pipe will allow the wood to ride high and steam evenly.
 

Attachments

  • Steamer2.jpg
    Steamer2.jpg
    127.9 KB · Views: 244
I took the bow stem out

I removed the planking low enough to expose the old stem splice. I grabbed the straight portion of the stem near where the serial number resides and gave a light tug. The stem loosened up and two ring-shank nails later the stem came out. I wasn't intending to remove the stem but as poorly as it was secured I dont think the stem provided much strength in an area subject to obuse. Looking at the stem, I'm glad to replace the whole thing. I attached some photos.

Steve
 

Attachments

  • 001.jpg
    001.jpg
    63.5 KB · Views: 259
  • 002.jpg
    002.jpg
    67.5 KB · Views: 275
  • 004.jpg
    004.jpg
    37.8 KB · Views: 246
  • 005.jpg
    005.jpg
    22.3 KB · Views: 250
Back
Top