Rib Bending

113932

Curious about Wooden Canoes
I am having trouble getting my newly bent rib to lie flat in its new position. I started tacking it in, but quit stopped when I realized that the complex curves were not lining up. In the curvature of the bilge, one edge of the rib is flush, while the opposite edge is elevated by about ¼ inch. Any suggestions?
 
113,

Well, based on a lot of reading and responses from the members here, this is what I do.

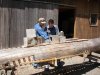
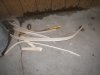
I bend my ribs over the outside and let them dry a day before installing them in the canoe. I am careful to not remove too many ribs in one place, at the least 1 only with preferably 2 between removed ribs.

I carefully measure the inside distances and find the same distance on the outside.

The rib is quickly and tightly bent over the outside and clamped in place, effort is made to make sure it's laying flat against the hull.

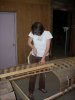
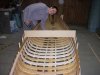
The next day/night the rib is dry and placed/fit check inside. IF it lays flat against the hull along the full length, it is tacked in, starting from the middle planks, working toward the rails. If I can't get it flat it isn't tacked in.

This seems to be a lot of putsing but once I started using this process, I haven't had a bad rib yet. Prior to using it, I had plenty of bad ribs, including a couple that took 3 tries.

Being that I do this for fun and am not trying to live on canoe work, I don't mind spending more time getting something done.

BTW, the suggestion is to rebend a rib following the above process.

Dan
 
I'm in no way authorized to give advice, as I've only bent and installed ribs once, so I won't give advice, I'll more share where I went wrong.

Even though we only replaced one rib at a time, the amount of force required to make the new rib conform to the hull was definitely enough to deflect the planking. The result: by the time we replaced six ribs our so-called canoe was a hopelessly lumpy boat, which we unsuccessfully tired to fix with water and alot of weight (see picture 1). We also broke several ribs in the process (see picture 2)To fix this we wound up removing that entire section of the boat save the inwales (picture 3), and used hardwood batons to redefine the shape of the hull (see picture picture 4). I doubt the shape is exactly what it used to be but at least it is pretty and fair. I think if you braced the area with batons to provide reinforcement for the planking before trying to put new ribs in you would have a much better result that we did.

We also found it really helpful to immediately install the ribs after removing them from the form. We found that they relaxed significantly even after they had dried for a day.

We also found it helpful to re-wet the bilge area of the rib with boiling water just before installing it.

I don't know if any of this is useful, but maybe these pictures will make you feel better by seeing our rookie mistakes.

Try not to get as discouraged as I did in this stage. While the Stelmok/Thurlow book, which I assume you're using too, is immeasurably helpful, They made things sound a lot easier than I found them to be, and I found this really discouraging. I definitely lost some sleep in this stage of the process, and was about ready to pour the left over stripper on her and toss in a match, but we just kept trying and ultimately it worked out (see picture 5)!

Good Luck!
 

Attachments

  • lumpy boat resize.JPG
    lumpy boat resize.JPG
    100.5 KB · Views: 402
  • rib carnage resize.JPG
    rib carnage resize.JPG
    80.6 KB · Views: 367
  • Missing Middle resize.JPG
    Missing Middle resize.JPG
    176.7 KB · Views: 395
  • 6 New Ribs Installed resize.JPG
    6 New Ribs Installed resize.JPG
    185.4 KB · Views: 405
  • 19 Finished resize.JPG
    19 Finished resize.JPG
    188.2 KB · Views: 392
Neil B - That's quite a confession - something most of us have to share but have not shared.

It does sound that you never got the ribs hot enough. I soaked mine over night in the bottom of the neighbors pool and steamed them in a sort of rube goldberg device made from sewer pipe, a paint can, and a coleman stove. I used a batten on the keel of the canoe to slide the ribs under, then used the canoe (about 2 rib places to the smaller end from where the rib would be placed) as a form. They bent very very easily. The ribs fit very well, went in easily and stayed bent after being in the form over night.

Photos here:

http://www.canoehullabaloo.com/beeby-canoe/intro.html
 
At the risk of being flamed here but I have to ask. Did you by chance turn the rib around when you moved it from bending over the outside to the inside? I assume you bent it over the outside of the hull??

It sounds to me like that could have happened. Depending on where the the rib is along the length of the boat it will have a differing degree of directional lean to it. Just a thought.

I also don't leave the newly bent rib clamped in place very long before transfering it to it's spot in the canoe. I follow Jerry Stelmok's advice from his book (page 225-226) and leave it for a minute or so (or until I can handel it comfortably with my bare hands) to get a rough set on the rib, remove it to transfer it to the inside, pop it into place, press down on the ends to get it to conform to the hull (don't over-do this), clamp the ends and start tacking if all is well. The warm, right out of the steamer still has some give to it and is quite easy to fit properly. Works slick and haven't had a problem yet.
 
In my experience

I have replaced alot of broken ribs. All but 7 in one canoe.
Also, they can get installed in a new canoe wrong as well. For the new canoe I unfasten the rib ends and move the rib end fore or aft as the need may be to get it to lay right.

Installing one rib in a canoe is similar. Move it fore/aft so it lays in the right plane. Push down on the rib end to get it to fill out the space. I think you can do it with a rib right out of the steamer or one that was bent over the outside of the canoe and left for a couple days.

If things don't go well. Take a break. Think it over and then go at it a bit different.

And is it possible you reversed it like Scott suggested? That would throw it way out of whack.

The hundredth rib goes in alot easier than the first one. ;-]
 
Rib

Thanks for all the tips, suggestions, and comments.

I pulled my 16 tacks, and freed the rib. It looks like I bent the rib with the taper facing the end, and tacked it likewise. I plan on rebending the rib with the taper facing amidships. I am using the boiling water and towel method.

After this experience, I am not anxious to replace two other ribs that are only half-way-cracked.
 
If the canvas is off, now is the time to replace *any* cracked ribs. Do not despair. I still think you never got the ribs hot enough to become really bendable.
 
that would do it

With the taper wrong it would look all wrong when it layed flat. It would cant the wrong way. So you are learning. The towel and boiling water method is tough to have success on a 5/16" thick rib. If you can find some way to actually steam or boil the whole thing it'll work much better.
 
take heart

I'm no expert but here is my two cents. I'd replace any cracked ribs while the canvas is off. I had to replace seven ribs on my Propector and I nearly talked myself out of replacing two that were only cracked. Now I'm glad that I replaced them all, it feels a lot better when you're done. One cracked rib was under the stem and I worried a lot about doing it but when I replaced it I kept the rib in the towel for about 20 minutes, boil up some extra water and keep the towel really hot and steaming. I initially clamped the rib to the outside of the hull, let it sit there for a couple of minutes and then moved it to the inside. This worked really well, the rib was still soft and pliable and I tacked it right then.
Good luck and take heart, its a learning experience but the trip is half the fun.
 
Back
Top