opinions please

Craig Johnson

Lifetime member
I am working on a 1910 OT Charles River double gunwale. Compared to some boats on this site it is not that special but it is my oldest and rarest boat. On my first boat which was an 56 OT guide I replaced everything that wasn't perfect because I wanted to learn how, 20 ribs,1/4 of the planking, inwales, outwales, decks, spliced stems. This boat although previously restored has no replaced ribs or planking. The inwales are swiss cheese and outwales need new tips but I have decided to try to repair instead of replace as much as I can. With that in mind I decided I would do a backside repair on 5 cracked ribs. I would rather see the crack than a replaced rib. DSC_0886.jpg 
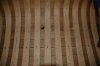
I only need to remove one plank but that isn't wide enough for a very long spline let into the back of the rib, but removing the full length planks on either side presents other drawbacks, so I decided to remove the ribs, do a nice long backside repair, and then put it back in. When I got the first, and worst, rib out I discovered the crack only went about a third of the way throughDSC_0888.jpg and flexing the rib I found it to still be quite strong. I believe that removing wood from the back side and epoxying in a spline can only make it weaker. So, I am back to complete replacement or putting it back in and doing nothing. Since the hull is quite true and the plank will be replaced I am leaning towards doing nothing and saving as much original wood as possible. Your thoughts please. Thanks.
Craig
 

Attachments

  • DSC_0885.jpg
    DSC_0885.jpg
    265.7 KB · Views: 190
Craig,

Seems like this is "snowballing" on you. :)

I've only done a few so I'll be interested to hear what others think.

But, for me, the whole purpose doing a backside is to avoid removing/replacing the rib, so for me, removing a rib and then doing a backside just isn't gonna happen. If I remove a rib, it gets replaced.

In this case, IF those ribs you show are the only ones broken, and the rest of the wood is reasonable, I would consider a "backside" repair. BUT not being a purist, I don't bother with a splint. I carve out a cavity about 4" long x 1.75" wide and about 1/2 or a bit more the rib thickness deep. I taper the ends of the cavity. I then mix up some "peanut butter", ie, wood flour filled epoxy resin, and fill the cavity flush or just slightly proud of the rib surface. I believe/suspect that the resulting epoxy "plug" is stronger than virgin cedar.

As for the cracks, remember that the load on the ribs is from the outside, ie, the water pushing up, and the outside area of the rib where the crack is/starts is/has the highest load. So when you "test" a cracked rib, push up from the bottom, and you'll see the crack open up as the rib deflects.

Dan

btw, if this was mine and I was planning to use the canoe more then a little, I'd replace them. On the other hand, if it is one of a collection and will rarely get used, then the backside.
 
I think it was Peter Mueller (?) who suggested this, for ribs that aren't broken all the way through. Push the rib from the outside, which opens up the crack. Push epoxy into the crack (peanut butter" is good). Then let the rib go back to shape, and remove the squeezed-out excess goo.
 
I think a 1910 OT Charles River double gunwale is a pretty special canoe... and certainly plenty rare and historically significant as well. Glad to hear she's getting a proper restoration!
 
I consider the opportunity I had to work on a 1909 OT CR Double Gunnel a privilege and just as rewarding as the opportunity I've had to work on our IG. Both are an eye full, very special.
 
Don't know if this will help....but I found this article from the Wooden Canoe Builders Guild Fairlines Spring 2011, very useful in repairing ribs, from the front-side (I realize that Craig was looking for opinions on backside repair):

Front-Side Rib Repairs By Luc Melancon p.15, Fairlines, Spring 2011

Being the laziest person in the world has played a major role in the fact that I tried to repair ribs without removing them, and in some case when the rib is broken flat, it works.

At first I used my sander with the round sole but it used to eat the other ribs on each side.

So, with a narrower sole equipped with 60 grit sandpaper, it does the work. The idea is to grind the rib to about 1/16th of an inch. It will grind the tacks as well, so no need to worry about trying to remove them.

The plug has the same shape as the sole, so it fits nicely in the ground area. Of course it takes a little sanding to make it fit properly and the remaining microscopic gaps will be filled with West System microfiber adhesive filler.

To prevent the plug from moving when fitted in place, I normally put two small tacks on and cut the heads so it will not try to leave when set in position.

The plug will then be glued with epoxy and held in position with two sticks for as long as it needs to cure. Of course, if we can remove planking in the area, it is easy to hold in place with clamps.

When cured, it will be sanded, stained and with a little maquillage it almost disappears.

Working with a rubber mallet and 60 grit sandpaper works very well to age the wood and give it the look of worn out rib.

Of course it will show a little, the wood grain being slightly different and the age of the wood, but then you have to look for it to notice there has been a human intervention in that area.

Actually, the toughest part is to make it disappear.


I would have dowloaded this entire issue of Fairlines since I was unable to include the photos from Luc's article since it was in pdf form....but I was unable to since the file exceeded the capacity limitations for such downloads....so the written part of the article will have to suffice....Fairlines are being included on the current WCBG website....although this issue has yet to be downloaded....I assume it will be shortly....I trust Luc and the Wooden Canoe Builders Guild are OK with this being shared here....

Hope this may help....
 
A double gunnel Old Town is one of the very few canoes that I would consider rare enough to use a backside rib repair. In order to make it as simple and original as possible, I don't remove any planking. I simply use a knife to cut through the planking and into the rib. Remove only the tacks within this area, and chisel out the wood. A wooden splint may or may not be necessary with the thickened epoxy. Put wax paper and duct tape over it and allow it to dry. Grind it fair and hope for the best.
 
I like it, leave it to Gil to have a better way.

Dan


"I don't remove any planking. I simply use a knife to cut through the planking and into the rib."
 
Back
Top