Inwale frustration

Howard Caplan

Wooden Canoe Maniac
I've been fiddling for too long with with scarfing the inwale ends. I know it would be simpler to replace the complete length with new but, I am afraid of damaging the rib tops while removing the ringed nails.
Is there a good, foolproof way to remove ringed nails with minimal damage?

Howard
 
Howard,
Depending on the age/condition of your boat, I think you will find that the inwale nails come out pretty easily - they are likely steel and not ringed and may have corroded. That said - you do have to be careful on the rib tops. I used a heavy piece of galvanized sheet metal or an old 2" putty knife to protect the soft cedar when pulling the nails - pry against the metal.
 
Or use a short hacksaw blade to cut the nail between the rib and rail, after slightly seperating the rib and rail.

Dan
 
Boy

take a good hard look at it before replacing the whole inwale just because the tips are shot. If you dont have more than 6 inches to replace, seems like alot of work to replace the whole inwale. Just sand a nice gradual taper in the inwale and transfer it to a pc of the same wood. Just keep it oversized so you can get the scarf joint correct, then go after shaping it to match the canoe afterwards.
 
Agreed,

Also, I keep old rails to use as stock on tips, to allow me to get the best match I can with grain, color, discoloration and shape.

Dan
 
taper

I save my cut-offs when I taper an inwhale. They work well as replacements for when an inwale splice is needed. I think I have a photo. then it's just a matter of staining it. Saving old rails sounds like a great idea.
 

Attachments

  • 100_1953.JPG
    100_1953.JPG
    92.3 KB · Views: 388
Cool, I'm splicing in ends on my White 16 foot Sport. Anyone mind sparing some old gunwale stock, I could sure use some. Enough for 6 inch splices on inwale ends.:)
 
Thanks to all.
I do have one section that's about 8" replaced. You are all correct - don't replace whole gunwale.
I am on a learning curve and I have now done almost everything wrong. Today I am doing it correctly.
Dave, your pic of inwale scarf is an excellent example. I printed it and it will be taped in the boat. I have been trying to minimize the length of the scarf to no avail. Even though I read here and elsewhere to make the scarf length as long as possible, I had to do it wrong and I had to create a lot more work for myself first. I'm over that. Now I know but I will continue to learn everything the hard way - my defect.

howard
 
Your Project-riddled Project Boat

Hi Howard--

I've been following your frustrations with much interest and a bit of chagrin. It will eventually be such a lovely canoe that Amy will forget all the frustrations.

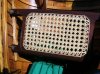
Now, about those seats: There's currently a 1946 Penn Yan on eBay that may have undergone the same "solution via plywood" that yours was subjected to, back when the canoe builders lost their caning supply. This eBay canoe has seats with machine-woven cane and not the plywood inserts. The seat frames appear to be Penn Yan and not some other replacement. My thought is that someone removed the plywood inserts and modified the seat to accept sheet cane. I could be wrong, but I think Penn Yan canoes had hand-caned seats, even into the fifties... they used the "canoe weave", which skips a step. Someone else here may know whether Penn Yan ever used sheet caning in their seats.

I wrote the seller of the eBay Penn Yan and asked if they could feel any holes on the underside of the seat. (The war-era Penn Yans had plywood seats fitted into a routed-out area of a seat built to be hand caned. I don't think cane was used in canoe seats again until 1947). Maybe the whole seat was remade on this eBay canoe, but the seats have the distinctive Penn Yan look, and if one was carefully making that identical seat frame, I would think they'd drill holes for hand-caning.

Anyway Howard, I just thought I'd let you know there may be a way to cleverly modify those war-era seats to make them more comfortable and attractive-- and I decided to post here in case anyone else has a similar problem.
 
Thanks Katherine,
no chagrin necessary. I wanted this because of all the lessons I can learn.

The seats do have holes drilled. I will pad out the rabbitt cut that held the plywood, redrill the holes through the pad piece and turn it over to the bookkeeper in our office who is a traditional Navaho weaver and has the patience to sit and weave the cane seat. She has already googled up how to weave a cane seat and it's my choice as to pattern.

Howard
 
Great, Howard! As I said, your canoe will be grand.

I'll attach a picture of a Penn Yan seat with the "canoe weave" pattern, which I believe is what PY used. It's a bit easier to weave because it skips a step, and I think the seat is a little bouncier but without compromising strength. Looks to me like the same gauge cane is used throughout, rather than with 7-step, where a wider binder cane is used in the final step (for the outside edge).

Kathy
 

Attachments

  • seat penn yan.jpg
    seat penn yan.jpg
    86.3 KB · Views: 272
Howard Caplan said:
I do have one section that's about 8" replaced.
Dave, your pic of inwale scarf is an excellent example. Even though I read here and elsewhere to make the scarf length as long as possible, I had to do it wrong
howard

Here is one more guide to use. Peter has been doing a nice job of showing some shop tips from time to time:
http://www.wooden-canoes.com/projects.htm
 
Imho

You will notice in the pictures of the scarf joints, one by Dave Wermuth above in post #6 and the other in the link to the Northwoods site that the direction of the joints are in opposite directions. The Northwoods site picture shows the original inwale on the outside and the new piece on the inside. It’s easier to cut the actual edge to be jointed on the original inwale if the rib tips are not in the way of saws, files and planes. Both ways will work but I do it the way shown on the Northwoods site.

If the new piece needs a vertical curve then use a thicker piece of stock and cut the curve in rather than try to bend it. Trying to bend an inwale tip with a glued joint will end badly with a lot of cussing at least. And don’t forget that the decks serve a purpose in holding the canoe together so make sure that you add a screw through the original inwale into the deck even if there was not one in that location originally. That way you’re not relying solely on the glued joint to hold things together. This assumes of course that the joint is made where the deck is located.

Just my 2 cents worth and you may be paying too much at that.

Good luck,
Jim C.
 
I smile now as I read through all these great techniques. The pics are very good.

And Jim C. yes - the opposite sides, the difficulty in cutting the old within the small space. On the one side, I started sawing with my Japanese saw and couldn't do much because of the space limitations. So, I took out my trusty rasp and went to work - it worked and I was able to easily match up the new piece to it using the adjustable bevel and some eyeballing. The other side sliced up nicely with the saw. So, Jim, all you said is exactly right. Now, if you said this a few weeks ago, I never would have grasped what you were talking about. Today (see above post "YAHOO!!) I know exactly what you are saying and I smile fondly remembering my moments of understanding this past weekend.
One end is completely buttoned up and tonight I complete the finish sanding and planing on the other end and should have it complete later.
I did cut the curves from a wider piece of stock. The shortest of the 4 ends I needed to replace, I did not cut the curve and that side wants to look funny but I am hoping the final sanding, once the canvas and outwales are on will give enough shape to it as to not look too straight - it's only a 4" span but I may regret not cutting the curve - you probably would never notice.
Thanks - you folks are great!

Howard
 
Back
Top