Larry Westlake
Designer/Builder
Greetings, all.
New member here, first post.
Long-time lurker, though, so I feel like I know the place.
I have seen occasional interest in these forums about "open mold" wood-canvas canoe construction, and I have built two canoes that way (as well as several rowboats - it's basically the same system).
Something that’s even more fun is building with no plans, molds or jigs whatsoever – you work right out of your head, shaping the wood to match your own ideas. I call it the "free molding" or "mind bending" system. It’s the ultimate in both freedom and responsibility for a designer-builder. I can find no real discussion of this here, with only one detailed mention by Greg Nolan of no-form methods for skin-frame craft. The boats I’m building, however, are standard wood-shelled canvas-wrapped canoes, not drum-skinners. I’m now working on my second mind-bent canoe, and am about to start planking it.
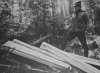
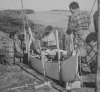
Here's a picture of the first one at the wrapper stage. It's curing in the rafters now.

I didn't invent the system. It's old hat for bush builders, similar in concept to bark construction, but very different in procedures.
Is anybody interested in a description of the process?