Skidplates

giardb

Curious about Wooden Canoes
Hey all,

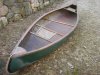
Another rookie here! I am once again starting the rebuild process after a couple month break. I have a Stowe Mansfield that needs a lot of work. I have already replaced the gunwales and decks and have removed the keel. The boat had been left outside without care or use for many years.

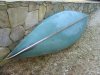
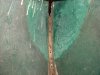
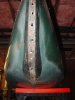
My problem is as follows; when I removed the keel because of rotting, there was a split in the fiberglass at the bow and stern. Did the skidplates hold these two halves of the hull together? The skidplates had torn as well from weathering.

Does anyone know a good outfitter to buy new skidplates from as well as seats and wood protectant.

Thanks in advance,

Bryan
 
Bryan, I'm not sure what your calling a skidplate... could it be a keel? Anyway, Strippers are made on station molds and the strips are laid up one by one from the shear line to the bottom of the canoe so it is never in two halves. This site and Bear Mountian Boats site are the two that I consider the bibles of the hobby and with the search features you can find dozens of photo's showing the construction. Include photo's when you post and you will get help from everywhere...
Let us know where you are from and we can recommend sources, OK
CYA, Joe
 
Hey woodchuck

Thanks for the reply,

I forgot to add the pictures last time. The skidplates I am talking about are the black strips under the keel in the pictures. I am in New Hampshire.

Thanks Joe
 

Attachments

  • DSC01655-1.jpg
    DSC01655-1.jpg
    394.4 KB · Views: 563
  • DSC01660-1.jpg
    DSC01660-1.jpg
    316.6 KB · Views: 586
are you sure it is a stirpper?

Hello Joe,

It is hard to tell from the pictures but this canoe looks like it had ribs. In the picture there appears to be no depth to them like they are a stain where they were taking out but that could just be the picture. Are you sure this is not a plank on rib boat?

What you are calling a skid plate could be a carbon fiber strip. I say that only because it is black. I have never seen a "skid plate" on a canoe. I would say that it is a patch from an earlier problem or something this canoe manufacturer did as a sort of trademark.

All of this is a guess.

I can help you if you are looking for cane seats if you email me. Or if you are from New Hampshire you might be near Newfound Woodworks.

Jack@sandypointboatworks.com
 
The boat is a fiberglass hull with thin mahogany veneer "ribs" stuck in to make it look woody. They may add a little bit of hull stiffness, but aren't the type of structural members that a real rib and plank canoe has.

Standard procedure for most glass boats with re-curved stems and/or tumblehome would be to use a two-piece mold, split down the middle. With the mold halves bolted together, the hull could be made as one continuous lamination. Then the mold is unbolted allowing the builder to get the finished hull out of the mold. You might have a raised line on the boat where the mold halves met, but the layup would be continuous and the line would just be a small ridge in the gelcoat. It certainly would be possible to build two seperate halves and seam them together down the keel line and up the stems, but it would add a tremendous amount of extra work, some extra weight and wouldn't be as strong. I can't imagine them doing this on a production canoe as it does little other than run up the labor costs.

Skidplates on fiberglass canoes are a concept that's been around since the 1960's when Rivers and Gilman equipped their Indian Brand fiberglass canoes with thick vinyl strips over the stems to protect them from grounding. Old Town brought out do-it-yourself Kevlar felt/epoxy skid plate kits in the late 1970's for protecting the stems of Royalex boats and a few years later, Mad River started offering both similar Kevlar kits and pre-molded carbon versions. I suspect that those shown here were factory installed and either fiberglass applied with black pigmented resin or some sort of glued-on plastic (I haven't seen the boat in real life, so I can't tell). They're most likely just there to help protect the stems and not actually holding the boat together. I doubt they are carbon on these boats since fiberglass reinforcement is both cheaper and easier to do and these weren't high-end, expensive boats. In any case, even if the boat was seamed together up the stems, the structural part of the seam would be on the inside, not the outside. I'd like to see a good, clear photo or two of the "split in the fiberglass" to see what we're really talking about. It might be a split and it might be some kind of mold mark that's been there since day one.
 
more pictures

Hopefully these will help you get a better idea of what I'm talking about. Please let me know what suggestions you may have.

Thanks again

Bryan
 

Attachments

  • DSC01768-1.JPG
    DSC01768-1.JPG
    574.5 KB · Views: 532
  • DSC01769-1.JPG
    DSC01769-1.JPG
    772.9 KB · Views: 534
  • DSC01770-1.JPG
    DSC01770-1.JPG
    569.1 KB · Views: 514
Bryan, this is a new technique for me and it looks like Todd has explained everything quite well. I will be following the thread just to learn more...
 
Wow! That's a very strange (and not particularly bright) way to build a canoe. The stems on a fiberglass hull present a problem. Due to the contours and radius of curvature, they can't flex the way more open or flatter areas of the hull can. Given the fact that canoes occasionally get bumped into docks and other obstacles, the stem area needs to be pretty tough. Standard procedure is to build up the area during layup with additional reinforcing layers of fiberglass materials on the inside of the hull. If it can't flex, the only option is to get your durability through the use of this reinforcement. The bugaboos to all this are that it's the most difficult spot on the boat to work in (labor intensive and tedious) and reinforcement adds a certain amount of extra weight.

It looks to me like they decided to skip most of the typical reinforcement and rely on the screwed-on (possibly also glued-on) wooden outside stems to beef up the ends. With the type of abuse that stems sometimes get and the fact that wood often becomes a problem below the waterline if not very carefully maintained, you might want to put this stem design in the "totally nuts" category. Had they done a typical, reinforced stem with a mostly cosmetic wooden cap on it's outside, the boat would probably be fine. The stems could be removed if needed, cleaned up, maintained or replaced and you would be fine. The fact that the fasteners pulled through the glass and that some of the glass was so flimsy that it got ripped out of the boat simply means that there should have been a hell of a lot more fiberglass backing up the stems. It's one thing to take a bite out of a fiberglass stem by hitting something, but it should take a sledge hammer to wind up with a big hole there.

The fix - I think the logical fix is to go inside and start building up vertical strips of fiberglass until you've created a pretty substantial and repaired stem. Then the outside can be filled or built-up as needed to create a fair shape and a spot where you can attach new outside stems. It won't be horribly difficult, but it's a lot of work and not particularly pleasant. I'd literally close up the holes with duct tape, lay up all the patches on the inside until I had a good, solid stem and then fill and shape the outside as needed for the wooden stem cap. I suppose you might also be able to block the holes with foam, remove what's left of the skid plates and cover that area with new layers from the outside to make a solid stem/skidplate construction if you would rather try doing most of the repair work from the outside of the stem.

If you haven't worked with fiberglass before, go find a couple books or websites on fiberglass boat repairs and patching holes and they'll show you the way and what you're in for. These are bad enough holes that it might even be worth finding out what a pro would charge to fix the fiberglass part of the stems. Somebody with experience and the proper tools can obviously do it faster and likely better than someone who is starting from scratch at repairing fiberglass.

I guess I should also say that by the time you get this canoe back in good shape and in the water, you're going to have a fair amount of time and money invested in it - more than it will ever really be worth. These canoes are an interesting curiosity, but they aren't particularly valuable or particularly great boats. The construction is rather experimental and more effort was spent making them look woody than making them strong, durable or well-engineered. Are you sure this is the boat that you want to put all that effort into?
 
stem repairs

I just finished a repair on a stem, not unlike this one -- 'glass boat that had kissed way too many rocks, way too hard. Here's what I did, and it came out well enough:

As Todd said, you need to make a form for the glass cloth to rest on, while the first coat of epoxy cures. I made this from a "sandwich" of 1/2" mesh "hardware cloth" (gives it a malleable structure), a piece of window screen (fairs out the curves between the first layer's wires), and finally a layer of "releasing cloth," which is a tightly-woven synthetic fabric that epoxy doesn't stick to very well, so you can remove it reasonably easily. I picked up scraps of releasing cloth from a local canoe repair shop; a plastic garbage bag would work too. Duct tape around the edges held it together... where would we be without duct tape?

I pressed this into the stem from the inside, using a piece of wood with a rounded end, and forced it into a reasonably good shape to match the stem curve. Then I duct taped it into place.

I then layered glass cloth over the outside, 3 layers, with gussetts cut to allow for the compound curve; the gussetts were offset from each other, so I didn't compound any weak spots. I used 12oz cloth, which doesn't take gussetts well -- you might try something lighter. Then I put two layers of epoxy to fill in the weave & allow for finish sanding.

After pulling out the "sandwich," I added another layer of 12oz cloth on the inside, filling in the gaps with epoxy & glass fibers.

It's not pretty, but it's seaworthy. Good luck!
Paul
 
If you need to apply strips of woven fiberglass cloth to reinforce or rebuild canoe stems, try cutting them on a bias, with the weave running diagonal to the length of the strips, rather than lengthwise/crosswise. You'll find that with a little coaxing, you can get them to follow the contours from one side of the stem, over the end, making a nearly 180 degree turn and back onto the stem's other side - even on a curved stem with a narrow leading edge without having to make any cuts or gussets in the cloth strips.

It does take quite a few layers to build up the brute strength needed at the ends of a canoe. As a general reference, two layers of the typical 6-7.5 ounce woven cloth, once applied, saturated and squeegeed to remove excess resin will generate a laminate that's about as stiff as a plastic milk jug. Obviously, you want your canoe stems (or patches anyplace else, for that matter) to be more substantial than a milk jug, so more layers need to be added. It isn't unusual to end up with a total of 40 oz. to 60 oz. worth of built-up and stacked layers of woven fabric on a high-stiffness area like a stem that needs to survive an occasional grounding or docking miscalculation.
 
Keep it wet

I agree with Todd that the buildup will have to be substantial although the boats that I pop out of molds are generally about 30 to 40 oz at the stem.

It is far easier to do this if you have the ability to vacuum bag but if not, I have found that If I really saturate the cloth strips on the bench and then lay them up in the stem I get better results. Fiberglass does not like sharp corners so if you get the cloth good and saturated and then lay the cloth in with your GLOVED fingers, you can usually get the cloth to get into the corners by pushing inward from the hull. This only works well if the cloth has plenty of resin on it. You can always go back can clean off the resin before it dries. If the cloth is saturated but too dry it tends to leave air pockets in tight corners and it more difficult to work with.

Although no one has said it and it is probably a give, Make sure you clean the area out well before applying patches or you will probably be repairing this again.

You still have the problem of having something substantial to attach the cutwater or outer stem to. A quick way (albeit not particularly elegant way) would be to lay up a couple of layers of 10 oz cloth, mix a batch of thickened epoxy and shape yourself a putty knife and squeeze in what would amount to a thickened epoxy inner stem. Then finish up with a couple more layers of glass over the top of that which should be a snap to lay in.

Jackbat
 
End Pour?

Just a thought, but if you clean out the stem area...real good...put duct tape on the out side, stand the boat on end and pour in thickened epoxy, let it set and repeat on the other end. Refashion the outside stems. May not be pretty but may get the boat back into the water.

Ric
 
Good thought but....

Ric,
I don't think that is a long term fix and here is why. The problem with doing a pour without fiberglass in this case is the mechanical properties of epoxy. By itself it is a very strong, but very brittle material. I went through this once with a one of the owners (and not coincidently inventor) of MAS epoxy. He went through a long disortation about the chemical and mechanical properties of epoxy which I am not qualified to repeat. However, the bottom line is this. The cloth acts almost like rebar in concrete adding to the flexibility and adhesion of the epoxy.

Epoxy is basically a glue. That is why when you scarf boards using epoxy as glue you want to make sure that the epoxy can penetrate the wood to get a strong joint. When joining using epoxy, the wider the glue surface, the better the joint.

Think about it. If this reasoning was not true then you could build a stitch and glue boat without using fiberglass cloth. Just put the fillets in and call it a day. I think we can agree that would not workout too well. In fact as the expected stress levels of joints increases in a stitch and glue hull, the more layers and greater width of the supporting fiberglass strips.

Jackbat
 
Back
Top