Bevel and Taper of Outwales

Brad Koeneman

Maker of fine kindling
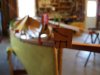
I am currently setting up to mill my gunwales for a stripper with rather acute tumblehome, at least to me, and it has become apparent that my old style of nearly square, boxy looking gunwales will not do this canoe justice.

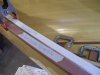
I do plan on beveling the underside of the outwhales from 3/4" inboard to 5/8" outboard. No Problem, and not really relavent to my question, I don't think.

I also plan on tapering the ends from 7/8" to 1/2" with the taper being cut from the hull side, beginning 30" from the stems. Also no problem, but, in my own mind, perhaps very connected to the next step, although I can't seem to connect the two, or figure out the proper order.

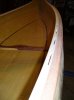
I also realize that I need about a 14 (76) degree angle on the hull side of the outwale at station 0 in order for the top to be level. This angle, of course, diminishes to nearly 0 (90) at the stems.

Do I cut the 14 degree angle along the entire length, and then cut my taper for the last 30" at 0 (90) degrees in hopes that the top will remain somewhat level as I lay it against the hull?

I fully expect to do some fussing with things but would really like some more confidence before running some of what may be the last 18' lengths of genuine Honduras Mohogany left in this state through my table saw. I have scoured all of my canoe books for advice on this issue and it seems to be danced around or omitted entirely.
Many Thanks for any advice!
 
Bevel and Taper of Outwales

You're getting way fancy... it should look great when you're done.

Maybe make a set of "dummy" rails from pine, and see how it works out, before committing the mahogany? It's a lot cheaper.
 
Yeah, I noticed that I wasn't overwhelmed with responses to this one. Maybe its just one of those builders secrets, or perhaps its all meticulously done by hand, one shaving at a time. I've never seen a production canoe with what I beleive Dan Miller once referred to as a "winding bevel", but I have seen it on finer custom craft and sure would like to duplicate it. I own more than my share of boat building books and find it odd that this is such an obscure subject. Guess I'll start chewing on some pine and see what comes of it. Thanks!
 
I may not understand what it is you are trying to do -- but as I read it, I think you want the top surface of your rails to be level, when mounted on a canoe with sides that have 14 degrees of tumblehome at the center and 0 degrees of tumblehnome at the ends, and varying degrees of tumblehome in between?

If that is the case, why not install the rails, then plane the top surface level. In this way you would put the "winding bevel" on the top surface of the rail, rather than on the mounting side surface. This would seem easier to me, rather than trying to put a changing angle (from 14 to 0 degrees) on the side of the rail prior to mounting?

But if you really want the winding bevel on the mounting side of the rail rather than on the top, you might mount a pine dummy, plane the top surface, the unmount the dummy, measure the changing angle every few inches and transfer the complementary angles going along the side of the real rail and cut accordingly, either with a bandsaw (probably awkward) or a plane. I'm not sure, though, how you would transfer those angles in a way that would clearly indicate the wood to be cut away.

But be warned -- these are just some random, speculative thoughts by someone considering your problem while sitting at the computer, but who has not tried anything like this in the real world.
 
Thanks for the thoughts, Greg. I think you understand what I am trying to accomplish. I think that the problem with planing the top surface level is that then, the top and bottoms would not be parallel, hence thickness of the outside edge of the rail would not be consistant without then planing the bottom sides as well. I would think I would have to begin with a huge stock of wood and most of it would end up on the floor. Perhaps that is how it is done. Transferring the angles is worthy of some thought too, but I think the margin of error with my skill and patience level would be pretty large.
 
Bevel and Taper of Outwales

Okay, so we want parallel top & bottom surfaces... what if you mount the rails, plane them level, take them off, then run them through a table saw or planer, to get the other surface parallel? This would maintain the angled mounting surfaces. Presumably, you'd then do whatever shaping on the outer surface after this is all done.

And I'll echo the same disclaimer/warning about these being the ruminations of someone sitting at a computer, who has never actually tried this, as well.
 
DBL the Disclaimer for this one.

In my experience, my midships tumble home turns out to be only 7 degrees. I think of the inwale and outwale as one stick, two inches wide and one inch deep, and I cut the angle down the middle. Actual size is not 1 x 2. then when they go back together, all is well. I round over and taper with spoke shave. Any inwale taper is inboard using a taper jig, an outwale taper is on the outboard side. Now the issue of the winding bevel: I think it best to find a spot in the quarter somewhere and use that angle for the whole thing. then when it's all done, plane or belt sand the top surface level to the planet if you like.

I think of these things as brain teasers and it is usually better for me to start on the project and think it through as I do it. then I learn from mistakes. I also leave the barn door open sometimes so I can throw the mistakes outside as far as I can throw.

the idea to use a pine board first seems like the best way. A good builder I once knew said "it'll all work out".
One more disclaimer-what I do is on w/c and not strippers but it should be the same.
 
Ok. So Here is what I did and it worked great. I bought a 20' pine "dummy" board and beveled the entire length along the hull side to match the angle of tumble home about 2' from its most acute angle in the center. I then tapered the hull side ends to 1/2 thickness beginning 30" from the stems. I cut the taper square, ignoring the bevel angle. I then block planed the transition from my square taper cut into the bevel angle cut and all is well with the world. Although not technically perfect, to the naked eye the rails look level across the top, and the rails maintain a consistant thickness for their entire length because no wood needed to be removed from the tops or bottoms to make them level. Today we rip up some Mahogany!
 
Sounds like you figured it out, with a way that doesn't waste too much wood or involve too much work.

Would like to see pictures of the finished product, and maybe some of the process.
 
I agreed, post of pics of what you do and end up with.

I've been following the string but haven't posted as all the rails I've made didn't have to match to that much tumblehome.

But you never know when a canoe will come that has that and needs a rail.

Dan
 
I would do a "rolling bevel( best done with a belt sander) rolling the angle all the way along the gunnel. Or live with angled gunnels.
 
Pics

I didn't take any pics of the shaping process that I described in text, but here is what I do have. The result is well within my standards, which may be lower than others, but the rails appear relatively flat for the entire run.
 

Attachments

  • Canadian Rails Sm1.jpg
    Canadian Rails Sm1.jpg
    164.2 KB · Views: 444
  • Cabadian Rails Sm2.jpg
    Cabadian Rails Sm2.jpg
    192.7 KB · Views: 428
  • Canadian Rails Sm3.jpg
    Canadian Rails Sm3.jpg
    156 KB · Views: 438
Actually, with temps near 60 here last week, we took her down the Boyne River on St. Patty's day! Still needs a few coats of varnish, but we just couldn't wait!
 

Attachments

  • Stpats2010sm1.jpg
    Stpats2010sm1.jpg
    392.7 KB · Views: 405
Actually, with temps near 60 here last week, we took her down the Boyne River on St. Patty's day! Still needs a few coats of varnish, but we just couldn't wait!

The Boyne river is one I have not paddled. What stretch of river did you float? Where can i strike it. Any liveries or spotting services?
 
The Boyne River is not exactly what I would call a "destination river", but if you happen to be in the neighborhood, it is worth a float. It is a beautiful little river that happens to be nearly in our backyard, so we paddle it often. There are no liveries or spotting services, and access is limited. It's only about a 2 hour float one way, if you really take your time. Except during high water it can be paddled in both directions, although it can get a little tricky going upstream near the top, where the water is faster and narrower. The upper put in would be on Dam Road, just East of Boyne City. There are numerous places to take out in town as she spills into lake Charlevoix.
 
Back
Top