Deck fabrication?

Scooter 67

Curious about Wooden Canoes
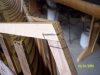
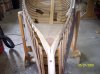
In the process of attemping to restore/renovate a 1935 OT HW. Has typical stem end rot which involves the ends of the rails and decks. Wondering the best route to take to fabricate new decks..."CS" grade so the originals were oak. Should I try to reproduce the curve out of a thicker piece of stock?...try to steambend a piece of oak or another wood?...scarf new tips on to the original decks?

Any thoughts would be greatly appreciated!

-Scott
 
scarf

Mostly scarf joint of the tip is sufficient and retains more of the original wood. I try to do as close to original as possible. You could do any of the above. Also, if the deck is too far gone you can order new from Old Town. I've been very pleased with their decks.

My last deck scarf joint I did was a birds beak sort of thing. The pic shows more contrast than in person. I did not have an exact color match. Never seem to have exact color match. But I have some stain and some tea bags, which I am told do a fine job of color matching.
In the case of bending a deck; I will cut it thicker and shape it to match as opposed to building a steam bending form for one deck.

Disclaimer: I'm just a hobbyist with 7 new canoes and less than ten rebulds under my belt. So, fwiw, that's how I do it.
 

Attachments

  • 100_1953.JPG
    100_1953.JPG
    92.3 KB · Views: 366
Thanks!

Thanks Dave!

Didn't realize that OT could supply new decks...are they replicas of the originals?

The pic you provided is very helpful for me to see how you scarfed the stem and inwales...if you've got any additional shots of that, I'd love to see them. This is my first go-round with this sort of thing so I'm gathering as much beta as possible.

Cheers!

-Scott
 
more shots

The pencil marks show where the cut is going. This Shell Lake did not possess any wood at the joint so I did it how I usually do it. One photo shows the head of a #8 2" sil bronze screw going into the end of the deck through the stem. I eyeball it and drill the hole and then countersink. Try to not drill though the top of the deck, or bottom for that matter. The stem band covers it if you do.

I bought one deck for an OT last summer and it was nearly a perfect match. And well made. I gave them the ser no. and they did the rest.

"are they replicas of the originals?" I'd have to say No. They ARE originals.

As far as scarfing: Try to make them longer than I did.
 

Attachments

  • 100_1952.JPG
    100_1952.JPG
    76.9 KB · Views: 319
  • 100_1954.JPG
    100_1954.JPG
    68 KB · Views: 335
  • 100_1932.JPG
    100_1932.JPG
    89.5 KB · Views: 307
Thanks

Thanks Dave. I ordered new decks from OT...that'll save me a lot of time and effort. Again, the pics are very helpful as there wasn't much left of the tips on my boat and I'm trying to figure out how the stem, rails and deck actually came together on this old HW.

-Scott
 
Scott

Old Town fastens things different, I believe. I tried to find how Old Town did theirs and cannot find anything. Someone with more knowledge may chime in. I think the inwales come together on top of the stem with no notch and a nail is driven in downward at an angle into the top of the stem from both sides.
BUT I could be wrong.
 
Dave Wermuth said:
Old Town fastens things different, I believe. I tried to find how Old Town did theirs and cannot find anything. Someone with more knowledge may chime in. I think the inwales come together on top of the stem with no notch and a nail is driven in downward at an angle into the top of the stem from both sides.
BUT I could be wrong.

That's how my 1929 OT was done. I scarfed in a stem top as the inwales were OK (outwales replaced). I found only one nail angled down through the inwales and into the stem top.

Eric
 
Better approach?

Thanks guys.

Dave, I wonder if it would be better to approach it as you did in your pics...to notch the tips of the inwales and secure the stem in that notch. Just seems like it would make a more secure fit. Would you see any problem in deviating from the way it may have originally been done?

-Scott
 
You get to decide

It's your call on how to do it. I try to be as close to original as possible. Up to a point. If it's an ordinary canoe it's not so much an issue. What I have seen is wide lattitude by prior restorations. But they did not have internet or WCHA to get info from so they just did the repair the way they wanted.
I don't think it a bad idea to notch it and put a bronze screw in like I do. Steel nails rust and rot.

This Shell Lake has galvanized nails fastening the ribs and they are a pain. They tend to rot the wood. I have lots of rib tops to scarf. I'll use bronze ring nails instead.
 
scarf

Dave Wermuth said:
Mostly scarf joint of the tip is sufficient and retains more of the original wood. I try to do as close to original as possible. You could do any of the above.

Dave, The photo you posted is, in my opinion at least, an example of a well done and good looking scarf. I've printed it to save in my 'how to' book. I've had trouble cutting nice, clean scarfs in old, partly deteriorated gunwales. But I've been told different things about the scarf should go. Your photo shows the long taper of old gunwale wood extending on the inside of the canoe. I was working on a canoe where there was rot that I wanted to cut away which was mostly on the inside, so I cut the opposite directions, and it was indicated to me that this was not the best way. And I've been told that bow and stern should be cut in opposite directions!??? Is there a "right way". Tom McCloud
 
Hi Tom

I'd say there is no right or wrong way. The best way is decided according to your best decision (guess), I guess. I save my cut offs when I taper the inwales for a new canoe. When it comes time to splice a repair I look for the tapered cutoff til I find it. Then I lay it on top of the inwale to be repaired as my guide and make the long cut with a dovetail saw/Japanese pull saw. I then adjust with a good low angle plane if needed, check for match, glue, clamp. My cutoff is sometimes too wide or thick but I adjust that. The 45 degree or 90 degree joints have worked on many repair jobs but a nice long scarf seems best. You could make a taper jig, make an inwale and cut a long taper on your saw. It can also be done by hand.
I think as far as cutting opposite directions goes; I'd try for symmetry side to side and end to end.
 
Back
Top