18' 1925 Otca

Andrew

Curious about Wooden Canoes
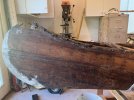
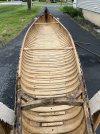
With some of the warmer weather we've had lately, I've finally had a chance to get some work done on the Otca I picked up in January.

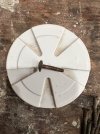
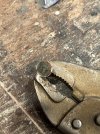
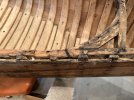
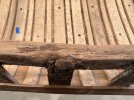
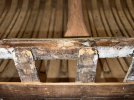
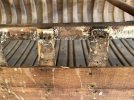
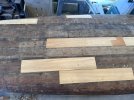
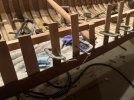
Taking off the brass capped keels and rub-rails (weight TBD) wasn't very difficult, besides the ends of the bilge keels which were riveted in. Those were quite a pain to remove, and I ended up chipping out part of the ribs. Oops. The canvas then came off without much effort.

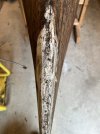
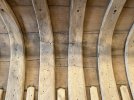
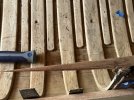
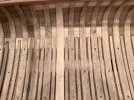
As for stripping varnish... what a fun and pleasant experience this has been! I've seen a lot of different paint/varnish strippers mentioned, but I ended up using Multi-Strip Advanced from Back to Nature. I stumbled across it after seeing Jim Clearwater's Rushton video where he used Back to Nature's Ultra-strip, which wasn't available near me.

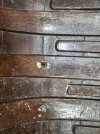
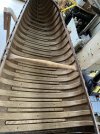
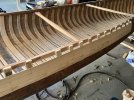
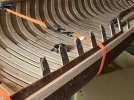
It took about 2 coats of the stripper to get the varnish completely off. I still have half of the canoe to do, and will need to touch up a few spots that I missed, including the seats and thwarts. I struggled getting in between the half ribs with the first coat, but I ended up buying a small brass bristle brush that worked like a charm! Other than that, I used a green scotch-brite pad which also worked pretty well. I'm happy with the results so far!

Andrew
 

Attachments

  • IMG_1394.JPG
    IMG_1394.JPG
    240.7 KB · Views: 123
  • IMG_1395.JPG
    IMG_1395.JPG
    349.7 KB · Views: 113
  • IMG_1398.JPG
    IMG_1398.JPG
    345.8 KB · Views: 111
  • IMG_2125.jpeg
    IMG_2125.jpeg
    195.3 KB · Views: 128
  • IMG_2131.jpeg
    IMG_2131.jpeg
    274.4 KB · Views: 121
Andrew,

On the canoe I am currently working on I used Total Boat Paint Remover that came from Jamestown Distributors. It has a consistency like mayonnaise and spreads better than Ultra Strip. It actually works well too, no stink etc.
Good luck with your project.

Jim C.
 
It was nice to meet everyone at my first assembly this year!

I'm happy to report that the varnish has been stripped, and I'm moving on. There's only 2 ribs that need to be replaced, about 4 others with small cracks, and a few handfuls of rib tops that will need fixed.

The inwales will be another challenge; there's a 4' section in the center of the canoe that's cracked and rotted in a few spots. This is mostly visible in the first picture attached below. Additionally, there's around 5' at each end, and on each side that that will need replaced. The rot starts where right where the 30" decks end. Mike Elliott has a great guide on rebuilding rotted ends which has been very helpful, and at the recommendation of many, I bought G/flex epoxy.

The stems will only need a small section spliced on at the top, and I'm planning to fill in some of the larger holes caused by the outside stem. I'm wondering if anyone has suggestions on cleaning up the bedding compound that's dried on there?

Andrew
 

Attachments

  • IMG_3397.JPEG
    IMG_3397.JPEG
    201 KB · Views: 120
  • IMG_2325.jpeg
    IMG_2325.jpeg
    279.6 KB · Views: 125
  • IMG_3389.jpeg
    IMG_3389.jpeg
    154.2 KB · Views: 128
  • IMG_2318.jpeg
    IMG_2318.jpeg
    205.1 KB · Views: 141
  • IMG_3402.JPEG
    IMG_3402.JPEG
    219.4 KB · Views: 114
  • IMG_3400.JPEG
    IMG_3400.JPEG
    219.5 KB · Views: 113
  • IMG_3390.JPEG
    IMG_3390.JPEG
    258.1 KB · Views: 110
  • IMG_3393.JPEG
    IMG_3393.JPEG
    255.6 KB · Views: 103
  • IMG_3392.JPEG
    IMG_3392.JPEG
    243.7 KB · Views: 117
  • IMG_2438.jpeg
    IMG_2438.jpeg
    291.7 KB · Views: 136
Andrew, I think your old varnish removal came out really well, especially when comparing the before and after pix! The interior is going to be beautiful with new varnish.
 
Andrew
To answer your question about dried bedding, a heat gun will soften it.
If you are referring to photo 1, the white stuff is likely filler that was applied before the stem was tacked. In that case just sand it. However there is no need to remove it all as long as it is smooth enough to accept new canvas over it.
 
Slowly but surely, work continues on the otca.

I strapped the hull to hold its shape before cutting out the 4' piece of inwale that was cracked and rotted. I made the scarf about 10" and let the g/flex go to work with a new piece of mahogany. I'm sure the cut could've been cleaner and the scarf could be longer, but so far so good. The rib tops of that entire section were split and had a bit of rot as well. I found replacing those to be very tedious, but after a few it wasn't too bad of a process.

I initially thought that I'd only have to replace 2 ribs, and could fix the remaining cracks on the backside.. I ended up putting 5 new ribs in and 2 backside repairs. Following the advice on many on the forums, I chiseled out the back just enough to expose the crack, then cut a new piece of cedar and epoxied it in.

So far I've replaced only the planking that had significant damage, but there's a few that I'm not sure about. I'd love some advice here- will these spots likely be cleaned up when I sand the hull, or should I replace them?

IMG_5673.jpeg
IMG_5674.jpeg


In the future I'll try color matching the new planks before tacking them in as I suspect that would've saved me time down the road.

There's still a ways to go only spending an hour or 2 a week, but I'm looking forward to tackling the ends next!

Andrew
 

Attachments

  • IMG_3596.jpeg
    IMG_3596.jpeg
    188 KB · Views: 48
  • IMG_5636.jpeg
    IMG_5636.jpeg
    262.6 KB · Views: 42
  • IMG_5665.jpeg
    IMG_5665.jpeg
    217.3 KB · Views: 48
  • IMG_4376.jpeg
    IMG_4376.jpeg
    194.4 KB · Views: 49
  • IMG_4319.jpeg
    IMG_4319.jpeg
    146.3 KB · Views: 51
  • IMG_4338.jpeg
    IMG_4338.jpeg
    234.1 KB · Views: 52
  • IMG_4189.jpeg
    IMG_4189.jpeg
    169.1 KB · Views: 54
  • IMG_3594 (2).jpeg
    IMG_3594 (2).jpeg
    222.4 KB · Views: 46
Back
Top