
You are using an out of date browser. It may not display this or other websites correctly.
You should upgrade or use an alternative browser.
You should upgrade or use an alternative browser.
Copper Tip
- Thread starter Craig Johnson
- Start date
Murat V
LOVES Wooden Canoes
Not sure if this'll help but there's an online article on google entitled, "It's Easy to Repair a Canoe" from Popular Mechanics (July, 1934) that shows a pic of sample tip. It contains a lot of slits to allow the top to accomodate the curve of the blade tip without crinkling. Article Link here:http://books.google.ca/books?id=LeA...dle "copper tip"&pg=PA109#v=onepage&q&f=false
Attachments
pklonowski
Unrepentant Canoeist
Wouldn't a rig like this leave the paddle tip prone to water damage & rot? Especially with nails through it...
OP
OP
Craig Johnson
Lifetime member
I have thought about the possibility of rot from holding water and penetrating the wood with tacks or rivets but will varnish after the tip is on to try to prevent that. I really just want to try it as a design element, also after using my new paddle just two days on a shallow river I had worn some varnish off the tip so constant maintenance is required either way.
pklonowski
Unrepentant Canoeist
Have you tried putting laminating epoxy on the tip? If you clamp the paddle with the tip up, and put the epoxy on the tip, it soaks in... keep putting more on the tip until it stops soaking in. After it cures, sand & varnish like normal. It's not bomb proof, but it holds up well on the shallow rivers around here.
I have three halves of Rushton double-bladed paddles - all three are somewhat the worse for wear, but not because of the copper tips. These came out of a livery in Canton, NY, so were presumably abused.
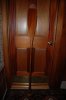
The paddle on the left has a copper tip that was put on in two halves, joined along the edge of the tip of the blade. The paddle on the right has a square tip, and the copper was first folded over the tip, then again over the sides (like a Christmas package). The paddle in the middle has the classic one-piece mustache tip. The shape of the mustache allows you to bend the copper to shape in one piece.
There is a description on this in Graham Warren's first book, "Making Canoe Paddles in Wood." It is too bad this book has become hard to find, because in my opinion, it is far better than his second book with Gidmark.
Attachments
Another thought - your success may depend on the state of your copper, so you may want to anneal it before you start shaping it, and perhaps again during the process, as copper will work-harden.
pklonowski
Unrepentant Canoeist
Interesting that the rot doesn't seem to have gotten started. How did they treat the wood to prevent that?
OP
OP
Craig Johnson
Lifetime member
Thanks Dan.
The sharp curve of my paddle tip is what is causing my problem in trying to just peen it into shape. I am going to try to do 2 halves with the seam along the edge of the paddle which I will solder. will show photos if it works.
Craig
The sharp curve of my paddle tip is what is causing my problem in trying to just peen it into shape. I am going to try to do 2 halves with the seam along the edge of the paddle which I will solder. will show photos if it works.
Craig
Interesting that the rot doesn't seem to have gotten started. How did they treat the wood to prevent that?
I doubt they did. Paddles are spruce, best I can tell. They were factory-produced, and at least one, if not all three, pre-date 1905. All extant damage is from use, particularly the two-pieced tipped one (on the left in the image above) - the tippy-tip is separated from pushing-off, and the blade split completely to one side of the shaft and was repaired with copper plates clinch-tacked into place. No rot evident. but, these are the survivors!
Paul Miller
Canoe Nut
The following info about copper will explain why the tips don't rot:
Copper(II) ions are water-soluble, where they function at low concentration as bacteriostatic substances, fungicides, and wood preservatives.
Happy paddling,
Paul
Copper(II) ions are water-soluble, where they function at low concentration as bacteriostatic substances, fungicides, and wood preservatives.
Happy paddling,
Paul
pklonowski
Unrepentant Canoeist
Oh, duh... this is why copper has been used as flashing on roofs... and the copper-based slurry used in pressure-treated lumber...
Todd Bradshaw
Sailmaker
With enough wet/dry cycles, it will still eventually rot around the fasteners. It's just a matter of time and maintenance (or lack there of). It will also vary with wood species - ash most likely being one of the most vulnerable with the black fungus it gets. With the limited use and exposure that paddles get, you probably won't live long enough to see serious structural rot unless you have some very strange storage practices for your paddles. Still, it certainly wouldn't hurt to stick a little something in the holes to help seal them before driving the rivets in. Splits are probably a greater danger than rot, since the holes make a pathway into the end-grain for water intrusion. Obviously, tipped or not, well maintained paddles last longer.
OP
OP
Craig Johnson
Lifetime member
progress
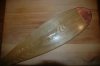
OK, so here is my first attempt. I am pretty happy. Slips right on like a glove, fits nicely, maybe a little epoxy before I put it on permanently. Seems like a good place for some art,whatever it's called when you emboss a pattern in copper. Possibly in the future leave the paddle tip a little oversized in order to relieve the copper tip into the wood and trim flush, small detail, maybe not worth it. Still have to polish it and decide on fasteners, then a couple more coats of varnish. More photos then.
Craig
Attachments
pklonowski
Unrepentant Canoeist
Looks pretty nice! I wonder if there might be a better top coat for it than varnish. Maybe lacquer? I don't know, just wondering, & hoping someone might have experience with this. It may not matter.
Jon Bouton
Sucker for an Indian Girl
Copper paddle blade protector: Gauge?
This does look nice. and obviously, some nice soldering!
I've also been thinking about how to put a copper protector on some paddles. We had a standing seam roof put on the house this summer. I asked and the contractors dug out and gave me some waste copper roofing from another job. I'm thinking it looks thinner than what you are using. Do you know what gauge your copper sheeting is?
OP
OP
Craig Johnson
Lifetime member
I am not sure what gauge it is. I had lots of scrap from coil stock I use to flash chimneys on slate roofs. If I talk to the suplier soon I'll ask.
Craig,
I would be interested in the technique you used to fabricated your most recent paddle tip protector and eliminate the wrinkles. I made two sassafras paddles for a close friend who is an avid paddler and a very hard man on paddle tips. After two trips back to the shop to refurbish the tips he asked if I could put some kind of protection on them. Your brass tip seems to be just the ticket for him.
Ed
OP
OP
Craig Johnson
Lifetime member
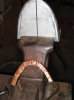
Hi Ed. So here are some photos of the 2nd attempt. I made a mandril the same shape as my paddle. I used aluminum because it was easy to shape and helps conduct heat in soldering process. I also made a template for the copper and bolted on a couple pieces of wood to hold the copper in place because on the first one the clamps left marks.
 Here is the first piece of copper in place.
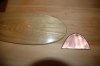
 Here it has been rolled over with a hammer and the second piece is in place.
 Here the second piece has been rolled over the first and then removed to clean and flux the outside of the one on the mandril and the inside of the other.
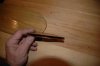
 Then they are put back together, a little final hammering and some spring clamps and ready for soldering.
 Propane torch and get it to suck into the joint,just like copper pipe. thats pretty much it, clean up with a file and sandpaper then polish. I'll send more photos when I get it cleaned up and figure out how to attach it. You may have figured I have been messing around with this longer than it took me to make the paddle. It will be quicker in the future.
Craig
I used aluminum because it was easy to shape and helps conduct heat in soldering process. I also made a template for the copper and bolted on a couple pieces of wood to hold the copper in place because on the first one the clamps left marks. Here is the first piece of copper in place. Here it has been rolled over with a hammer and the second piece is in place. Here the second piece has been rolled over the first and then removed to clean and flux the outside of the one on the mandril and the inside of the other. Then they are put back together, a little final hammering and some spring clamps and ready for soldering. Propane torch and get it to suck into the joint,just like copper pipe. thats pretty much it, clean up with a file and sandpaper then polish. I'll send more photos when I get it cleaned up and figure out how to attach it. You may have figured I have been messing around with this longer than it took me to make the paddle. It will be quicker in the future.Craig
Last edited:
Gary Willoughby
Boat Builder
Copper is not made by Gauge it is made by oz. 16 oz is the standard 3' X 8' sheets. Would be afraid to ask how much a sheet cost.