Before and After...Critique?

yeolwoodsman

Rolf Warncke
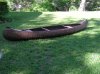
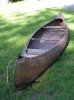
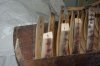
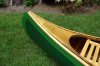
I'm hoping to post a few pictures of the project I just finished. It will be getting into the water tomorrow or Friday and will be with us on a camping trip to the Adirondacks next week. Since this is my first restoration I was interested in a critique form some of the wonderful contributors here on the forum. I'm not sure how many pictures I can add, but I'll do what I can. I hope that I've done this boat justice! It's a 16' 1945 Otca. CS grade. I'll add an additional post for additional pictures.
 

Attachments

  • 1.JPG
    1.JPG
    300.8 KB · Views: 355
  • 2.JPG
    2.JPG
    282.5 KB · Views: 384
  • 3.JPG
    3.JPG
    265 KB · Views: 353
  • 4.JPG
    4.JPG
    291.7 KB · Views: 394
  • 5.JPG
    5.JPG
    274.8 KB · Views: 320
  • 6.JPG
    6.JPG
    188.9 KB · Views: 354
More pics

Here are the next 6
 

Attachments

  • 12.JPG
    12.JPG
    259.2 KB · Views: 336
  • 11.JPG
    11.JPG
    248.1 KB · Views: 328
  • 10.JPG
    10.JPG
    309.2 KB · Views: 288
  • 9.JPG
    9.JPG
    291 KB · Views: 294
  • 8.JPG
    8.JPG
    272.6 KB · Views: 294
  • 7.JPG
    7.JPG
    279.3 KB · Views: 350
Sure you haven't done this before?? I'd say you did a super job. Looks like you had some substantial stem/deck/rib work and I know what this is like as I've done several. Beautiful canoe and great job.

I've just finished up a 1909 Old Town closed gunnel this week which I've been working on for the past year as it had LOTS of repair/replacement needed. Should have some pictures in the near future.
 
Wow! Nice job. Looks like you are an "ol' pro", IMO.

Interesting joinery in the original seats. Those must have been fun to duplicate. Or do I see that you altered it a little?? That's it! Rip them out and start over!

Be sure to post some photos of your trip. I, for one, would like to see that beautiful canoe surrounded by some Adirondack grandeur.
 
Great looking canoe. Isn't it a blast to look at the before and after's. Only you can feel the thunder. Now go get another one. Fred
 
Thanks

Thanks for the encouraging words. The seats on this were in rough shape and their construction was somewhat crude. I had little choice but to completely replace them. Where the originals had half laps for all the joinery I used through mortise and tennons for the corners and half laps for the slats. It should be a lot stronger. The original front seat was cracked and reinforced with angle iron... functional but not very attractive.

In terms of the next one. I have a 1922 HW CS grade ready to go next and am picking up a mystery Old Town on our camping trip next week. I'll be busy for a while.
 
Rib Splices

If you don't mind, how about a short description on the technique you used to splice the rib ends. I'm facing the same problem on the Guide I'm rebuilding and would prefer not to replace the ribs under the stem for obvious reasons.
 
Rib Scarf

I used a scarf joint to attach the new rib ends to the ribs. Its about a 15 degree angle through the rib just below where the rib was soft. At first I used a back saw that I had but it was not as smooth as I would have liked. I picked up a little pull saw made by Marples from the Home Depot. It has a very thin and flexible blade but it worked like a charm. After cutting it I cleaned the cut up with a sharp 2" chisel. I cut a matching piece from some rib stock and then glued it on. I was a little skeptical about the strength of the joint so I experimented with both epoxy and water proof wood glue. The waterproof wood glue proved to be stronger. (Titebond Three) After it was glued up and dried I shaped the rib end to match the original as best I could. I've attached a photo that shows the ends glued on. Its actually a picture of the glue up for the inwale but it shows the ribs.
 

Attachments

  • Rib Splice.JPG
    Rib Splice.JPG
    247.2 KB · Views: 332
Maiden Voyage

A couple shots of the first time back in the water. Yes I did go outside the swimming area, and yes, I know, it is not a wood paddle... I'm embarrassed, but the varnish was drying on the two wood ones that I have right now.
 

Attachments

  • Maiden Voyage 1.JPG
    Maiden Voyage 1.JPG
    335.3 KB · Views: 247
  • Maiden Voyage.JPG
    Maiden Voyage.JPG
    230.3 KB · Views: 262
Nice job on the restoration. I want to use that same paint scheme on one of my canoes. What color is the light green and what brand paint?

Adam
 
My green

The light green on the canoe is my own. I mixed some yellow into the green until it looked like a shade I liked. I had intended to add a stripe as a transition line but liked the way it looked without it, so I left it. The paint is Rustoleum Marine Coatings Topside paint. The Rustoleum Marine paint does not come in a yellow so I used some of their Professional High Performance enamel for the yellow. I'm guessing it's somewhat unconventional but after pouring over all the posts about paint that I could find, and seeing that some use paint from tractor supply, and some have used porch and deck enamel, I settled with this. We'll see how it holds up. It went on nice and I'm pleased with the results.
 
Back
Top