Canvas Bubbles

Steven Hanton

Curious about Wooden Canoes
Hello

I'm new to the forum, so to introduce myself, my name is Steven Hanton and I have started to build Wood and Canvas canoes in Scotland - currently trying to build up a company -www.canvascanoes.co.uk.

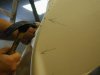
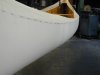
This is a blister issue, but I have searched the forums for a specific answer and can't find one. My problem is not with paint or filler blisters, but with the canvas lifting from the hull and creating air spaces between the canvas and the hull. There is no cracking, or cosmetic blisters in the paint or filler. This only seems to happen near the stems (where the canvasing is done by hand after freeing from the envelope). These bubbles have appeared only in one boat and only after the final paint job. A clue may be that we took the boat to a show in which the boat sat in a warm room for two days, where the blisters developed. When we took it back to the shop, the blisters improved considerably, but still remain visible. I suspect a filler drying issue, but I would love to hear of similar tales?

Thanks,
Steven
 
Hello Steven,

Welcome aboard as it were.

Can you elaborate a bit about your process..

How did you stretch the canvas in the stem areas? Did you get it properly tight? What did you use as a bedding compound? What did you use as a filler and how long did it cure before you painted? How many layers of filler did you use? What about the canvas? where did you get the canvas, what grade is it and was it cured or uncured and do on.

Normally bubbles show up after you let the canoe sit in the water for a while...not as you have experienced.
 
Sometimes the canvas gets stretched to the stem and the hollow of the hull gets bridged and the canvas feels floopy in that area. If it's that, then the canvas should have been stretched at the last two feet of the gunnel after fastening the stem. That helps to pull it in against the hollow of the hull. But I think you may be describing something different.
 
Thanks for your comments so far. To gove you more info MGC -

We stretch the canvas as per Rollin Thurlow's video and book 'The Wood and Canvas Canoe' - but in essence we tack the canvas to the last full rib while its in the envelope, cut it free and then hand stretch the stem areas. We do this by first cutting the canvas along the stem until the rib that we stopped tacking to when it was suspended. Then we begin the overlap and continue down one side, then overlap the join on the stem and tack. Then we complete the tacking at the gunwales towards the stem on each side. As I say, the canvas seems to go on tight at this stage?

We use Dolphinite bedding compound and apply it only to the seam of canvas at the stem. We use a standard filler recipe that we got from this web forum, linseed oil, oil-based paint, a dash of varnish, silica powder, white spirit and drier. We let this cure for 8 weeks, but our workshop in Scotland does get cold... infact during this curing, it dropped below freezing for a week or so. I wondered if this affected the drying?

The canvas we used is treated 10oz duck, and its good stuff. We get it from a company supplying sail makers in Scotland.

Potential factors I have considered are - our workshop is a little damp, and so I have wondered about the canvas being a little damp when it goes on. Likewise, I wonder if the moisture content of the wood could have caused excessive shrinkage once it was removed to a warm dry room. Also, I suspect that the filler may not have been fully cured - although it felt cured, I wonder if 8 weeks at low temperatures was enough?

As I say, this happened before the boat had even hit the water.

Thanks in advance,
Steven
 
It is not clear to me whether we are talking about blisters in the filler or paint, or an air gap between the canvas and wood hull... If the latter, the culprit is most likely not stretching it tight enough in the right directions as you closed the stems.

Dan
 
Sorry I thought I had said in my first post that this is a problem with the canvas lifting from the hull and creating air spaces between the canvas and the hull. The paint and filler appear to be fine and still adhering to the canvas. It has happened only at about the last 2ft under the decks before the stems. And on all 4 'sides' so to speak, not just in one area.
 
It is just under the gunnels below the deck area, in between where you stopped while it was in the envelope and the stem? Little "sags"? If it is what I am thinking, just pull the gunnels, and tighten the canvas.

Pics of the problem area would be great!!

Very nice looking website, plus, you've been "liked" on FB
 
Last edited:
Thanks Mark, but it needs a bit more than that. I know the little sags you mean, but this is a bigger problem. As I say, it has improved since I brought it back into the shop, but I just wondered what the underlying problem might be. Its simply strange that the canvas went on tight then loosened so much after the filler and paint went on.
 
I'd guess that the boat itself is swelling/shrinking with changes in the temps and humidity. I think that what happened was that you fastened the canvas to the gunwales nearly all the way to the stems before removing the stretchers/clamps.?? Then when you pulled the canvas around the stems you put enough stretch to pull the canvas away from the hull as the humidity changes. I leave about three feet of the canvas unattached at the gunwale and then stretch the canvas to the stems tight. The last fastening I do is back to the gunwales and pull them tight so that the canvas follows the hollow of the entry lines of the wood. I think you are pulling the canvas away from the hull by stretching the stems last. You may be able to remove the outwales, unfasten a section along the gunwale and pull the canvas so that it lays down in the hollow. Hard to describe. Easy to show in person.... It may not be a big problem as is.
 
Dave is correct. The first photo shows this problem on a Thompson Ranger I recently restored. High humidity was the cause of the canoe distorting. Three days after dehumidifying my shop back to normal levels, the canvas tightened up…turn the dehumidifier off and the problem would reappear. I pulled the rail staples, re-tightened the canvas, and all turned out well as you can see in the second photo.
 

Attachments

  • Thompson Ranger.jpg
    Thompson Ranger.jpg
    172 KB · Views: 270
  • Thompson Ranger 2.jpg
    Thompson Ranger 2.jpg
    60.9 KB · Views: 250
I also think that the most likely issue is the wood shrinking,welling, compounded by the fact that the canvas is not as tight in the stem region as around the rest of the hull, possibly explaining why the problem is only here. No, I didn' fasten the canvas to the gunwales nearly all the way to the stems. I did the stems first and then finished the gunwales. Again, I dont think it is a canvassing issue. Something has happened after that I'm trying to get to the bottom of.... and I really do think it has to do with moisture/shrinkage in the canvas or wood. I wonder if I can get the moisture content of the wood down so that it is more stable and only will expand once canvassed and sealed? I was simply hoping that this might be a common problem (given that we're dealing with materials that do react to certain conditions), but it sounds like this problem is normally not to be expected - therefore I must change something!
 
Oh wonderful Jeff! This is exactly the issue I had... thanks alot for posting those photos. It does seem however that I had the opposite humidity effect - my bubbles appeared when the canoe was moved to a very dry warm room, and dissappeared when taken back to my cold, damp workshop. Also, it looks like your bubbles appeared pre-filler? This happened to me after painting - the canvas remaining tight all through the filler drying. Do you think I will still be able to re-stretch if I remove the stemband and outwales? I have never attempted this?
 
I had a problem earlier in the year with what I called 'bubbles' in the canvas. These occurred about 2 weeks after the filler was applied and got worse over time, eventually developing into full blown 'wrinkles'. At the time I blamed the filler since I know the canvas was stretched very tight prior to filling. Ultimately I took the canvas off & recanvassed. In retrospect I can think of only two causes: 1) I filled the canvas about 2 days before we had several nights where the temperature get below freezing, or 2) perhaps I added too much thinner in the filler. I'm leaning toward the latter as the likely cause and now no longer thin the filler. The only other observation I have was that the bubbles/wrinkles seemed to become less severe when the canoe was left in the sun and allowed to heat up. So... as to your problem, have you tried to heat the areas?
 
While the humidity in the shop can effect the canvas, I find that in almost all cases the real reason for the bubbles in the canvas is that it was not stretched tight enough. The canvas will naturally relax a bit after it is stretched. Combine that with a bit of humidity change and a real bag can form in the canvas.
Its a simple solution that for many builders it just seems too simple. They want to make the problem bigger than it really is and find some kind of elegant solution. That way it is not really their fault because they "know" they stretched the canvas super tight! They do not want to believe it when I tell them they may of thought they pulled it tight but they didn't really pull it tight enough. Its physical work to canvas a canoe and if you are not use to it it can be deceiving how much effort you have to put into pulling the canvas. Many times the builders first one or two canoes are ok because they have the fear of god in them when they first canvas. After a bit a experience they feel more confident and don't really put in the effort they did before.
It is difficult pulling the canvas in the deck area because the deck is in the way so even with a pair a vice grip canvasing pliers it takes a steady pull to keep the canvas stretched. After the canvas is stretched and nailed there should be a pucker above the tacks. Also in the deck area sometimes there may be a long distance from the last cant rib to the end of the stem. If that is the case you may have to pull the canvas between the last cant rib and the stem and put a few tacks directly into the side of the inside rail.
Along the face of the stem its important to pull the canvas perpendicular to the face of the stem and not pull in a up or down direction. Pulling with one hand and tacking with the other is difficult enough without trying to hold a strain on the canvas and this is where many people don't pull enough slack out of the canvas.
Its not uncommon that once I canvas a canoe, to have to go back and redo a few areas along the deck areas. I may only be able to pull an extra 1/8" of slack but it makes a world of difference in the tightness of the canvas.
 

Attachments

  • canvas11.jpg
    canvas11.jpg
    78.7 KB · Views: 275
  • canvas01.jpg
    canvas01.jpg
    52.3 KB · Views: 278
  • canvas19.jpg
    canvas19.jpg
    76.8 KB · Views: 276
I've played the humidity game a couple of times. I canvassed as a demo under a tarp in a rain storm once.... Not Good!!
After normal humidity returned it was loose. Also canvased on a foggy morning, outside, on the shore of Lake Superior... had to re stretch that as well. It's rarely mentioned, but would-be canvassers should consider it. What humidity is too high??? I don't know.
 
Back
Top