Rushton All-Wood

Kathryn Klos

squirrel whisperer
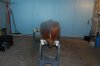
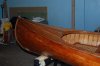
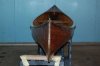
It isn't ours and isn't for sale, but we had the pleasure of examining it--- this beautiful canoe was inherited by a neighbor. It was given to her grandmother, who was probably the second owner. The current owner paddles it and truly appreciates this canoe, which was part of the pleasure we had in seeing it. The canoe is 15 feet long and appears to be either the Ugo or Igo model. Denis plans to get more measurements and more pictures.

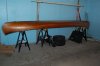
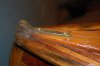
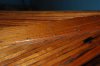
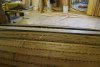
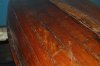
The canoe was (take a deep breath) fiberglassed at one time, but that has been removed. It currently has some cracking and minor damage to the outer planking and minor rot on the stern stem. The owner plans to have repairs done by someone who knows what he's doing... maybe someone familiar to me.

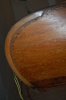
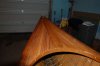
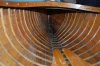
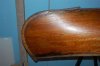
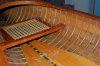
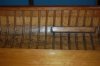
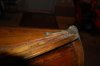
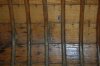
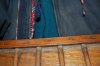
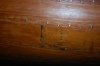
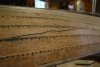
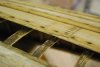
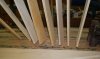
The hull is double planked. Bow deck is stamped (in three lines) "J H Ruston/maker/Canton NY" . The middle seat is missing. All trim is cherry. The ribs are pocketed and stems have a slight splay.

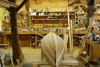
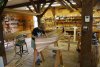
There are 12 pictures to upload, so I'll continue in a reply...
 

Attachments

  • Rushton 4.jpg
    Rushton 4.jpg
    41.1 KB · Views: 631
  • Rushton 5.jpg
    Rushton 5.jpg
    46.4 KB · Views: 691
  • Rushton deck.jpg
    Rushton deck.jpg
    45.1 KB · Views: 685
  • Rushton deck2.jpg
    Rushton deck2.jpg
    43.2 KB · Views: 635
  • Rushton Igo or Ugo.jpg
    Rushton Igo or Ugo.jpg
    36.1 KB · Views: 646
  • Rushton int.jpg
    Rushton int.jpg
    60.4 KB · Views: 689
Here are the last of the pictures. It's interesting what some folks have in their garages...

Kathy
 

Attachments

  • Rushton Ugo Igo 3.jpg
    Rushton Ugo Igo 3.jpg
    43.5 KB · Views: 558
  • Rushton Ugo Igo 2.jpg
    Rushton Ugo Igo 2.jpg
    44.6 KB · Views: 583
  • Rushton seat.jpg
    Rushton seat.jpg
    64 KB · Views: 586
  • Rushton ribs.jpg
    Rushton ribs.jpg
    50.6 KB · Views: 563
  • Rushton nose too.jpg
    Rushton nose too.jpg
    43.4 KB · Views: 589
  • Rushton nose.jpg
    Rushton nose.jpg
    40.7 KB · Views: 567
That was not the last... here's the last...

Note how the ribs go into pockets.
 

Attachments

  • Rushton ribby dibby closeup.jpg
    Rushton ribby dibby closeup.jpg
    55.7 KB · Views: 548
  • Rushton pocketed ribs.jpg
    Rushton pocketed ribs.jpg
    58.6 KB · Views: 559
  • Rushton planking.jpg
    Rushton planking.jpg
    47.3 KB · Views: 556
  • Rushton deck reeding.jpg
    Rushton deck reeding.jpg
    50.6 KB · Views: 562
What leads you to believe it is double planked? It is indeed a beautiful canoe, and thank god someone had the sense to get the glass off of it. It looks as though someone has already worked on it. If it is indeed double planked, it has had major work done on it!
 
Denis took a picture of a seam on the inside of the canoe, that is 1/2 to 3/4 of an inch near a rib, showing the nails and the seam-- this is the picture in the group above, on the far right. The outside of the same place is the picture second from the left.

The canoe was heavy for a 15 footer, requiring three (albeit fairly wimpy) people to turn it. And, if you tapped on the hull on both sides, it sounded double.
 
Not double planked. This is typical Rushton flush lap or "smoothskin lapstrake". What you are looking at is the scarf that joins two shorter strakes.

The dimensions of Ugo are Igo are nearly identical - the way to tell them apart is hull shape. The Igo is has a flatter bottom than the Ugo. Igos are much more rare than Ugos as well - I know of only one...This one looks like a Ugo from here.
 
Thanks, Dan. The canoe's owner will be thrilled to get this information. Any thoughts as to how many of these canoes may have survived?

The owner says it takes on water but eventually swells. Over the years people have suggested all manner of "cures", which I imagine may have happened to other canoes like this-- leading to things that can't be undone very well, if not permanently damaging the canoe.

The owner says it rides low in the water and is a pleasure to paddle, although it's a bit tender.
 
Dan and all,
There are several significant cracks in this hull. They are up to about 1/8 inch in width. Any suggestions how they may be remedied would be appreciated. I will forward photos to Kathy and ask her to post then here on the forum.
Thanks, Denis
 
Dan, Thanks for explaining that.

Paul, Where might I get that product. Thanks! I have thought of some of the Permachink products that I use on logs too.
Denis
 
I disagree with the use of Life Caulk or any other “adhesion in a tube” for an application as suggested. Squeezing goop into the cracks is a short term solution at best, has zero structural properties, and will without question devalue the canoe.

If the canoe is going to sit idle and be admired for its’ beauty or used as a study piece, leave it alone. Don’t do anything.

If the intent is to make the canoe useable then a different approach should be considered. If the crack is 1/8 of inch (or more) wide on both the inside and outside, that is a pretty significant opening. Sounds like it’s time to be thinking more along the line of a spline (wooden) or perhaps, dare do I say, even replacing part of or all of the plank if the gap is too wide or cuts across the plank at a funny angle.

If you have splits smaller than 1/8, those can generally be stabilized rather easily by cutting in a spline by hand (not a router) using a smallish “V” grooved carving chisel.

There is a lot to consider when making planking repairs on a canoe like this. Sometimes a split runs widely across the plank, sometimes the plank will shift and the plank will lift up on one side of the split causing unevenness. Sometimes there will be multiple splits on a plank, along the row of tacks, or located where the seat cleats (bracing the seat) are fastened into the hull. All of this needs to be looked at and evaluated so the best repair is made.

Will a spline suffice where a seat cleat is? Will a spline suffice on a plank with several splits or on large splits? Has the garboard been compromised because of splits? These are the types of questions that need to be asked and answered.

The way I look at it, any repair work done to a canoe like this should equal or exceed the workmanship that went into building it. And goop in tube isn’t going to achieve this.

Attached are pictures of a Rushton which show the scraf and some unwieldy splits.
 

Attachments

  • 5.JPG
    5.JPG
    88 KB · Views: 539
  • 4.JPG
    4.JPG
    86.4 KB · Views: 558
  • 3.JPG
    3.JPG
    80.2 KB · Views: 540
  • 2.JPG
    2.JPG
    70.1 KB · Views: 524
Hi Dylan,

I would agree that the nature size and location of a crack would dictate how to fix it.

Do you have any "after" pictures for the cracks shown in your pictures?

Thanks,
Paul
 
Maybe I should restate the question.

It appears you fixed those cracks by replacing the whole piece of plank.

Do you have any pics showing a big crack fixed with a spline?

Thanks,

Paul
 
Life Caulk

Dylan, I think you are right about not using lifecaulk. But, speaking as a hobbyist in canoe restoration/ construction I have to agree with Peter, especially for my canoe. My Dean has the metal battens and I can safely say that if i had opened it up, i would have never gotten the boat done. I put in a couple splints in the wide spots, but the lifecaulk got the Dean on the water. As far as it's value, I just put it on eBay with a start of 1000 and got zero bids. So I think the value is not yet determined and likely won't ever be. I was hoping to raise money for vacation. I can say that the value of it when I got is was documented at zero because by the time it was given to me it had been given away two other times. So, it was three times free. I think if it wasn't for lifecaulk I would not have ever got the Dean done. If I would have had a proper repair done I think it would have required a professional and the money involved would have been more than its value. We have to make choices.
 
Denis asked that I post pictures of the cracks in our neighbor's Rushton.
 

Attachments

  • Rushton showing cracks.jpg
    Rushton showing cracks.jpg
    48.6 KB · Views: 539
  • Rushton showing cracks2.jpg
    Rushton showing cracks2.jpg
    39.3 KB · Views: 541
Folks,
I very much appreciate any and all suggestions. Thank-you. I am happy to see more. I will then present them to the owners and see where it goes from there.
Thanks again, Denis
 
Dennis, two more posts and you will be only 2,000 posts short of Kathryn!:D

More seriously, I would suggest that your neighbor has someone that has experience with these take a look at it.

Dan or either one of the Smith's would be a good place to start.
 
I hear you Dave. It’s tough to put money into a canoe, paying someone with the skills to do the appropriate repairs, and then see any sort of return on your investment by selling it. It takes the right canoe and circumstances to do this. It can be done, just not with every canoe.

Paul, yes the garboard was replaced. There was just too much damage to it. The other plank was replaced too. There was more damage to it than seen in the photo.

I looked high and low on my computer for pictures showing a completed spline and all I could find was the gluing process. The picture showing all the battens coming off the sides of the boat is more than an art deco project; they are acting as a clamp on the spline. Oddly enough we have a Rushton in the shop that will require a few splines so if you would like to see the process I can post pictures once the work has been done.

I’m not going to refute anything Will Ruch has done or not done, that would just be silly. He is a very talented builder and does superb work but I don’t think we should all simply say okay yes this is acceptable just because so and so did or didn’t do something (sorry Will no offense meant). Rather a thought process should occur, all considerations should be weighed, and determined if it is the right thing for you to do in your situation.

Peter, if you could please clarify a few points in your pictures; the one on the right looks like it has a batten tacked on the inside behind the split thereby providing a mechanical back up to the caulked filled split. The other split looks really small in width. I would guess the width is 1/3 to 1/2 of the size of the surrounding tack heads?? (Whose heads should measure 9/64 in diameter, at least the tack heads on the Canadian Canoe currently in my shop measure that).

I am not trying to nitpick or be difficult here, but rather trying to show there might be some rhyme and reason or even parameters as to why caulk was used in these splits. It should be kept in mind that this technique shouldn’t just be applied to every split in every wooden canoe just because it was on yours.

Kathryn/Denis, those splits appear to be located on the laps, a common occurrence for this type of construction. Those feather lap edges are/can be pretty fragile. Squeezing goop in there will inevitably adhere the laps/planks together. I can tell you from experience that by putting caulk in those splits in this situation will create a huge mess and financial cost in the future should the owners ever want to have the canoe properly restored. I am literally living this as we speak with a current restoration.

Dan would be a good place to start but if you are going to have someone perform the work, do your homework and do it carefully. I am not trying to be a preacher here, just giving friendly advice. This construction and canoe isn’t your run of the mill wooden canoe (but I don’t need to tell you that) and there is certainly some skill set required to work on a canoe like this. There are a few good builders out there who are more than capable of work like this and I wouldn’t solely rely on the first builder(s) recommended to you.
 

Attachments

  • 2.JPG
    2.JPG
    123 KB · Views: 565
  • 4.JPG
    4.JPG
    188.3 KB · Views: 526
  • 3.JPG
    3.JPG
    81.4 KB · Views: 547
I as well disagree with the use of Life-caulk on a watercraft of this significance. Use of caulking in a situation like this is nothing but a temporary solution at the best and one that creates a lot of difficulty when the time comes to do it right.

Peter, I do understand your concerns, however the use of Life-caulk and other similar products has a number of disadvantages over time, one being that caulking oils are picked up by surrounding wood with later severe adhesion problems in the seam and surrounding planking surfaces

There are many uses for Life-caulk, but I don’t think this is one.
In all other cases, when and if Life-caulk is used, follow the manufacturer’s instructions to the letter.

I’ve repaired many wide-board canoes with similar methods that Dylan so well describes with very satisfactory and long-term results. If the planking cracks are too uneven, cross grained or too big, replace the plank or part of it. If the canoe is retired to a display piece or a museum piece, do nothing leave it alone.

Stay warm,

Dick Persson
Buckhorn Canoe Company
 
Last edited:
Back
Top