Partially failed Scarf Joint

George F.

Curious about Wooden Canoes
Hello; looking for some advice.
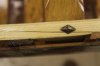
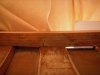
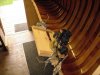
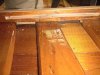
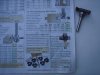
I am working on a 1945 18' OT Guide. About a 3-4 weeks after gluing up a 10" scarf joint on the inwale, I noticed it was beginning to fail. See attached picture. About 3" of the 10" joint is separating.
My next step is to canvas the canoe. I really don't want to go backwards, pulling the inwale off or doing any disruptive fix.While I am looking for advice on how to save this particular glued joint, I will pass along what I originally did in the glue up process:

-10" scarf, clean and dry prior to glue up.
-used System 3 T-88 Structural epoxy. From prior posts, I have learned to use structural epoxy.
-roughed up glue surface lightly with rasp
-clamped, but not so hard as to squeeze out epoxy (for 24 hours)
- mixed epoxy per instructions.
- You will note that, unfortunately, the thwart screw hole comes pretty close to, but does not touch the joint.
-all other scarfs I did at same time look good.


What I would like to do is salvage this joint, repairing it without taking the inwale off. I am looking for advice on how I can repair this partially failed joint. There will be a brass screw coming from the outwale into the rib and inwale at this location, which should help. How can I get to the failed portion and clean out 2-3" of this joint (while it is in place), re-glue and clamp?

Any thoughts would be appreciated!
Thanks!
 

Attachments

  • _MG_6760.jpg
    _MG_6760.jpg
    48.4 KB · Views: 1,043
failed joint

There was a thread a year ago started by our now prez Greg Nolan titled "Why these screws?", about two extra screws from the inside of the inwale bracketing a bolt. Do a search and read this thread. I would run a coping saw blade into your failed joint just enough to clean it out, then dribble in epoxy, clamp it, and after it has set but before it has another chance to fail, add the two screws as is shown by the photos posted by Greg. No guarantees - good luck. Tom McCloud
 
I was waiting for someone smarter than me to weigh in first. Now that Tom has, I’ll take my turn.
That’s an interesting problem you have there. I assume you have spliced together two pieces because you couldn’t find a long enough piece of (looks like ash?)
And you need to get that fixed caused there’s a lot of stress on the inwale right there.
I would say there are 3 approaches.
One is that referred to by Tom. I recall that thread. Benson and Greg Nolan found several OT canoes where screws had been used to “strengthen” inwales adjacent to the center thwart. I was dubious that this would work that well. I’d trust a through-bolt more than I would wood screws. But you still end up with three holes in a small area where there’s a lot of stress on the wood.
The approach I would try you might call an underside Dutchman. Router a groove, say an eighth inch wide, into the underside of the splice on its thick side, as long as the failed section of the splice. Make the grove almost as deep as the full width of the inwales (In other words, don’t let the groove show from the topside. ) Once this groove is cut, prepare a piece of wood, a Dutchman, to fit into the groove. File or rough up the side on the inwale that’s got some residual dried epoxy. Then epoxy the Dutchman into the slot.
The advantage of an underside Dutchman should be that the fix will be invisible from the top
What Tom is suggesting could work. But I wonder if I would have confidence in it over the long-term.
 
I would apply more epoxy and clamp it. Then screw it on both sides of the diamond bol after the epoxy has cured
To get the epoxy in, you can try a syringe or dip a string in epoxy and draw it through the joint.
The screws would go in from the outside and be barely noticeable.

I think the Dutchman idea is good, too. It would add a lot of glue surface But I'm not sure how you would get a router in there unless the inwale was removed.
 
George

I agree with Tom on how to do the repair.

I have spliced nearly all of my Ash gunnels. I too use at least a 10 to 1 ratio, and have never had a problem with delamination !

I assemble the joint off of the canoe first, letting the epoxy cure at least a week or two. I coat the splice with mixed epoxy, letting it soak in a few minutes, then mix up thickeners cabo-sil, ground glass and wood flour, or saw dust for color. Apply this mix. Spring clamp the joint and let it cure. Remove excess.

I'm surprised your method didn't hold !

In your case I would used a heavier clamping system, beings the repair is being done on the canoe.

Fingers crossed !

Jim
 
Last edited:
Clean out the scarf really good first and reglue it with West System and let it dry at least 24 hours. Then grind the Dutchman pocket flipping the canoe over, use a trouble light and get underneath the canoe and take a Dremel with a saw or composite disc mounted on it and outline a Pocket. Do what you can to dig out the pocket manual or with the Dremel. This will relax the inwale a bit so I clamp it so its straighter than normal so it will round back out when you remove the clamps. I just did this on a canoe that I'm currently restoring after noticing a kink in the inwale due to a stress crack. You don't notice the repair at all and is very strong. Curious as to why you didn't use West System? It pricey, but has never failed on any repairs I have done.
 
Chris,

I'm not the OP but for me, I try to only use a non-blushing resin. I also like the 2-1 mix ratio.
I've used MAS and System 3 on my projects with no problems.
BTW, I haven't checked lately but System 3 may cost just as much as West. I believe MAS a bit less.

OP,
Nobody asked but is there any chance of contamination? How were you sure that the joint was clean?
And why don't you want to remove the rail, it's just a few screws. Also, I don't remember if you said,
but any scarf should be in a lower load / less stressed part of the rail, ie, about 1/3 from an end, never in the middle.

I would remove it, and maybe break the rest open and refit and re-glue the scarf.

Dan
 
Last edited:
I have had similiar failures with scarfs (with west system and others). So I use mechanical fastners as well as glue in all scarfs. I think that epoxy is great glue, but epoxy has some plasticity (some formulations are more brittle/hard than others) and are very strong when pieces are glued in place. If there is a continous unidirectional stress on the scarf after glue has set up, then there can be creep, then failure (such as scarfing a gunwale, then bending it on a form). Most epoxy is also heat sensitve, becoming softer with higher temperature. The plasticity and sensitivity to heat are not a problem as a rule, especially if the joint is not under continuous unidirectional stress. This opinion of mine, tends to generate derision from many, but you have had the failure of a joint, so may believe. The best option I think is to (admit the joint has failed) take apart the joint (somehow) and re-glue, screw, and bolt it.
 
One way to get a really strong scarf joint would be to reinforce it with dowels glued in across the grain. That is, after you’ve cut and fit the joint and glued it, drill 3 to 4 holes almost all the way through, from side to side. Then insert and glue in 3-4 dowels cut to fit. This would increase the glued surfaces across the grain. I have secured mortice and tendon joints this way and they never move.

This might work on your problem. Clean out the joint as much as can. From the outside, drill 2-3 1/8th inch holes that go across the failed scarfed surfaces. Don’t drill all the way through (so the holes will not be visible from the inside.) Get as much glue as you can in scarf surfaces. Then insert and glue in your dowels. Clamp it up. Gluing in wood dowels would be a better cross grain reinforcement than screw or bolts. This is simpler to accomplish than the underside Dutchman.
 
Like Jim said, chestnut and later fraser scarphed many gunwales with no problem, but if I had to guess your joint was starved for epoxy. When joining or laminating I always coat both surfaces and then mix up cabosil any time up until the coats would go green, then coat with the cabosil and clamp. Don't need a ton of pressure, but after the squeeze out not as much will be drawn into the wood pores. Since they are already coated I would force in cabosil and reclamp and it should be fine. Good luck!
 
We have been able to save several inwales that had minor cracks with a special jig that could be used to reinforce your failed scarf joint.

The fixture clamps to the inwale and the groove is routed in using a MLCS # 5371 router bit. The pictures show it best.

Here at the canoe shop we have used West System exclusively for over 20 years, it works for us.
 

Attachments

  • OT 166552 010.jpg
    OT 166552 010.jpg
    63.1 KB · Views: 630
  • OT 166552 011.jpg
    OT 166552 011.jpg
    96.9 KB · Views: 609
  • OT 166552 015.jpg
    OT 166552 015.jpg
    95.1 KB · Views: 580
  • MLCS 5371 001.jpg
    MLCS 5371 001.jpg
    94.2 KB · Views: 554
Thank you all for your input. Your knowledge and experience are invaluable. I have decide to try to clean out the 2" section with a thin jig saw blade. Then go with Larry's suggestion of drilling and placing 2-3 1/8" dowels. I will probably switch to West System and use fillers such as Cabo-sil, ground glass, etc. for a stronger joint. If this does not seem to solve the issue, I will next grind in a Dutchman pocket and reinforce the entire 10" scarf that way (which sounds like probably the best overall approach).
Thanks again for your help.
 
I might use a fairly softwood dowel (birch?) on the theory that the softer the wood the more its fibers are going to soak up epoxy. Essentially what you want to do is “create a nail in the hole.” Don’t have a dowel that fits the hole too tightly. You shouldn’t have to pound it in. Leave some space for the epoxy.

I have some wood-working pegs that are grooved on the sides. Grooves help the pegs grab.
 
Funny, I was just thinking the same. To score the dowel a bit so there is more surface to bite into (assuming I can't find spiral 1/8" dowel). Good idea re having hole a bit oversized. I have a similar scarf on the starboard side that has not failed, but I think I will dowel that one as well. Your ideas are very welcome!
 
I’d even use a smaller diameter dowel . . . and then more of them. What is going to give strength to the joint is not the strength of the wood, but the epoxy.

I’ve never made a long scarf like that but I think I would do it “over and under” if I did. That way, instead of a long angle cut visible from the top, you’d have just one short cut visible across the narrow width of the top.

You know Jerry Dennis, by the way? Great writer who lives in Traverse City.
 
Back
Top